A sawmill is a very useful equipment that allows you to evenly and correctly saw a large log into logs or boards. As a rule, this equipment is quite expensive and not every person could afford it for domestic use. It is for this reason that you can make a sawmill from a chainsaw with your own hands, which will save a large amount of money.
On the Internet and on forums, craftsmen provide a lot of advice, drawings, photos, videos and diagrams with which you can assemble a sawmill yourself using available materials.
How to make a homemade sawmill from a chainsaw with your own hands?
In order to correctly understand the drawings and diagrams, you need to understand what types of home-made saw installations exist and what their differences are. Thus, there are mobile sawmills and stationary ones, which, in turn, are divided into mobile and stationary.
Chainsaw sawmill
In a mobile chainsaw sawmill, the sawing part moves along the log and can be moved to any convenient place. Your workpiece acts as a guide, making it easier to use and lighter in design. The only drawback that a mobile sawmill has is the need to constantly monitor the size of the stroke.
Stationary ones have a better quality cut and high accuracy and correctness of sawing. In stationary installations, the workpiece itself moves towards the saw. The movable one, in turn, has rail guides, thanks to which the saw moves while the workpiece remains stationary. This design is easy to assemble and use, but the length of the workpiece is limited.
How to make a sawmill from a chainsaw: step-by-step instructions with drawings
To make a homemade sawmill at home, you will need to prepare the following materials:
- a tool equipped with a gasoline or electric motor;
- guide channels with a shelf height of up to 150 mm (the length depends on the size of the future installation);
- a special mechanism for moving a tool or workpiece;
- steel angle used to strengthen the structure and manufacture workpiece clamps;
- design drawings and diagrams;
- welding machine;
- a set of tools for connecting components.
The sequence of steps in making a homemade tire-type sawmill:
- Mark channels or other metal profile for making the base. The sawmill parts are welded together using arc welding; additional cross braces are used to increase rigidity and accommodate log clamps.
- Make a vertical frame that moves along the base on rollers or ball bearings. Additional braces are installed to the main profile to increase the rigidity of the structure. The supports are equipped with adjusting bolts that allow you to select the gaps between the outer part of the roller and the guide. The width of the frame corresponds to the length of the bar mounted on the saw.
- Mount a mechanism to adjust the position of the saw on the vertical frame. The product must use a special screw clamp that can hold the saw during operation. The design of the clamp must withstand vibrations and possible shock loads.
- Install the nodes, adjust the relative position of the elements and carry out a test cutting. During operation, breakdowns are possible that will require modification of the design and the introduction of additional parts, clamps or regulators.
The described algorithm for making a sawmill from a chainsaw with your own hands is not the only design option. There are freely available drawings of installations created by different authors, which differ in the configuration of units or methods of position adjustment. Designers film their products on video, which can be viewed on specialized websites.
For example, a simplified homemade sawmill made from a chainsaw consists of a section of channel on which an adapter plate with a fixed tool is installed. The installation is mounted on a wooden beam (which is also a blank), laid on supports. After each cut, the tool moves a distance equal to the thickness of the board being made. The disadvantage of the sawmill design is instability; if the unit overturns, there is a risk of injury to the operator.
Disc units are assembled on the basis of an electric motor; it is possible to use a gasoline unit to rotate the disc. The motor is mounted on the frame through standard mounting points; at the base of the equipment there is a rectangular or square unit made of channel material. The design includes a steel protective casing covering the upper part of the disk. It is recommended to install a small switch that does not allow the engine to be turned on with the shield open (only for versions with an electric motor).
For household sawmill installations, it is recommended to use steel circular saws with a diameter of 500-600 mm. The working element is mounted on the output shaft of the engine rotor; it is possible to use a step-up gearbox with a belt drive. The tension is adjusted by moving the motor housing on the base. When manufacturing structural elements, it is recommended to place the working edge of the disk at a minimum distance from the base. There are designs with a special groove in the base designed for a rotating disk.
Choosing a chainsaw for a home sawmill
The main part of the installation is the chain saw and its choice must be taken with the utmost care. You can install either a new, just purchased saw, or a used one, such as the Ural brand. To create a sawmill, you can use not only a chainsaw, but also an electric saw. The only thing you need to remember is that you will be limited in your movements due to the length of the network cable.
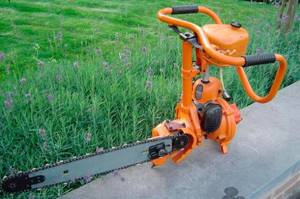
Chainsaw Ural
To select the correct saw, it is important to initially understand the intended purpose of the installation. For semi-professional, commercial use, give preference to stationary sawmills with powerful and productive saws. Domestic use of the equipment allows you to choose a less powerful chainsaw by creating a mobile mini sawmill with your own hands according to drawings from the Internet.
What do you need to make a manual sawmill from a chainsaw with your own hands?
It is not necessary to contact service centers or ask for the help of experienced handymen. Do-it-yourself sawmill diagrams and drawings are posted in large numbers on the forums. You can find the type of installation you need: stationary, mobile, mini or manual sawmill. Next, having all the necessary spare parts and tools, even without the special skills of a designer or engineer, you will be able to assemble the structure, guided by additional photos, videos and step-by-step instructions.
Required Parts
In order to make a sawmill from a chainsaw with your own hands, in addition to the sawing unit itself, you will need:
- pipes with a diameter of 35-40 mm;
- two eight-meter channels with a height of 15 cm, onto which the entire load from the structure is transferred;
- two perfectly straight rails that act as the top of the sawmill and guides;
- corners of the following sizes: 50*100 mm, 40*40 mm;
- cut water pipe into 25 cm pieces, which will be used as ties; steel plate, the length of which is at least 60 cm and the thickness of 4 cm;
- hoses that act as protection for electrical wiring.
- Tools for assembling sawmill from chainsaw
In addition to parts and components, you will need improvised tools such as a set of screwdrivers, metal files, fasteners (screws, nuts, bolts, bearings) and others that almost every man has. You also need to acquire a welding drill, a device thanks to which you can connect individual parts and weld them securely together.
How to make a sawmill with your own hands
Before making a sawmill, you need to choose the place where the future machine will be located. The minimum area of the working room should be 18 m2. The equipment can be placed in open space. In this case, it is recommended to build a fence around the homemade sawmill and install a small canopy over it. This will allow you to process workpieces in any weather conditions. It is also necessary to pre-equip the storage location. It is recommended to store the sawmill in closed areas with low humidity.
In order to make a sawmill, you need to purchase the following tools and components:
- Cutting elements: chains, saws, discs and frames. To make a band sawmill, you need to purchase several saw blades.
- Measuring instruments: ruler, tape measure, level, caliper.
- Tank with cutting fluid.
- Fastening elements: 100x100 angles, 8 M16 bolts, nuts, screws and washers.
- Pipes with dimensions 80x40 and 60x60 A round pipe with a diameter of 50 mm is also required.
- Electric motor and bearings.
- Rollers, rail tracks and several hubs.
- Hammer, drill, pliers, grinder.
After selecting components and tools, it is necessary to develop drawings of the sawmill. They must be marked:
- Dimensions of the site where the equipment will be located.
- Distance between sawmill rails and cross units.
- Location of rollers, screws, bearings.
- Total number of angles and metal pipes.
The process of assembling a woodworking machine is carried out in several stages:
- Construction of the foundation. Its height should not be 10-15 cm. It is necessary to install a reinforcing belt and a cushion of sand and crushed stone on the base.
- Installation of guides from angles, rails and channels. They must be laid edge up. Using anchor bolts, guides are attached to the base of the machine. Sleepers are laid between the rails. The corners are fixed with a threaded connection.
- Arrangement of a platform for fixing logs. H-shaped sections of the profile and projections are attached to the sleepers.
- Assembling rollers from bearings. They must have the same internal diameter. The difference between the outer diameters of the parts depends on the height of the rail and the angle.
- Assembling the saw frame. Bushings are installed on 2 guides made of metal pipes installed in a vertical position. The frame for the mobile cart should have a rectangular shape. Rollers are installed in its lower part.
- Installation of the screw mechanism. The nuts are attached to the lower sliders, the stops are attached to the upper crossbar. Devices for adjusting tension are installed on the shafts of the screw mechanism, fixed between the rollers and brackets.
- Fastening the wheels and hub to the bottom of the frame. These components are attached using bearing units. A pulley is mounted on the hubs, receiving torque from the electric motor.
- Installation of the power unit on a vertical frame. It is connected to the screw mechanism using a pulley. To increase productivity, it is recommended to equip a homemade machine with an engine from a walk-behind tractor. It runs on gasoline, which increases the power of the unit. Sawmills with a walk-behind tractor engine are very noisy.
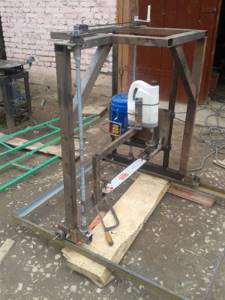
After installing the electric motor, you must connect the machine to the electrical network. It is recommended to equip the unit with a steel shield that protects the operator from sawdust and industrial debris. When using a homemade saw, you need to periodically sharpen the cutting elements.
Band sawmill
To assemble a band-type woodworking machine, special wheels and band saws are required. Initially, the frame of the machine is assembled. Then the rail guides and sleepers are made. Devices for fixing the workpieces being processed are attached to the profile pipe. According to the drawings, a mobile cart is assembled and wheels are installed in its lower part. At the end, an electric motor is connected to the working mechanism.
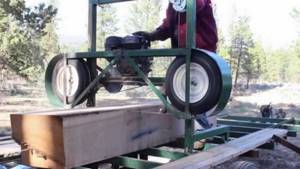
Chain sawmill
This woodworking machine requires a chain saw to make. It is installed on a flat surface, which allows the operator to control the unit from different sides. Initially, the frame is made from a profile made of steel. Several holes are made in the base on which the frame is fixed. The stop and clamping mechanisms required for fixing the electric motor are installed on the base. At the end, a saw with a chain is attached.
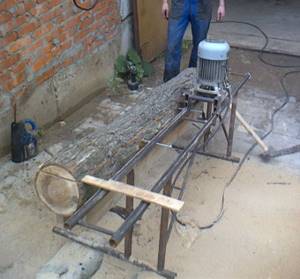
Corner or disc sawmill
To cut many logs, you need to use corner or disc sawmills. They are distinguished by high power and structural strength. You can make these sawmills yourself using an electric saw. Guides are installed on the frame. The joints are fastened by welding. If you don’t have an electric saw, you can assemble corner or circular sawmills from a grinder. It is recommended to use a gasoline engine as the main power unit. It will increase the power of the device to 6-9 hp. With. The disadvantage of a gasoline unit is its noisy operation.
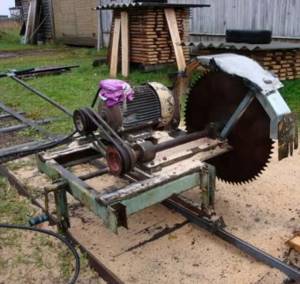
Chainsaw sawmill
You can make small-sized machines from a chainsaw. To assemble a woodworking machine, you will also additionally need 2 channels, angles and rails. You need to make holes in the base. They need to be secured with metal ties. These components are fastened using bolts. During installation work, it is important to ensure that the ties are installed at right angles.
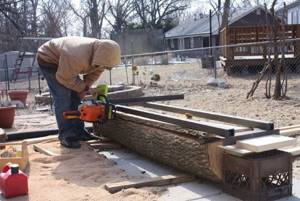
To increase the strength of the frame of a homemade chainsaw sawmill, you need to attach stiffening ribs to it. After this, the mobile cart is assembled. 2 corners are fixed in its lower part. Afterwards the cart is installed on bearings. To secure the chainsaw to the frame, you need to install additional angles at the top of the cart. At the end, fasteners are installed to secure the logs being processed.
Instructions and drawing of a homemade sawmill
Work begins with the design of the base, the frame of the structure. Angles and rails are used for this. The designer must properly level them and weld them. You will see a drawing of how to make a sawmill from a chainsaw below:
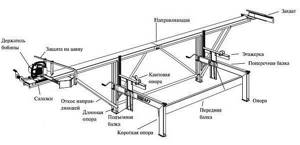
Instructions for creating a sawmill with your own hands from a chainsaw
Next, drill holes in the frame itself. Their diameter should be 10-14 mm, and the distance between each hole should be 1 meter. Install ties in them, securing them with bolts.
The next step is to install the frame on racks, which are made from steel angles. Remember to leave a gap of about 1 meter and weld the parts. If you plan to handle large volumes or large diameter logs, you will need to weld braces between the posts to make the sawmill more secure, stable, and strong.
Next, you need to assemble a cart from the corners and install the cutting part on it. Here you need to take into account the model of sawing equipment and the length of the bar. Corners 40*40 mm are welded from below, rollers with bearings are placed on them and 2 more similar corners are welded on top. Check the degree of welding of the fasteners very carefully, since your sawmill structure must be very strong.
The procedure for making a homemade band sawmill
There are certain recommendations regarding the question of how to make a band sawmill with your own hands. These include the following:
- It is important to choose the right location for installing the equipment. If an electric motor is used as a driving element, it is recommended to eliminate the possibility of increased environmental humidity to prevent a short circuit. For ease of processing logs, the area of the workshop or shed should be at least 18 square meters.
- The work of a band sawmill involves manual feeding of logs, the weight of which is quite large. That is why work on creating the structure in question begins with the manufacture of the frame. It must be stable and have an elongated shape. One part of the machine is designed to accommodate the main structural elements, the second for feeding the workpiece. The elongated part, where the log is located before processing, has rails that help move the workpiece. During production, a profile with a cross-sectional area of at least 5 centimeters is used. Particular attention is paid to the evenness and horizontal guides.
- The homemade product cuts the workpiece in a horizontal plane. That is why you should consider how the height of the saw will change. Various mechanisms can be used.
- In our case, an electric motor is used to transmit rotation to the main structural elements. When choosing an electric motor, it is taken into account what voltage it should be powered from (220 or 380 Volts), what power is needed, as well as the placement of the main fastening elements. It is recommended to choose a motor that is powered by a 220 Volt network and has a power of at least 2 kW. The power of the electric motor determines how productive the created machine will be. If you choose the wrong electric motor, it will overheat during operation.
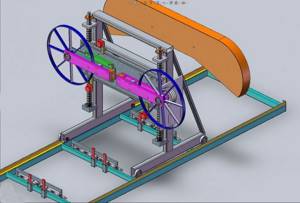
3d model of band sawmill
- The electric motor mount must be located on the opposite side from the place where the workpieces are fed. In this case, it is important to pay attention to the strength of the fastening - during operation, a great impact will be exerted on the electric motor. In most cases, the electric motor is placed under the frame, creating a protective casing (from water and mechanical stress).
- The next important point is the type of drive used to transmit rotation. For many years, direct installation, when the output shaft of the electric motor is rigidly connected to the cutting element of the band sawmill, has not been used. The reason is that the load on the electric motor will vary over a wide range, and there is no protective mechanism to prevent the saw from stopping. Therefore, the drive used is a combination of pulleys and a belt. If the load is large, the belt will slip. By changing the diameters of the pulley, you can reduce or increase the rotation speed of the cutting element of the machine. However, the power from this remains unchanged (the use of a belt drive determines the loss of several percent of efficiency). In addition to the above points, it should be taken into account that over time the belt wears out, the movement of the pulleys leads to the appearance of sound.
- An important design element is the rollers on which the cutting blade is mounted. One of the rollers is driving, the second is tensioning. Let us note the point that homemade versions are often created using ordinary wheels instead of rollers. When creating this structural element, it should be taken into account that the tape must have good tension, for which one of the rollers is spring-loaded. When creating a structure, you should pay attention to the strength of fastening of all elements, since during sawing a strong lateral load may occur on the blade - if a mistake is made, it can fly off.
The above points indicate the main points for the production of a homemade sawmill. You can make a band sawmill yourself at minimal cost. After all, you only need to buy or find an engine, pulleys and rollers, find a metal profile for the frame and a blade for sawing. The reliability of the design depends on the technical condition of all components and the quality of their connections. Therefore, before using the sawmill, you should check it carefully.
Tips and tricks
When you assemble a sawmill from a chainsaw or power saw yourself, pay a lot of attention to securing the logs, since the wood can move a lot during cutting. To secure the log in one position, forum user Oleg recommends installing movable hoses and pipes.
Fixing the wood is an important point, because thanks to the complete immobilization of the log, you can get even and identical boards and logs.
You can find a lot of information on the Internet about how to assemble a sawmill from a chainsaw, but there is little information regarding electric saws. The design and build process is completely the same. Drawings for sawmills and electric saws are available in the same way and are practically no different.
The only thing to consider is that there must be a power supply nearby. To a greater extent, users install the installation in a garage or small workshop. In this case, it is better for you to make a mini sawmill from an electric saw, which will not take up much space.


