Repair and decoration
07/24/2018 Anastasia Prozheva
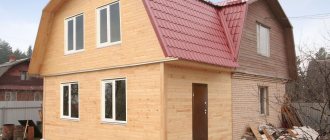
Sometimes, for one reason or another, you need to expand your country house. For example, if new family members have appeared and space has become scarce. In this case, a wooden or ordinary house can be supplemented with an extension. And to complete it, you will not need to carry out major construction work. So, if you equip a wooden house with an extension made of timber, it will not be too difficult, since all the work can be done with your own hands.
In the material you will learn how to build an extension from timber with your own hands, and also see photos of extensions to wooden houses.
- 2 Features of a wood-based extension
- 3 How to build walls for an extension?
- 4 How to install a roof?
- 5 What must be taken into account during the construction process?
- 6 Features of connecting buildings made of different materials to each other
Foundation for extensions
There are two types of foundation construction for an extension - rigid coupling and expansion joint.
Rigid coupling This connection is designed for non-heaving soil and is justified when erecting a heavy structure of two or more floors, but only if the main building has already settled and settled. The new foundation must be of the same type as the main one (strip, slab) and be the same in depth, taking into account possible shrinkage. The bundle of tapes is made using reinforcement, for which the foundation of the house is dug out to the full depth; in the working area, too much exposure is fraught with deformation.
Holes for reinforcement are drilled in a checkerboard pattern in the foundation sheet, on the basis that their length is 35 times the diameter of the rod, and the length of the reinforcement itself is twice as large as the depth of the holes. The reinforcement is driven into the holes, then the protruding part will be filled with concrete, creating a common monolith. Bonding of slabs is possible if the thickness is more than 40 cm and there is a protrusion of the main slab of 30 cm; for coupling, the reinforcement is beaten and welded to the reinforcing frame of the new slab.
To perform a rigid coupling, it is necessary to take into account that the poured foundation connected to the main one must settle, ideally for a year. If it is not possible to withstand such a period, it is better to use another method.
Expansion joint The most common type of joint is when a completely independent joint is poured near the old foundation. It is optimal on heaving soils for lightweight structures, the thickness of the seam is from 2 to 5 cm. To aesthetically connect the foundations, and the seam at the junction remains the same along the entire length, use boards pre-wrapped with polyethylene or roofing felt. Since the load on the base will be less, the subsidence will also be less, and the seam will allow the extension to “play” as planned, without affecting the integrity of the house.
During the construction process, the joint between the walls is filled with insulation, and the seam itself is subsequently sealed using elastic means or covered with special strips. One of the users found an interesting solution - stainless steel linings, between which there is a layer of corrugated rubber.
zhpFORUMHOUSE user
In principle, you can buy such a “cap” for an expansion joint, immediately properly insulate the space between the walls, close it from the street with a “cap”, and if over time there is shrinkage, compression or stretching, the “cap” will compensate for this moment. And in order to return the rubber to its previous shape, you can unscrew the screws from the missing side and drill again, in new places in the bricks.
Since the foundations are not connected to each other, you can choose any type for an extension, based on the characteristics of the soil and the expected load. It can be slab (monolith or USHP), strip (MZF or freezing depth) or columnar (pile).
Users of the portal prefer joining foundations through an expansion joint, as the most justified and safe way.
mfcnFORUMHOUSE Member
No matter how good (non-heaving) the soil is, if it is not rock, then you should expect shrinkage of the foundation of the extension in relation to the main house. Accordingly, measures must be taken to ensure these shrinkages are non-destructive and ensure acceptable functional properties of the structure. Hence: an extension is actually a new house next to an old one or a light structure, the movement of which is permissible, and violations of the horizontal floor and jamming of doors are permissible.
Features of connecting buildings made of different materials to each other
If you are planning to attach a timber structure to a brick house, then in order to ensure that the quality of the construction is high and it will serve you for as long as possible, you should remember the following:
- Be sure to decide how you will connect the rooms. Remember that the same tree has a property that can ensure its high hygroscopicity. And in order to reduce it, you need to use special impregnating compounds , which will need to be used to treat all the end sections of parts for construction;
- in places where wood and brick walls meet, it is imperative to carry out high-quality waterproofing;
- To prevent drafts from appearing in the room, you need to make a movable seal between the wooden and brick wall surfaces.
When there is a need to expand the living space of your private home, an extension is the best option. As you can see, it can be different and you need to take into account a huge number of nuances in each case and follow the rules of technological processes, then the result will be excellent.
The best posts
- Crochet Santa Claus hat: master class with photos and videos
- Decoupage an old box in three different styles
- Bamboo roller blinds in the interior: advantages and disadvantages
- Colored non-woven wallpaper: white, gray, purple
- How to knit mittens with braids: diagrams with photos and videos
- Removing and installing a sink drain
- Stylish wall made of wood: accent designs [panels, cork, board]
- Light green wallpaper in the interior of a children's room
Related article: How to choose a toilet seat with a microlift?
Materials
The modern building materials market offers a large selection to suit every taste and budget. The greatest demand today is for extensions made of foam concrete, aerated concrete, cinder block and similar large-format masonry varieties and frame structures. Frames are in the lead due to the speed of construction, relative accessibility and simplicity; in terms of energy efficiency, they are not inferior to stone buildings due to the use of insulation.
However, if possible, it is recommended to choose a material similar to the main one: a wooden extension to a wooden house, etc. This is especially true for houses that are not supposed to have the same façade as the extension. If you plan to use siding or similar cladding, the choice is unlimited.
Frame-based extension
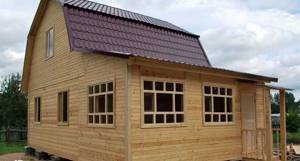
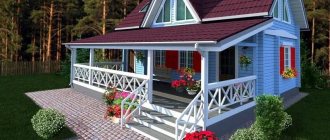
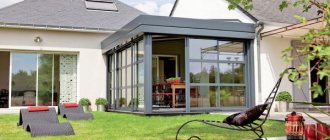
The frame extension fits organically into the design of the house
The construction of an extension to a wooden house can be started from any wall material. However, an extension using frame technology will be preferable to others in terms of price and quality ratio. It will not require a complex foundation and heavy walls. At the same time, the shrinkage of such a structure is minimal; finishing can be done quickly and construction can be completed. At the same time, it is quite possible to do such work with your own hands. By the way, the frame construction method involves thinner walls of the extension without reducing thermal conductivity, so the building is smaller, and the living area itself is larger.
The foundation with such material is sufficient without deepening; it is not difficult to make it with your own hands, for example, strip or tiled. A waterproofing material, roofing felt, is laid on top of it.
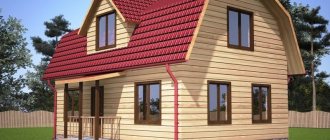
An important point is compliance with the general style of the main building. After all, if an old house is built of timber or logs, then making and installing an extension from completely identical material will not be easy, both from a technical and material point of view. But it is possible to sheathe a frame extension with a material that imitates the walls of a house. In this case, it will be possible to repeat the cuts, the ends, and other structural elements.
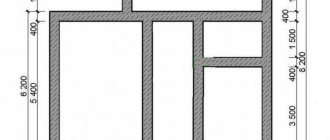
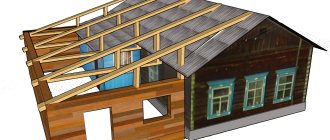
To attach an extension to a wooden house, racks-bars are attached to the walls of the house; wall cladding elements will subsequently be nailed to them. The frame itself can be made with your own hands according to the diagram below.
Stages of work:
- Lay the perimeter of the frame with a beam of at least 15 cm. Use the same beam or board to position the corner posts using a level.
- Make the top trim from edged boards. Secure the boards to the top trim with self-tapping screws.
- Insulate the walls with expanded polystyrene, polystyrene foam or mineral wool.
- Lay hydro- and vapor barriers, also securing them with self-tapping screws.
- Cover the insulation with OSB boards, plywood, plasterboard, etc.
Options for connecting walls
An extension to a house can have four walls or three, then the role of the fourth is played by the outer wall of the house. Four walls are relevant in extensions made of masonry materials; a connection of walls is not required; the correct foundation and compliance with the level of the masonry provide an even seam. The presence of a layer of insulation between the walls allows the use of thinner blocks for the adjacent wall. In frame construction, sliding ties are used: two vertical beams are placed on the wall, between which the vertical beam of the extension is inserted.
Connecting beams in an extension
When an extension is assembled from profiled or laminated timber or logs, the walls are connected to the house either with metal brackets or with special galvanized corners with a shelf of 63 mm or more. The corners are placed on self-tapping screws, leaving a small gap for shrinkage. The seam in both cases is closed with a flashing or platband. Also, the joining of beams in the extension is carried out using a tongue-and-groove system, the grooves are selected in the load-bearing wall, the tenon is cut out on the built-in segments.
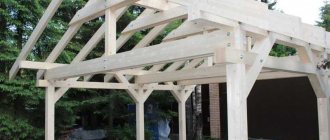
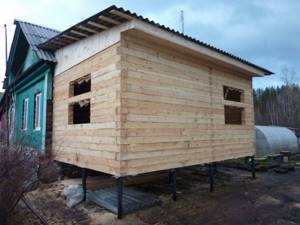
DIY timber extension
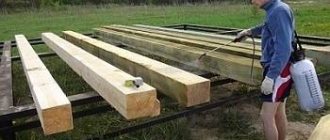
The material used for the construction of the extension is high-quality timber with a moisture content of no more than 22%. The selection criteria and requirements for timber are the same as for the construction of a timber or frame cottage. Materials must be treated with an antiseptic and fire retardant compound.
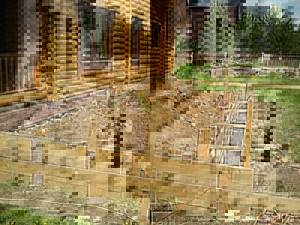
Foundation for an extension made of timber
The foundation for the extension is built in the same way as for the main structure. It is important that the depth of the foundation is the same. The main question that arises when installing the foundation: is it necessary to connect the foundations of the main and additional buildings? There is no clear answer to this question. Bonding of foundations, as a rule, is carried out during the construction of a massive extension, when, according to calculations, its shrinkage will correlate with the shrinkage of the main structure. When erecting small structures, a bunch of foundations is not done, because in this case the weight of the buildings will differ significantly, and the heavier part will “drag away” the lighter part. The need and type of foundation connection is determined based on the results of engineering calculations made on the basis of the project.
The most common type of foundation for an extension is a monolithic strip foundation with different laying depths, which depends on the depth of the monolithic strip of the main structure. The stages of arranging a strip foundation for a timber extension to a brick or wooden house are standard:
- Layout of the site, marking and digging a trench for deepening the monolithic tape.
- Adding gravel and sand base, laying waterproofing.
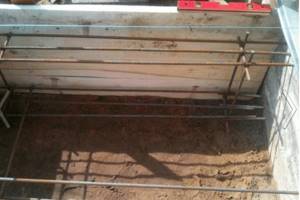
- Installation of formwork, binding and installation of reinforced frame.
- Pouring the foundation strip with concrete mixture.
- Waterproofing and, if necessary, insulation of the foundation.
Monolithic strip foundation for an extension
For a veranda or terrace, a screw foundation with a wooden grillage would be an excellent solution. This type of foundation will completely eliminate labor-intensive concrete and earthworks. The screw foundation is not connected to the main one, so it is logical to use it only for light and small structures.
When building an extension that will be tightly adjacent to the existing house and have a single roof with it, it is recommended to construct a strip-monolithic foundation on screw piles. The shrinkage of screw piles is minimal, so the extension being constructed will not sag relative to the entire house. Such a combined foundation requires detailed professional calculations, which can only be performed by design engineers.
If a timber extension is being made to an old house, the foundation of which is unknown, then a set of works will be required to study it:
- the base is dug out a little from the side where it is planned to build the structure;
- the foundation is examined, its design and current condition are assessed;
- the necessary calculations are made.
In some cases, the old foundation needs to be strengthened, which is done before installing the base under the timber or frame structure being erected.
Construction of extension walls
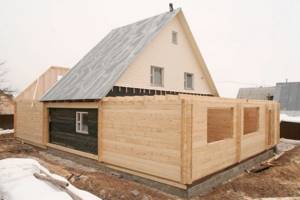
When building an extension, three walls are erected, and the load-bearing wall of the house is used as the fourth. The walls of a structure using timber are erected using frame or frameless technology.
Frame walls
The frame for the walls of the extension is made of timber and attached to pre-installed floor beams. The beams are mounted on a wooden frame, which can be a wooden grillage. After installing the frame, the walls are filled with boards or OSB plywood. This cladding gives the structure rigidity and stability, allowing you to immediately proceed to the installation of the roof. The structure, made using frame technology, is often sheathed with imitation timber. This method allows you to significantly save on materials.
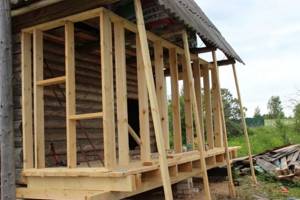
Timber frame walls for an extension
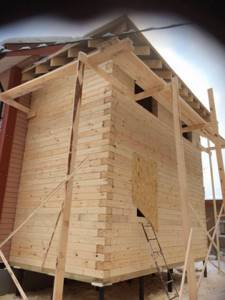
Frameless walls
When building using frameless technology, the walls of the building are made of timber of the selected section. The advantages of a frameless timber extension include:
- simplicity and high speed of installation;
- excellent heat-retaining properties;
- uniform design if the extension to the house is built from timber.
The technology for laying timber during the construction of walls depends on the type of timber used. The optimal solution is to use ready-made timber, which has splines and grooves that greatly simplify assembly. When erecting walls, it is recommended to pay special attention to the inter-seam connections of the walls and not to forget about inter-crown insulation.
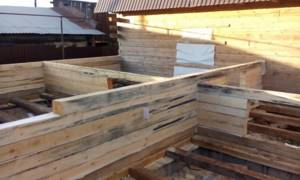
Frameless timber extension walls
After completing the construction of the walls, regardless of the technology used and the purpose of the extension, it is necessary to carry out work on tying the structure. The strapping is carried out with a beam of small cross-section, for example, 15x15 cm, around the entire perimeter of the building.
Roof installation for an extension
The roof of the extension and the existing cottage does not have to be combined into a single structure. If possible, you can connect the timber of the extension and the house, making the structure stronger and more rigid. This option is suitable for non-residential premises; if a living area is being added, then the roof should be common.
The construction of the roof begins with the installation of the ceiling, for which wooden beams are used, installed on top of the walls at a distance of 50-70 cm from each other. The floor beams are secured with angles and fasteners. After this, the beams are hemmed with thick plywood or boards, on top of which insulation - stone wool - is laid.
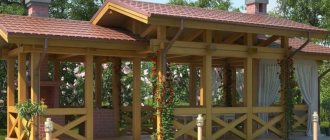
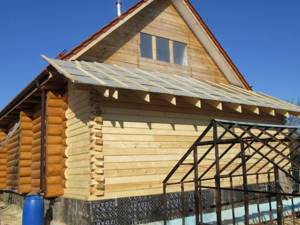
The roof of an extension made of timber can be of different designs, but, as a rule, home owners choose the simplest option - a pitched roof. Such a roof does not collect precipitation, and soft roofing, metal tiles or inexpensive ondulin can be used as a roofing covering. Typically, the roofing material chosen for the roof of an additional building is the same as that used for the roof of the house.
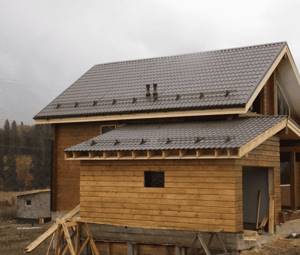
Gable roof for extension
The technology for constructing the roof of an extension from timber with your own hands is no different from the traditional way of performing similar work for the house:
- The rafter system and mauerlat are being installed.
- Installation of sheathing or laying of continuous flooring is in progress.
- The gables are covered and the cornices are hemmed.
- The selected roof covering is installed.
- Windproof and drainage elements are installed.
Floor installation in the extension
If a strip base was chosen as the foundation for a timber extension, then the floor can be either concrete or wood. Concrete floors are not made on a wooden grillage. A columnar foundation also requires the installation of a wooden floor.
Concrete floor
To install a warm and reliable floor inside an unburied strip, excess soil is selected to a given depth - 20-40 cm. A gravel-sand cushion and a layer of waterproofing are poured onto the bottom of the resulting pit, on which the reinforced frame is laid. The floor is poured with concrete mixture using exposed beacons or using modern self-leveling solutions.
When building an open veranda or terrace, it is advisable to fill the floor with a slight slope of 3-5 degrees to ensure effective drainage of precipitation.
After the concrete has hardened, the finishing coat can be laid. The choice of flooring depends on the preferences of the home owner, his financial capabilities and the purpose of the extension. For residential premises, this can be tiles, parquet boards, laminate, etc. For a veranda - a terrace or ordinary treated wooden board.
Wooden floor
The floor is installed on wooden beams, the thickness of which is at least 15x10 cm. You should choose high-quality timber for the beams, since the strength of the floor depends on their reliability. The beams are mounted on a grillage or pillars using angles and metal fasteners. Boards are laid on top of the beams, which can serve as either a finishing floor covering or a subfloor.
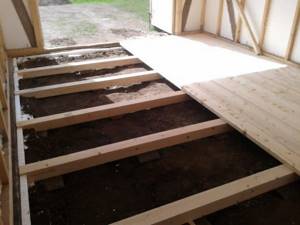
Wooden floor installation
After installing the floor and arranging the roof, doors and windows are installed in the timber extension, and interior finishing is carried out.
Roof installation methods
The extension is placed under a common roof, when a rigid connection is made; if an expansion joint is selected, it is easier to cover the building separately, sealing the junction. Depending on the roofing material, the seam is covered with a stainless steel apron, 30 cm wide, or with a special decorative element.
Rigid connection to a house made of timber.
mfcn
The shrinkage of the extension in relation to the main house imposes certain restrictions on the arrangement of the roof. Therefore, in practice, making an extension with a roof like a continuation of the existing one should be considered and justified.
Construction Features
A do-it-yourself extension to a house made of timber is carried out in several stages. A person must strictly follow the sequence of work performed, which will have a positive effect on the operation of the building.
Construction design
If the house is located on a large plot, then designing an extension will not be difficult. Before building an extension to a timber house, it is recommended to create a detailed plan. In this case, you need to follow certain rules:
- Initially, the purpose of the future building is determined. The features of construction directly depend on this moment. In accordance with the purpose of the extension, the material is selected and calculated.
- When drawing up a plan, the availability of water supply or sewerage is determined.
- When calculating materials, you need to determine their quality and appearance. This will provide the opportunity to calculate the price.
At the final stage, you need to determine the type of construction that will be used in the future. It can be framed or solid.
Construction of the foundation
Before making an extension to a house made of timber, it is recommended to build a foundation. Its construction can be carried out using the same technology as the construction of the foundation of the main building. When arranging it, it is recommended to first determine the features of the main foundation - dimensions, depth, construction material.
The main foundation can be reinforced concrete, prefabricated, concrete, stone, foam block, cinder block.
The construction of the foundation for the extension is carried out using the same technology as for the house. Initially, the soil is dug near the house in the place where the extension is being built to the foundation. After this, an examination of the emerging piece of foundation is carried out. If it is not damaged, then you can begin building the foundation.
Attention! Between the wall and the beam, which has a groove, you need to put a waterproofing tape. This will protect the wood from rotting in the area of contact with the brick.
Construction of walls
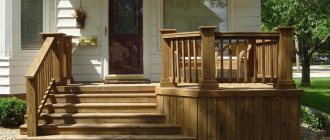
After the foundation has dried, you can begin building the walls. Adding a veranda to a house made of timber requires the construction of three walls. The fourth is the wall of the house. There are forms of buildings that require only two walls. If the building material for the house is wood, then attaching an extension to it will be quite simple. Fastening is carried out using metal plates and staples, nails and screws, special brackets, etc.
Important! If you plan to live in the extension all year round, then for the construction of walls you need to use building material whose size is at least 200x200 millimeters.
The timber has a significant mass, so it is recommended to provide for its shrinkage in the future. That is why it is secured to the main building using a metal bracket. After erecting the walls, it is recommended to leave the extension for a year to shrink. The time of this process directly depends on the size of the extension, the condition of the main building and the material used to construct the extension.
After shrinking, it is recommended to remove the staples and secure them in a new place. During the period of shrinkage, the building is insulated using any material that a person can choose in accordance with his wishes and financial capabilities.
In order to increase the quality of thermal insulation and give an aesthetic appearance in the area of joints, it is recommended to use a special wooden flashing. During the shrinkage process, a slight distortion may be observed. In this case, it is dismantled and reinstalled. Attaching an extension to a timber house at the top of the walls requires the use of strapping. In this case, it is recommended to use timber measuring 150x150 millimeters. It is best to use timber without joints.
Roof arrangement
After increasing the area of the house, you can begin installing the roof, which is carried out according to the standard scheme:
- Initially, it is recommended to install a rafter system of crossbars, racks and other elements. In this case, the load parameters must be observed.
- After the rafters are installed, the sheathing is created. For this purpose, the use of slats and bars is recommended. Instead of lathing, you can use solid flooring made of boards or plywood. At the next stage, the gables are faced.
- Next, you need to hem the cornices and install the wind parts. At the final stage, the direct installation of the roof is carried out. The selection of material is carried out in accordance with the general style of construction.
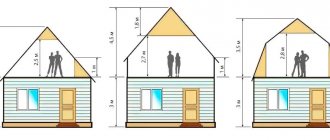
If the roof of the extension continues to slope the roof of the house, then the specifics of its construction are affected by the height of the house. With the correct design of a house, which has the same slope on both sides, the rafter legs are built up. A more complex option is to change the slope angle and build a sloping roof. If the roof of a house is being replaced at the same time, it is recommended to install one rafter system.
Functional
As with the construction of a house, before constructing an extension it is necessary to determine the functionality in advance, since different purposes require appropriate construction manipulations. If you plan to make living rooms, enhanced insulation is necessary. Communications are immediately laid out for the boiler room, bathroom or kitchen. It’s easier to change your mind and plug a couple of plastic pipes into the wall than to decide that another bathroom is more necessary and dig into a newly built one.
Legalization of extension
Before constructing a major extension, permission must be obtained. Within the city limits, this is done by the department of architecture and urban planning; in rural settlements, by the administration. You can build without papers, but then when you try to sell, bequeath or donate a house with an extension, you will still have to draw up documents, but it will be more difficult, through the court. In the event of a confrontation with neighbors, they can sue for self-development and insist on demolition.
For anyone planning an extension, it is useful to study the topic General questions about major extensions to the house on the forum. The experience of the user of our portal in the topic of adding an extension to a house with their own hands is also interesting. An article on choosing a foundation will help you decide on the type of foundation for your future structure. And our video will teach you how to work with aerated concrete.
Subscribe to our Telegram channel Exclusive posts every week