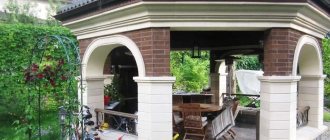
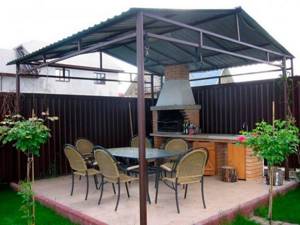
Finishing and canopy
In order for the building to last as long as possible, it is necessary to build a canopy.
He can be:
- general and cover the entire recreation area;
- be located directly above the grill.
To do this, concrete bases are made under the canopy pillars or fixed to the base. The supports can be metal or wood. In the latter case, according to fire safety rules, they are required to be at least 16 cm away from the structure and treated with special antiseptics.
The roof for the canopy is made from absolutely any material. But if it is combined with the roof of the house and other outbuildings, then the brick grill will harmoniously fit into the overall landscape.
The structure can be left as it is with just a little sanding. Can be coated with special paints for brick ovens. The decoration made of decorative stone looks interesting. You can also use special plaster.
You can also use various decorative elements not only on the grill itself, but also on the doors of built-in cabinets, shelves, etc.
Watch the following video, which clearly shows the process of building a brick grill.
Roof selection and installation
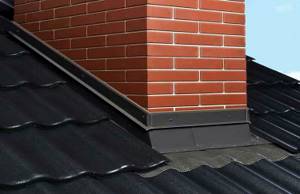
The construction of the roof of terraces with barbecue does not have any special differences. The only thing is the need for a hole for the pipe. You need to take care of it in advance. The joints between the chimney and the roof must be carefully insulated with thin sheet metal or galvanized iron.
Due to the strength of brickwork, you can choose any covering as a roofing material: from wood to ceramics. If a project for a “winter” terrace with a barbecue, which has glazed windows and warm walls, is being implemented, the roof can also be insulated.
Often, the floors in brick buildings with barbecues are made of stone or paving slabs, so there is no need to worry about their fire safety. If wood is chosen as the floor covering, the perimeter around the stove should be covered with sheet metal.
Judging by all of the above, it may seem that building a summer gazebo made of brick with a barbecue is not a task for everyone. But, if you thoroughly understand the theory and take your time in practice, then everything will definitely work out!
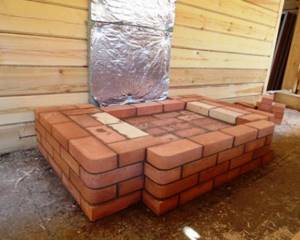
Arrangement of the foundation for a barbecue oven
Foundation arrangement
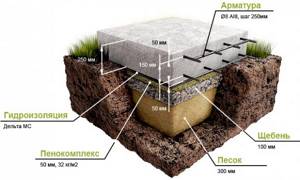
The oven will have a relatively small mass. It will be perfectly supported by a reinforced foundation with a thickness of about 20 cm. M100 concrete is optimal for pouring.
First step. Mark the area for the foundation. Do this using pegs (metal rods, pipe scraps) and twine (cord, rope, etc.).
Second step. Dig a pit around the perimeter of the base. The recommended depth is about 30-35 cm. Be sure to leave a 5-centimeter margin for the width of the hole.
Third step. Fill the bottom of the hole with sand and gravel mixture and compact it thoroughly.
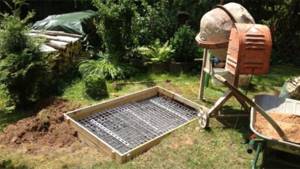
Fourth step. Make formwork. To make it more convenient, first assemble boards 30-35 cm wide from boards. Select the length according to the size of the sides of the base. Install the formwork elements around the perimeter of the pit.
Fifth step. Place the reinforcement in the formwork. It is best to use steel rods with a diameter of 1 cm.
Sixth step. Pour the concrete.
You can begin further work 3-4 days after pouring the foundation.
About the foundation
A brick brazier, even if built with your own hands, is a solid structure and should be characterized by increased strength and stability. It is naive to believe that to install it it will be enough to simply compact the site thoroughly and cover it with crushed stone and lay it with paving slabs. A heavy structure simply needs a solid foundation, then it will not be afraid of either soil movement, which the territory may well suffer from, or other climatic or geodetic problems.
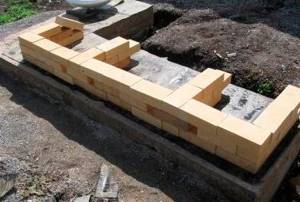
Brick foundation for barbecue
Take your time, spend a little more time on the preparatory work, but make a solid foundation for the future hearth. Before starting work, the cleared area is marked with pegs and twine, according to the plan. They dig a pit according to the outlines, trying to match it with the design indicators. A mixture of rubble stone and crushed stone is poured into the bottom of the resulting pit.
DIY foundation diagram for a brick barbecue
Formwork is installed around the perimeter of the pit, which should preferably be moistened before use. When everything is ready, the resulting space is filled with cement-sand mortar mixed in a ratio of 1:3. Filling is done in layers, with a reinforcement layer. Reinforcing mesh is never laid at the bottom of the pit.
Laying reinforced mesh for pouring the foundation
The finished foundation is covered with film or sheets of roofing felt and left to set. The drying process may take a couple of weeks. If the weather is too hot, you need to take care to periodically moisten the top layer of poured concrete with water so that it does not “tear”.
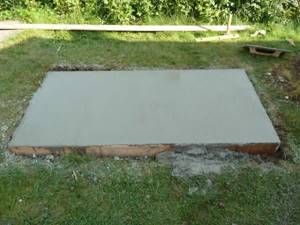
Poured foundation for barbecue
The forcing of the brick walls of the main structure can begin only after the concrete base has completely dried. This time can be spent usefully and prepare a clay mortar, which will be required when laying the walls of a brick grill, made with your own hands.
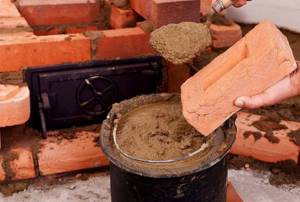
Do-it-yourself clay mortar for building a barbecue
Find a suitable tub and soak in it the main component of the future fastening composition - clay. The material will need to be left there for about a week, but do not forget about it, but control the soaking process, periodically stirring the mass and adding water if necessary. Sand is mixed into the softened clay, bringing the composition to the consistency of sour cream. The resulting solution should not spread. It’s easy to check how well the proportions of the components are selected. Take some of the mixture in your hands and rub it between your palms to form a sausage. Your creation should not lose shape, spread or crack.

Mortar for laying a brick barbecue
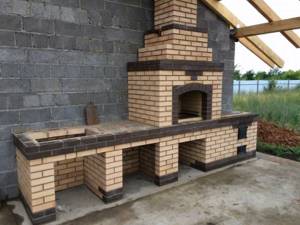
Construction of a barbecue with an oven
After receiving the construction plan, or having completed it yourself, you need to move on to building a brick barbecue with a stove. Construction should be carried out with due care and precision. Since incorrect and poor-quality construction can ruin the entire structure, and will cost wasted time and money.
When laying bricks, a wooden frame can help, which needs to be installed at the beginning in order to obtain uniform walls of the barbecue. It is advisable to use clay in the masonry mortar. Instead of clay, you can use special dry mixtures. Use a metal corner to cover stove openings. If you decide to use old brick for construction, then do not forget about preliminary cleaning of dried old cement.
The fireplace should be made of fireclay bricks due to its fire resistance. Walls and cladding can be made of ordinary ceramic bricks. The mortar for the barbecue stove is made from cement, sand and clay. For a firebox made from fireclay bricks, a solution without adding cement is used in the proportion: three parts sand to one part clay. It is advisable to soak bricks in water before laying. This will provide a stronger grip.
Before starting construction, carefully calculate the location of the brickwork and make sure there is enough free space around it.
Choosing a barbecue stove design, ordering
When choosing a project, the amount of free space on the site, the functions that the finished building will perform and material capabilities are taken into account.
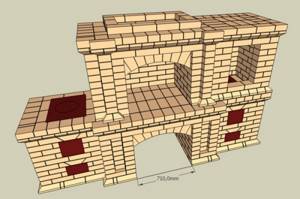
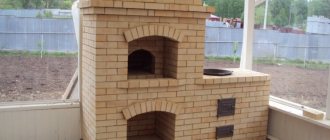
Photo 2. Design of a barbecue stove with a brick smokehouse, made in a special computer program.
The main elements present in every BBQ smokehouse:
- firebox;
- barbecue grill, grill;
- smoking chamber;
- chimney pipe.
There can be several fireboxes, each located under a smoking cabinet or barbecue grill. The chimney pipes from the smoking chamber and the barbecue are connected at the top into a common pipe.
Typical design options for smokehouses with barbecues:
- barbecue with upper smokehouse;
- corner smokehouse;
- smokehouse of the “Russian oven” type;
- smokehouse with open barbecue grill.
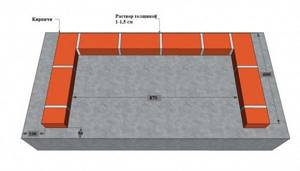
The first option, in which the smoking chamber is located directly above the barbecue grill, takes up little space (1-1.5 sq. m) and is suitable for construction in small areas.
In the second option, the main hearth with barbecue is located in the center, and on the sides there are two additional fireboxes with a stove and a smoking cabinet above them. The side fireboxes are located at right angles to each other, so they make the design convenient for installation in the corner of a country house or veranda.
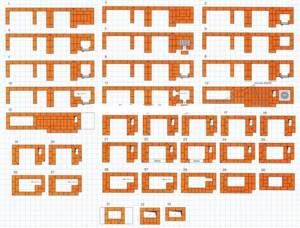
Photo 3. Step-by-step diagram for arranging a brick barbecue oven with a smokehouse. Includes 33 rows.
A smokehouse similar to a Russian stove has a corner central chimney, several fireboxes and a main chimney. In addition to the smoking chamber and barbecue area, it is equipped with an oven, stove and place for drying firewood. Such a project is chosen if there is sufficient space and the willingness to bear the cost of building materials.
A vertical smokehouse with an open barbecue fireplace attached to the side, without a chimney, suitable for outdoor installation only. The open barbecue grill allows the cook to approach the appliance from any side.
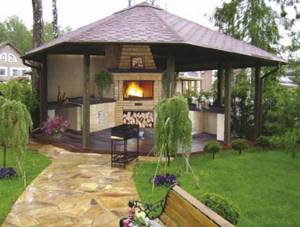
Brick grill
The owner of a summer cottage, on the territory of which there is a brick barbecue, gets an excellent opportunity to organize a magnificent place for relaxation. However, in order for this plan to be implemented efficiently, you need to take a competent approach .
It is best to present this process in the form of separate stages, which will help to avoid mistakes and save time on performing the necessary work. First of all, it is important to ensure that the gazebo is easy to use. And for this you will have to decide in advance on the place where the grill will be located. At this stage, you should remember the safety rules. Keep in mind that most often a place is allocated for the stove under the roof of the gazebo. Bearing in mind that the cooking process is accompanied by an increase in temperature, it is necessary to select appropriate materials for the construction of this zone that will cope well with such exposure.
For this version of the gazebo you will need a canopy , which must be installed over the barbecue. It is best to immediately build a brick barbecue oven with a canopy, then you will no longer have to waste time and energy on building an additional roof.
Choosing a location for the oven
When deciding where the brick oven will be located, keep in mind that this will require dividing the gazebo into two zones:
- The work area where the food preparation process will take place;
- A recreation area, for which you can allocate a place directly under the roof or in the open air.
In the process of installing the above designated zones, it is necessary to take the necessary measures to create comfortable conditions in them. They should be spacious enough to provide space for cooking, storing fuel and necessary equipment. When deciding where to place the grill, keep in mind that it will require building a foundation that will be able to cope with the weight of the oven.
Test device
The device consists of two vertical slats 1.5-2 m high, fixed on opposite sides of one wall to the bottom rows with two brackets each. The latter are used to safely connect the lath without bolts, so as not to “injure” the fresh brickwork.
The minimum number of tiers that allows you to establish an order is 2. Since the masonry is carried out in a checkerboard pattern, one bracket engages with the brick of the first row on one side of the masonry, and the second with the element above, but on the adjacent side - this is the same for both racks. The cross-section of the ordering strip is not specified: the thickness must be such as to withstand the tension between the two parts of the installation. As a rule, 50×50 bars are chosen.
Control is carried out by applying notches to the row every 77 mm in height. These intervals require the greatest possible accuracy, since the construction balance of the masonry depends on them. If on one rail at least one of the intervals differs by 1 or 2 mm from the opposite side, the horizontality will be disrupted. The distance 77 mm consists of the height of the brick and the thickness of the connecting seam: 65+12 mm.
A cord called a mooring is stretched from notch to notch. It allows you to track the accuracy of the laying of each brick in a row. If the first tiers were folded using a level, the pier serves them in the next stages. A tension bolt is provided at the place where the bracket is attached, either in row or nearby. It is enough to screw it in on one side, and the mooring can be completely straightened between the bars. Stretching the cord is extremely important so that there is no sagging in the middle of the masonry and horizontality is most accurately tracked.
Sometimes the order is installed on three or even four brick walls. This helps to track the symmetry of sizes and angles, as well as maintain the horizontal position of the masonry on all its sides at once.
You can make a control device yourself. The device consists of simple elements that literally lie underfoot during construction work.
For frequent professional projects, it is recommended to purchase a factory unit, which will be useful over long construction periods and will maintain its accuracy.
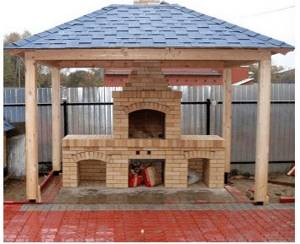
We build a canopy over the barbecue
It is recommended to install a canopy over the building. You need to immediately decide whether it will be placed over a large area or just above the grill. You will need to make at least three supports, and ideally at least six. The material used is metal or wood. A concrete base is formed under the pillars. The minimum permissible distance between the barbecue and a wooden post is 16 cm. The roof can be made of any material that is used to decorate the roofs of houses. The barbecue will fit well into the overall ensemble of the summer cottage if the canopy over it is equipped in the same way as the roof of the house. The process of installing the covering on the canopy is relatively quick and uncomplicated. The color of the roof is selected to match the shade of the roof of a residential building, the color of the grass or the shade of the brick from which the barbecue is built. The canopy can be finished with any roofing material, regardless of the angle of inclination.
Which brick is suitable for a barbecue?
It is better to finish the working area with fire-resistant bricks. If the building will be used infrequently, then ordinary red will do. The outer part of the structure can be finished with facing bricks - there are several different options in color and shape. The refractory material will help retain heat, which is useful for cooking over charcoal. In this case, the outer part of the structure can be made of clinker bricks. Sometimes they choose “aged” brick, then the building will look more interesting. Special stove or fireclay bricks are used in the braziers themselves and in fireplaces where the fire burns constantly. A dark shade indicates increased resistance to fire. Do not use silicate or ceramic bricks with voids. In order not to burden the structure, its walls are lined with hollow clinker. It is resistant to mechanical stress and temperature changes.
Block barbecues
Popular barbecue model made of blocks and bricks
Portable block grill
We removed two blocks and now it’s no longer a grill, but a barbecue
The main feature of this project is that you can always disassemble it, put it in the back of a car and transport it wherever you need it. Since there is no mortar, glue, nails or anything like it in its design, the block grill can be easily moved with minimal effort. You can install it anywhere and forget about it, as the design is weather-resistant and requires no maintenance at all. How to build a grill, I think, instructions are not needed.
If we're talking about blocks, check out a few more options. Here is a collapsible barbecue grill made from blocks with a shelf. It can be assembled like a construction set, anywhere, and after a picnic, it can also be disassembled and stored in a shed until the next event. But it is advisable that you have a permanent area lined with tiles or stones; usually there are always crowds around the grill, everyone wants to see how meat is fried, proven by practice. Therefore, it is not a bad idea to provide a paved path, it can be made of the same material as the site, then you have a chance to preserve the lawn.
And here is another barbecue made of blocks, complete with a bench made of the same material. If you put cushions on the bench and hang a couple of lanterns, you’ll get a very cozy place. And, most importantly, you can make all this beauty yourself. Everyone loves barbecue, and if you decorate everything with imagination, it will delight your family and guests, but in fact, you don’t need to do almost anything, just drag the blocks around for an hour :)
Here's a step-by-step tutorial on how to make a BBQ grill out of blocks. This is a stationary structure with finishing and an upper frame. However, for such designs there is no need for instructions; you can put together any combinations yourself. Photo source www.woohome.com/diy-2/cool-diy-backyard-brick-barbecue-ideas
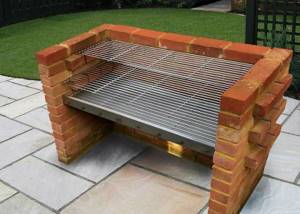
Simple brick grill
This design is very simple and can be easily modified to suit any needs and desires. It consists of brick walls in which projections are arranged (the brick is placed on its edge). Heat-resistant sheets (metal, etc.), grates, and skewers are placed on these protrusions. Convenient, especially if there is some kind of roof over your head in case of precipitation, but it is built separately and at will.
Project and photo of the finished brick grill/barbecue
Any brick structure requires a foundation, or at least a prepared foundation. Not even this small brick grill. Since there are not many bricks - the wall is half a brick - a compacted area lined with some kind of hard covering is suitable for this structure.
Preparing the base
Remove the fertile layer and, if necessary, deepen the pit. The depth should be about 20-25 cm. The dimensions of the foundation or platform are 50 cm larger than the dimensions of the stove in all directions. The bottom is leveled, crushed stone of the middle fraction is poured onto it. The thickness of the crushed stone layer is 15 cm. It is compacted well. It is advisable to use a vibrating plate, if not, a metal or wooden tamper.
Further steps depend on the selected base. If this is one of the coverings - paving stones, paving slabs and similar materials, then a layer of fine-grained sand is poured into which the covering is laid level.
If a slab foundation is chosen as the base, it is reinforced with a rod 10 mm in diameter. It is laid along and across the foundation in increments of 20 cm, and tied at the intersection. If you don’t know how to knit with special wire, you can tie it with plastic clamps. Reinforcement with a finished mesh of thick wire is allowed for this model. The formwork is placed around the edges and everything is filled with M250 concrete. Work can begin in a week if the average daily temperature was not lower than +20°C, and in two if it was +17°C.
Ordering (masonry drawings) and recommendations for masonry
For this brick grill, solid ceramic brick M200 is used. You can use a stove-type one, but it’s more expensive; you shouldn’t use fireclay: it’s not the right temperature and it doesn’t like moisture too much to feel normal in an open grill.
The masonry is laid using a clay-sand mixture, to which a little cement is added for greater strength. For beginners, it is better to take a ready-made mixture for stoves, but not heat-resistant, without fireclay. Knead according to the instructions, seam thickness - 3-5 mm, maintain strictly. Constantly monitor the verticality of the walls and the horizontality of the masonry
This is important for normal operation of the oven.
Arranging a brick barbecue (masonry drawings)
As you can see, everything is really very simple. Each odd row starts with a whole brick, the odd row starts with a half. In the 6th and 10th rows, the bricks are placed on a spoon - sideways, and turned across the main masonry. If you are making a barbecue - under the grate - in the same rows, the back wall is made of bricks, also placed on spoons, and to maintain the thickness of the masonry, they are placed in two rows, just like the rest - with bandaging - displacement of the seams. If you are going to use the grill for skewers, place a brick on the back wall, also on a spoon, making a ledge in this area as well. In front, a profile metal pipe of small cross-section, cut to size, is used as a support for the skewers. You can make recesses in it for skewers.
Starting from the 7th row, the laying is carried out only on half - right or left - as is convenient for you, but this layout is given under the frying chamber on the left - it is wider, and there is a table on the left. If it’s more convenient for you the other way around, do a mirror image of this order.
Brick is a hygroscopic material; in order to reduce the amount of moisture that it will “pull” from the base and extend its service life, waterproofing is needed under the first row. You can lay rolled material (such as roofing felt or waterproofing material) in two layers and apply hydrophobic impregnation around the perimeter. A layer of waterproofing between the first and second rows would not hurt either.
This is what one of the variations of a brick grill looks like without a table (if you don’t need one, just ignore this part)
After the brick grill is built, it is left to dry in warm weather for 1-2 days, in cooler weather - for 3-5. Then you can do a test run. Approximate “equipment” is shown in the photograph of the finished barbecue. This version has three rows of protrusions: the top one is for food, the middle one is for coals, and the bottom one is for collecting burnt coals and ash.
In order for a folded grill to serve more or less long, it is advisable to coat it with a composition that reduces hygroscopicity. For this case, KO-85 varnish is best suited. And it would also be nice to provide some kind of lid: close it in case of rain and for the winter.
We begin construction
The project must include calculations of all materials. For the entire construction, additional tools will be required, most of them may already be available, and building materials will only have to be purchased for barbecues and grills.
- You will need 2 types of brick: standard red and fireclay (fireproof) for the stove.
- Clay, sand, building mixtures. To lay the fireplace itself, special fireproof mixtures will be required. Concrete for laying the foundation.
- Grate boxes, doors for the firebox and ash pan
- Angles, steel sheet, fittings
- Cooking stove, metal rods and hooks for the smokehouse.
- Metal and reinforcing mesh.
Pouring the foundation
Gazebos with brick barbecues are two different construction projects. Each has its own foundation and walls. It is not recommended to combine the back wall of the fireplace and the wall of the gazebo. A strong and stable foundation will allow you to build a barbecue that will last for centuries. The greater the number of rows, the more solid the foundation should be. Each row of brick must be supported by a concrete screed of at least 15 cm.
A pit is being dug out. Its volume should exceed the width of the base of the grill by 90-100mm. Formwork can be made from any auxiliary material - boards, thick cardboard. Crushed stone and reinforcement are laid inside.
A gazebo at the dacha is not just a bench for eating barbecue. This is a perfect place for a cozy pastime.
Everything is poured with concrete mixture and left to harden. For waterproofing, roofing material or special mixtures are used.
Masonry solutions
The standard solution for building a barbecue is 1:3 clay/sand. The consistency of the solution itself resembles thick sour cream. To work with refractory bricks, fireclay is added instead of ordinary clay.
For a gazebo, a cement mortar in the same ratio is suitable. But clay has been replaced with cement. The mortar must be used quickly, otherwise the water will be tightly bound to the cement and the adhesion to the brick will not be strong.
How to make a brick grill with your own hands: drawings and photos, design and calculations
When choosing the type of construction and design of the barbecue, it is necessary to take into account the landscape features of the site. The structure should not stand out from the general style, but, on the contrary, must emphasize it. The process of developing a barbecue project is not limited to the aesthetic side of the issue. There are certain rules that must be followed to ensure safe operation and make it more comfortable.
Drawing of a brick grill
To build a site located in front of an open fire, it is imperative to use fire-resistant materials; the following are suitable for these purposes:
- sand;
- stone;
- concrete slab;
- paving stones.
You should also take into account the wind rose. You should not start construction if there is a possibility that smoke will enter the windows of a residential building
It is prohibited to place a barbecue near neighbors' property. Having a barbecue or oven can cause discomfort.
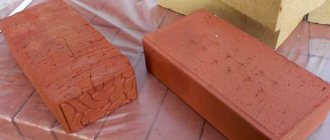
Note! If a batch of fireclay bricks contains blocks with a lighter shade, it means that the technology was violated during the manufacturing process of the material, and this casts doubt on the strength characteristics of the product
First of all, you need to carefully consider the placement of the brick barbecue - after all, it will be impossible to move it to another place later
In the construction of a brick barbecue with your own hands, the drawing plays an important role. To make your work easier, it is advisable to make a sketch of your summer cottage. Such a sketch will allow you to assess the features of the territory on a scale and choose the right place for construction. The area located within a radius of 5 m around the open fire must be free of trees. The presence of plantings is allowed on the side where the structure is fenced with a wall, but no closer than at a distance of 0.5 m.
An outdoor brick grill must be provided with free access, as well as a water supply in case of a fire.
Do not place fire hazardous objects nearby:
- compost heaps;
- sanitary and technical facilities;
- containers with garbage.
If you follow basic fire safety rules and install a barbecue away from the fence and street, you can avoid conflict situations with neighbors.
Brick laying pattern: 1. tie row; 2-6. spoon rows; 7, 8. dressing in half a brick
How to choose the optimal brick barbecue design
Having decided to build a barbecue or an outdoor oven at your dacha yourself, you don’t have to design the structure from scratch. On the Internet you can find drawings, photos and diagrams for building a barbecue with your own hands that will meet any wishes. Moreover, there is no need at all to try to select a ready-made project. In the drawing of the future design, you can combine any elements you like, which will allow you to achieve maximum compliance with your personal requirements.
At the initial stage, it is necessary to make a detailed drawing of a brick barbecue, indicating on it the exact configuration of the structure and all the data regarding its appearance.
The drawn up diagram should take into account the following nuances:
- structural design;
- the nature of the placement of the main and additional components, namely: combustion chamber, brazier, chimney pipe, loading door, etc.;
- dimensions of all structural elements.
At the beginning of the process of constructing a barbecue, it is important to decide on its structure and design.
You should also consider the presence of a roof. There are open and closed fryer options. In the second case, the design of a brick kebab oven looks like a fireplace. The advantages of such a project are obvious, since in case of rain the fireplace will be protected from precipitation. In order for such a structure to function properly, it is necessary to install a chimney.
At the design stage, the presence of additional structures is also considered. Near the barbecue you can set up a platform that will be used for preparing food. A countertop is installed in this area, and a sink with water is also connected. Designs for barbecues made of bricks with a stove for a cauldron, in which you can cook pilaf and other dishes over an open fire, look quite attractive.
Important! If water is supplied to an outdoor stove or barbecue, in the fall you will definitely have to empty the system of liquid, since during frosts the pipes will be destroyed
Brick grill diagram
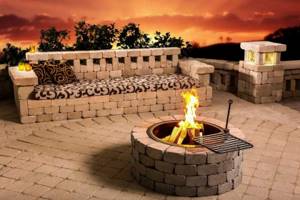
Brazier-fireplace
This is another option for creating a barbecue in a simple way. The finished structure looks like a fire pit lined with brick. Only the circle in this case is made of stone, and the bottom is lined with brick. It’s not at all difficult to make such a brazier out of brick with your own hands: no drawings are needed here.
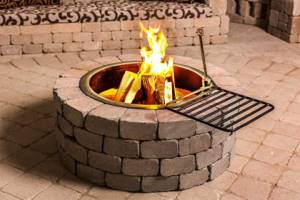
Here it is worth paying attention to the fact that such ideas, despite their simplicity, are implemented thoroughly. Of course, you can throw stones at random and put bricks underneath, but this will not have the same effect.
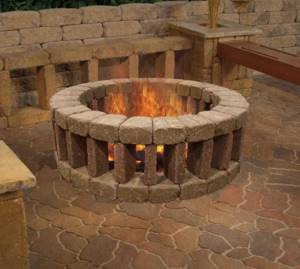
Important features of the construction of a barbecue fire pit:
- The stones are chosen to be approximately the same size. Stacked on top of each other in 2-3 layers to create a “mini-hedge” effect along a circle line. It is better to glue them together, fasten them with something, or place them in such a way that nothing falls or rolls away.
- Even before the stones are laid, a hole several centimeters deep must be dug at the site of the future fire pit. It is in it that the bricks are carefully laid. There should be a “floor”.
- There are other options for such a structure. The stones can be replaced with a beautifully laid brick “wall”, and the foundation can be made of tiles.
Order: how to build a brick grill
Despite the fact that we are dismantling an outdoor brick grill that is easy to build, the order of laying the bricks (diagram) is drawn up in advance, taking into account the selected dimensions and configuration. It is most convenient to do this on a checkered sheet.
How to lay brick? The simplest installation method is to offset each row by half a brick relative to the previous one. The first two rows are laid out solid. The very first row is made up of solid bricks, without halves.
The lower part of the grill is the base. The laying pattern is from the corners to the center along the lines outlined in advance. Every 3 rows it is necessary to check the correct installation level and plumb, and lay out a mesh for reinforcement.
The height of the plinth depends on the project. It may have one or more niches where firewood, coal and other utensils are stored. It is laid out in continuous masonry.
The central part of the structure is the firebox. The base for the brazier is pre-cast from reinforced concrete or laid out in brick. If arches for the firebox and niches are built according to the project, a circle is used. To distribute the bricks evenly, chips are inserted between them.
The gaps are the same, approximately 1 cm. Only after the arch has been completely laid out is the space between the bricks wetted and filled with mortar. The laid arch is left to harden with the circle for a day or two.
If the grill will also be used as a barbecue, you should consider in advance the possibility of installing a grate. A small protrusion or several protrusions are left for it so that the grille can be placed at different levels. Install it on reinforcement rods embedded in the walls of the barbecue.
Tip: if you leave small gaps between the bricks when laying the firebox, when using the barbecue in the future, thanks to the air penetrating into the cracks, combustion will be better.
The roasting pan is placed on metal corners, which are attached to the masonry with pins. Keep this in mind when assembling a country brick grill with your own hands (photo of a correctly folded firebox below).
Important! It is unacceptable for precipitation to come into contact with unfinished brickwork. If it starts to rain, it must be carefully covered with polyethylene.
The last stage is the construction of the chimney. Its presence allows you to maintain heat in the grill longer and remove smoke. For the chimney, the masonry continues to be laid, gradually narrowing towards the top. This is done by shifting the bricks in rows. The displacement is made by no more than a third of the brick - otherwise the structure may be unstable.
Feature: the pipe is a heavy part and requires support columns for its installation.
If laying out a brick pipe seems too complicated, you can install a metal one. Upon completion of the masonry, the walls of the firebox must be fired. To do this, light wood in the hearth and increase the heat to the maximum.
The construction of a brazier and the installation of a cauldron or tray are carried out at the final stage. After this, decoration is carried out. If there is a countertop, it can be decorated with a porcelain stoneware slab. The barbecue itself is covered with plaster, decorative stone, facing tiles, etc.
We looked at how to make a brick grill yourself. A separate issue is protecting the structure from leaching of the solution. The problem is solved by processing with special compounds. This can be a heat-resistant varnish, an oil impregnating composition for stoves and fireplace masonry, a silicone water repellent, which in addition protects against the appearance of microorganisms in the masonry.
To ensure fire safety, the barbecue for the dacha is covered with paving slabs. In addition to fire protection, it will create a flat, comfortable platform. There should be no flammable objects in the immediate vicinity of the grill. For decoration, only non-flammable, heat-resistant materials are chosen.
Why a brick grill?
If you look at the options for building a barbecue or barbecue, you will notice that brick as a construction and finishing material predominates in this direction. Initially, it was made of copper, and its shape resembled a large bowl.
Today everything has changed. A barbecue has ceased to be something special: it is easy to buy, it is inexpensive, and many people prefer to make it permanent in their yard. Now it is used to produce coals and then fry something: meat, vegetables, poultry, fish.
Brick is preferred because it is a material that is easy to obtain. It is always on sale, often left over from construction. It is easy to maintain, and the support for the barbecue is strong, durable, and stable.
It is also impossible not to mention the aesthetic component: usually such roasters look beautiful. Those who are interested in a do-it-yourself brick grill can look at the photos on this page.
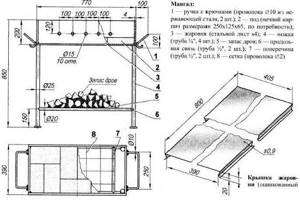
Preparatory work
Prepare a site 120x150 cm. Dig a trench 30 cm wide and 25 cm deep along the perimeter of the site. Remove 10 cm of soil from the rectangle remaining in the middle of the trench and round its edges. Install the formwork around the area so that at the back it protrudes above the ground by 5 cm, and at the front by 3.5–4 cm (a slight slope is necessary for effective drainage of rainwater).
Reinforce the support with five 130 cm pieces of reinforcement. Place two pieces of reinforcement 10 cm from the front and back sides of the trench; Place the remaining three evenly between them. Lubricate the formwork with drying oil or a special anti-adhesive agent and fill it with concrete.
A simple way to make a barbecue with your own hands from metal
Making a barbecue with your own hands from sheet metal is not very difficult and anyone can do it. The grill will become a symbol of relaxation for you and a decoration for your home.
Historians believe that the grill was invented in the Middle East. Even in ancient times, the modern brazier made of steel was replaced by a brazier forged from copper. Its appearance resembled a huge bowl, to which legs were attached from below. The top of the roasting pan was covered with a hemispherical lid. Handles were attached to both sides of the brazier, which served for carrying.
For all generations, the barbecue symbolizes relaxation, the opportunity to go out into nature, relax, grill shish kebab and enjoy free time in the company of friends, relatives and acquaintances. Any good holiday should be accompanied by cooking barbecue or other dishes on the grill.
The compact metal grill can be used from early spring to late autumn. Small size and light weight - allows you to load the grill into the trunk of any car and go with the company into nature.
If you have a small area near a private house, you can build a stationary barbecue from stone or brick. But you need to think a little, a stationary grill takes up space on the site, and besides, it is not used that often.
The grill should not be large in size or weight. The metal grill turns out to be quite durable and functional, as shown in the video.
When designing a barbecue drawing, you need to take into account the average number of your friends who are with you on vacation. It has been proven that for an average company of 8-10 people a compact grill with ten skewers is quite sufficient. If necessary, you can make a second portion. While guests are enjoying the exquisite taste of barbecue, you can prepare a second portion of delicious meat. All subsequent actions will be prompted by your imagination. Bon appetit.
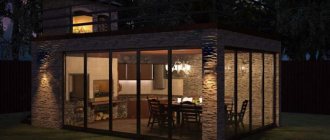
How to build a gazebo with a barbecue with your own hands?
If you want your vacation to bring you maximum positive emotions, then the grill in the gazebo under the roof will help you with this. But to do this, you must first choose a place where you will build a gazebo with a barbecue with your own hands. By building a foundation for a barbecue oven , you will minimize the risk of fire, so your gazebo can serve you for a long time.
Even before building a gazebo and a stove under the roof, you will have to complete a number of preparatory activities. When deciding on the location where the gazebo will be built, keep in mind that it is advisable to place it at a short distance from the house. It is best if you build it on a flat area, which is located near a pond or surrounded by trees. In this case, the gazebo should be located at such a distance that the smoke from the barbecue does not create inconvenience for people living in the house.
An equally important issue that you will have to solve at the preparation stage is the construction of a foundation for the furnace.
When choosing a place for it, you should pay attention to the soil, which must be stable and withstand heavy loads .
Typically, a barbecue oven is built on a strip foundation, which at the same time can be successfully replaced by a concrete monolithic pad on a sand base.
Design features of a brick barbecue
Despite all the variety of braziers, we can highlight the main elements that are always present:
- base. This is not necessarily a permanent foundation; sometimes a platform filled with gravel or sand is sufficient. But taking into account our climate, it is still better to concrete the base and lay a convenient path to it;
- supporting walls. The simplest barbecues are built in the shape of the letter “P” - two side walls on which the grill rests, and a back one. It not only covers the coals and meat on the grill from the wind, but also “ties” the side walls and gives the structure strength;
- grates for coals (wood) and cooked food. The place for coals can be represented by a solid slab or grate, under which there is a tray. This is quite convenient - as the coals burn, the ash is poured into a tray, from where it is easy to remove. There can be one or two or three grates for products;
- tabletop located next to the grates. Since kebabs are often added to other dishes during the cooking process with marinade or sauce, ingredients are added, or new portions are prepared, the analogue of the cutting table is very useful.
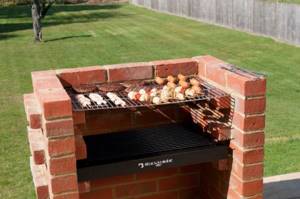
The simplest grill
It's just a rectangle made of brick. The bottom can also be lined with brick - then the ash will have to be removed from it using improvised tools - or, as in the photo above, with a grate. In this case, it is necessary to provide a door in one of the side walls (usually it replaces two to four bricks) to remove ash from under the grate. Skewers or a roasting rack are placed directly on top of the brick walls.
The level of all walls can be the same, or short walls can be laid out higher to protect against side winds. In addition to ordinary bricks, cinder blocks, foam blocks and other block materials are also used. It is possible to use wild stone.
A U-shaped structure can also be considered quite simple.
There are no special differences - the base is lined with brick, and so are the walls. There is no front wall, which greatly simplifies the removal of ash; the grate(s) rest either on bricks protruding from the masonry, or simply on blocks placed inside the brazier (as in the photo above).
The idea of constructing the walls of the hearth from gabions filled with wild stone is also very interesting.
Here, too, a concrete base is needed; it is better to use a hard stone that is not prone to crumbling under the influence of heat - granite, basalt.
You can also line an old metal barrel with wild stone.
Well, this option, perhaps, should not even be called a barbecue, but simply a fireplace - an equipped and fortified place for lighting a fire.
Dutch oven with cutting table
A U-shaped grill with an additional table top and shelves is considered more practical and convenient for constant use.
As you can see in the photo, this design has three grates - the bottom one for coals, with a pull-out tray for ash, the middle one for meat, the top one for vegetables, bread or side dishes. Another wall is attached to the side, the tabletop rests on it and the protrusion of the wall of the U-shaped main structure.
The gratings rest on bricks protruding from the walls; it is better to provide in advance the presence of hooks for easy removal of the gratings.
Option with chimney
This structure is noticeably more complex. In addition to the basic design, it has:
- niche for firewood (under the grates);
- niche for dishes and various household supplies (bottom left);
- full-fledged common tabletop;
- brick vault with a chimney - to remove smoke and protect prepared products from rain. In addition, the presence of a vault and a chimney enhances draft and prevents the heat from the coals from escaping aimlessly to the sides.
Please note - the base here is entirely made of brick on top of a concrete platform
A similar model with additional shelves and a metal roof-vault, a metal chimney duct.
Outdoor grill with additional stove and sink
This is a rather complex structure that you can make yourself.
In addition to the barbecue as such - that is, a brazier with an open fire (coals) and a vault with a chimney located above it - this design often contains a smokehouse, a stove with burners heated by the fire, a tabletop (tabletops), shelves, and a sink. If the structure is located next to the house and water supply and sewerage can be connected to it, the building can be equated to a full-fledged summer kitchen, especially if there is a roof over it.
Due to the presence of burners or holes for installing a pan (boiler), such a device is often called a barbecue cauldron.
Material Variations
To build a brick grill with your own hands, prepare materials and tools.
What to build from :
- fire brick;
- cement;
- clay;
- sand;
- water;
- crushed stone;
- poles made of wood or metal;
- reinforcing mesh;
- steel sheets;
- steel corners;
- roofing material;
- grate;
- hob;
- doors (to the firebox, ash pan and smokehouse).
Required Tools:
- Master OK;
- drill;
- level;
- roulette;
- Bulgarian;
- hammer;
- mallet;
- hacksaw;
- jointing;
- shovel;
- buckets;
- troughs for solutions and mixtures.
There are several types of brick barbecues in the gazebo.
Choose a design with a chimney.
Classic barbecue grill
A traditional grill with or without a roof is the most popular option . It looks like a brazier with a niche for firewood and a pipe for removing smoke. To cook food on the grill, they are threaded onto skewers.
It is easy to build a brick barbecue in a gazebo - it is a simple design, but it can be complicated to increase its functionality. The pipe can be connected to the brazier using a smokehouse niche.
Furnace complex
The Russian stove for the gazebo allows you to cook any dish . Equipped with a wood burner, barbecue grill, pilaf cauldron, smokehouse, and hob. It is convenient because during the warm season you can move cooking from the hot kitchen to the open air.
The drawing of a stove for a gazebo is quite complex - an inexperienced person cannot cope with it.
Invite specialist stove-makers to arrange the gazebo.
Brick BBQ
Barbecue cookers are in fashion today - American-style cooking does not require much time and effort, and the food turns out healthy and tasty. The device looks like a roasting pan for frying meat on a removable grate.
A brick barbecue can be stationary or mobile, complemented by countertops and a hood. It is installed quite simply.