Retaining walls are an indispensable element of a plot of land located on a slope. They serve not only as additional support, protection and prevention of earth movement after rain, but also serve for zoning or decorating the landscape. With the help of such a brick fence you can turn a nondescript, bumpy area into a garden with flower beds and terraces.
Advantages and Disadvantages of a Wooden Retaining Wall
The main advantages of a wooden retaining wall include:
- Relative cheapness;
- Decorative;
- Environmental friendliness;
- Ability to do all the work yourself;
There is only one drawback - a short service life, since the wood is susceptible to rotting. This is especially true in warm and humid climates.
What material should I use for a retaining wall?
Weird question. Of course, a tree! But it can be both logs and lumber. Most often, a solid wooden beam is used. It can be ordered at any hardware store. For low decorative walls, thick boards (at least 45mm) are also suitable.
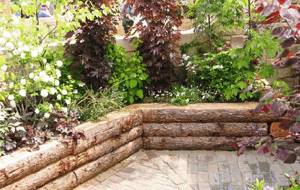
The cost of materials can be minimized if you use trunks and thick branches of old trees cut down on the site. A retaining wall can be built from such material if short logs are installed vertically. Fruit tree trunks are never perfectly straight. But the height of a decorative retaining wall is usually no more than half a meter. Considering that part of the log will be buried in the soil, it is clear that sections of 40-90 cm in length will be required. By carefully examining the available waste, you can always select and prepare suitable fragments.
Why are retaining walls needed?
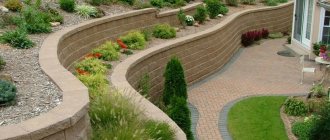
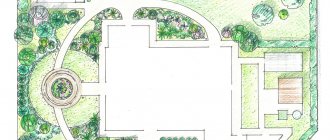
1. Formation of terraces
Terracing is the most effective way to create recreation areas, ponds, and sports grounds on steep slopes of gardens. Retaining walls are their foundation.
2. Strengthening and shaping the slopes
When constructing paths and level areas in relief areas, retaining walls create a clearly defined and stable slope cut and shape elevation differences.
3. Setting up a vegetable garden in difficult conditions
Areas with poor, wet, rocky soils are difficult to use for crop production. The easiest way to make them suitable for this is to add fertile soil to form high terraces. Retaining walls are used to strengthen their edges.
4. Zoning
Retaining walls used in landscape design delimit areas with different functions and divide them into levels. This creates a different atmosphere within the same area.
5. Placement of built-in equipment
Retaining walls serve as a base for stationary benches, which can beautifully follow their shape, or flower boxes.
6. Landscape design
Retaining walls accentuate the three-dimensionality of the site's topography. The variety of shapes and the use of different materials for construction make it possible to approach design in a non-standard way, even on flat terrain.
Horizontal laying or vertical?
The choice of installation method depends on several factors, the main ones being the length of the existing logs and whether the future wall should have roundings. If the logs or boards are long, then horizontal laying is preferable. Such a retaining wall is built much faster, it is stronger and, as a rule, more durable.
When planning a wall of complex shape, semicircular or zigzag, for example, choose a vertical installation. The same method is more suitable for construction from any waste of different lengths and thicknesses.
Protecting wood from destruction
The tree is susceptible to rotting. In addition, it is often damaged by various insects. In order to extend the life of a wooden retaining wall, the material should be treated with antiseptic agents, as well as the lower part should be burned or coated with hot bitumen or waste machine oil.
Creosote is often used to protect wood from rotting in the ground. It protects against rot and is also great for repelling insects. Copper or iron sulfate has proven itself to be excellent. Apart from this, there are many other modern chemicals used to impregnate poles.
The nuances of terracing a site
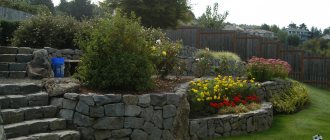
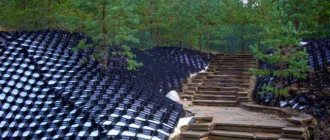
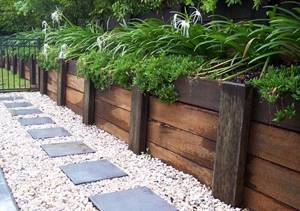
The main purpose of terracing is to prevent soil from moving downhill. Therefore, in addition to the forces of frost heaving, the retaining wall experiences serious lateral loads from soil pressure. It must either be deepened to at least 1/3 of the working height, or use rods, buttresses, and other devices, or be made of massive materials, as in the bottom photo. The main problems in this case are:
- unlike gabions, a wooden retaining wall does not have sufficient mass to compensate for horizontal shear and overturning loads;
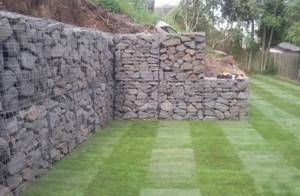
Terracing with gabions is more reliable than with wood.
- boards, beams or logs stacked on top of each other are not a monolithic structure, unlike monolithic reinforced concrete, so buttresses and rods are practically useless here;
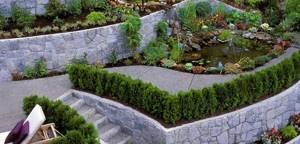
Concrete retaining walls can have any configuration.
- wood is susceptible to rotting from soil moisture and precipitation, so the operating budget increases sharply due to periodic repairs of the structure;
- the use of valuable wood species (for example, larch) will increase the resource, but for terracing these structural materials are not economically profitable for the developer.
Advice! Terracing with wooden walls is economically justified if the developer has lumber or logs left over from the construction of a home and outbuildings. In other cases, it is better to choose a more reliable structural material (concrete) or technology (gabions).
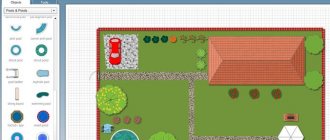
How to build a wooden retaining wall with your own hands
Wooden retaining walls are usually low and are built without a foundation. Therefore, it is important to do the following:
- Thoroughly compact the soil and gravel backfill to avoid uneven deformation of the soil in the future;
- Constantly check with a level the accuracy of the beam installation horizontally and vertically;
- Fasten the bottom row of beams to the ground using reinforcing bars so that the wall does not slide down the slope;
- Secure the retaining wall with a hill or fill soil using an anchor - a T-shaped beam, so that it does not tilt or bend under the weight of the soil.
How to make a retaining wall from horizontal beams
Step 1. Marking the area . This is done using a long cord and stakes. The cord indicates the height of the retaining wall along the entire perimeter. This is necessary for accurate calculation of materials and determination of horizontal and inclined sections.
Step 2. Preparing the trench . A trench 30 cm deep is dug along the entire perimeter of the retaining wall and the soil is compacted.
Step 3. Add gravel . A layer of gravel, crushed stone, and pebbles is poured into the trench to half its height (15 cm). Then the bedding is leveled and compacted.
Step 4. Laying the bottom beam . At a distance of 30 cm from the edge, a hole is drilled for the entire height of the beam to install the reinforcement rod. The timber is laid on the bedding so that the hole is closer to the edge of the wall.
Carefully check with a level the horizontal position of the timber along the length and width. Having achieved the desired position of the beam, they drive reinforcement into the drilled hole to fix the beam.
Step 5. Laying the first row . Continue laying the timber in the first row of the wall, carefully controlling the horizontalness of each new segment. Secure with reinforcement as necessary. As a rule, it is enough to fix the beginning and end of a beam or log in this way. If there is a significant length, a large load on the wall, or unstable, loose soil, fastening is done more often.
The segments can be fixed with vertical posts made of timber, deeply (not less than the full height of the wall) buried in the soil. They are usually installed on the back side, which is covered with soil. Sometimes the posts are made on both sides.
Step 6. Laying the second row of the wall body . Each subsequent row is laid staggered so that the joints of the beams overlap. In the corners, the width of the overlap is determined by the dimensions of the beam, and along straight sections of the wall, the length of the segments is selected so that the overlap is at least 120 cm.
The upper and underlying beams are fastened with wood screws, which are screwed in with a screwdriver. The length of the screws is chosen so that it matches or is as close as possible to twice the height of the beam.
Step 7. Drainage device. Between the hill and the body of the wall I lay geotextiles so that the material covers the gravel backfill. The upper part of the geotextile is temporarily laid on the slope, fixed with stones or other objects. A perforated drainage pipe with a diameter of 10 cm is laid on a layer of gravel covered with geotextile to drain rainwater.
After laying the pipe along the entire perimeter of the trench behind the body, the walls are covered with a layer of gravel and wrapped in geotextiles. This protects the drainage pipe holes from becoming clogged with soil, therefore, you do not have to constantly monitor the condition of the drainage and clean clogged pipes.
Step 8. Laying the third row . Carry out in the same way as the second row, making sure that the necessary overlap of the joints of the timber is ensured, and carefully treating the places of fresh cuts.
Step 9. Installation of T-shaped anchors . Such anchors are needed to ensure that the wall does not bend or tilt under the weight of the earth from the hill. For anchors you need to dig grooves in the slope. If the wall is made on level ground to artificially create a relief, then the anchors are laid directly on the ground. The anchor is knocked down from scraps of timber. Its length is usually about one and a half meters, and the short side is half a meter. Two holes are drilled along the short side for the reinforcement, in the same way as was done for the outer beams of the first row. The two parts of the beam are fastened together with self-tapping screws.
After the narrow end of the anchor is perfectly aligned with the third row of the wall, it is fastened to the lower level with two self-tapping screws. Then fix the anchor on the ground with two reinforcing bars.
Step 10. Laying subsequent rows of beams. Using the technology already described, the construction of the upper tiers of the wall is carried out. After reaching the desired height, soil is backfilled over the drainage layer between the wall and the hill, as well as trenches with anchors are backfilled. The soil is slightly compacted.
Step 12. Decorating the retaining wall . Upon completion of construction, the area in front of the supporting wall is usually covered with mulch from tree bark with a layer of 5-10 cm. The wall must stand for some time (several weeks) before plants are planted. Rain and sun will test the wall's strength, and the soil will settle. Plants are planted only when there is no doubt that nothing will have to be redone.
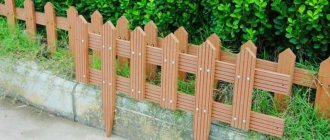
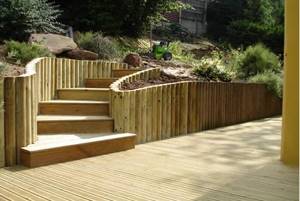
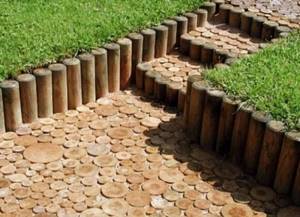
How to make a retaining wall from vertical beams
Retaining walls made from short vertical logs or scrap lumber are easy to construct and inexpensive. True, more time is spent on them.
Step 1. Preparing logs or beams . For the wall, even parts of the log are selected, the diameter of the trunks is usually up to 20 cm. Their size depends on the design of the retaining wall, but it is important to remember that the logs or beams must be buried in the soil by about half their length. There are two construction options:
- all the logs are buried halfway deep, the wall is reliable and strong, it looks like a dense row of posts driven into the ground;
- only some logs are deeply buried and reinforced (holding the entire wall), the rest end at the level of the gravel cushion (the design is like a wooden fence on “posts”); This option is only suitable for a low decorative wall.
The lower part of the beam or log (the one that will be driven into the ground) is treated to prevent rotting - you can use either special impregnations, machine oil, or heated bitumen.
Step 2. Marking the area . This is done, as in the first version of horizontal laying, using a long cord and stakes. The cord indicates the height of the retaining wall along the entire perimeter. When the beams are oriented vertically, it is often not necessary to strictly maintain the horizontal. Columns of different heights sometimes look more picturesque.
Step 3. Preparing the trench . Along the entire perimeter of the retaining wall, a trench is dug 15-20 cm deeper than the planned height of the entire wall. If the wall is supported by supporting logs, then deeper holes are dug under them in the right places. The soil is compacted.
Step 4. Add gravel . A layer of gravel, crushed stone, and pebbles (about 25 cm) is poured into the trench. Then the bedding is leveled and compacted.
Step 5. Installing the end beam . The outer beam is driven into the ground strictly vertically, the height of the future wall is controlled. It is reinforced with large pebbles, fragments of brick, and stones.
Step 6. Installation of the next bars or “columns” . Each new beam is driven into the soil next to the previous one or at strictly calculated intervals (if these free spaces are filled with short cuttings). The correct installation is checked vertically and along the height of the wall itself. Step 6. Fastening the wall using horizontal strips . Horizontal strips are fastened with self-tapping screws at the bottom of the wall. Their thickness is selected depending on the required strength of the retaining wall (usually 25-60mm). Sometimes, for reliability, 2 rows of such planks are made. If the wall has a complex configuration, then the slats are short. The slats give the structure rigidity. As a rule, they are installed on the side that will be covered with soil.
Step 7. Filling the gaps with short pieces of timber (performed only for the second version of the wall). The short parts are aligned in height and fastened with self-tapping screws to the horizontal strips.
Step 8. Drainage device. This is done in the same way as when laying timber horizontally.
Step 9. Installation of T-shaped anchors . This is rarely done, only if the wall must withstand heavy loads. The anchors are attached to horizontal strips, which in this case must be of sufficient thickness and strength.
Retaining wall design
Retaining walls can be functional (main, for strengthening and terracing) and decorative.
The main characteristics of a functional retaining wall are stability and strength. They depend on the height and width, shape, choice of material, preparation of the base and protection of the structure.
The height depends on the size of the beds and terraces being laid, and ranges from 0.3 to 2 m. The width is determined by the strength of the soil. The looser the base, the larger it is. On sandy, moist soils the width can reach up to half the height of the wall. To increase stability, the base is made larger than the top or the wall is tilted. The zigzag shape also contributes to this.
The strength of the material also affects the width. For reinforced concrete structures it is optimal. They are often used as a base and lined with suitable decorative material.
To install retaining walls more than 30 cm high, a foundation is required. Lower ones are made on a bed of sand and gravel.
The depth corresponds to 1/3 of the height of the structures or the depth of soil freezing.
When constructing a functional retaining wall, it is necessary to provide drainage and waterproofing, since in winter the water accumulated under it can tear the structure. For drainage, grooves are dug or drainage pipes are inserted at the base, and crushed stone is poured in front. The back surface is covered with protective compounds.
For decorative retaining walls, a foundation and drainage system are most often not needed.