Types of children's sandboxes
A children's sandbox is a design for more than one season, so you need to choose an option that will be interesting to a child even at 2, 3 or 5 years old. The classic box has faded into the background; today children's sandboxes are handmade masterpieces. The child will be interested, especially if it is made in the form of a car or a ship. This play area develops not only fine motor skills, but also children’s imagination.
Children's modern sandboxes can be:
- open;
- closed;
- with canopy;
- wooden;
- from scrap materials.
Open ones are more suitable for shaded areas. They are installed in private homes where a small number of children play. In a common yard, it is better to give preference to closed options. They are much more practical.
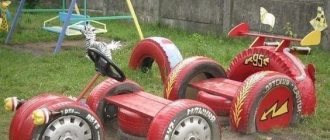
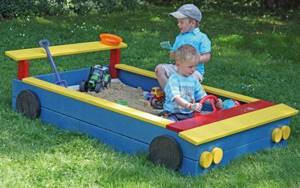
A children's sandbox reminiscent of a favorite truck will appeal to every boy. It is not difficult to build it with your own hands. It is worth considering that the design must have real wheels, which are made from old tires. Be sure to have a driver's cabin where the little naughty boy will have fun. It can be decorated with a steering wheel.
Advice! It is recommended to install a traffic light nearby so that the child, while playing, learns the rules of the road.

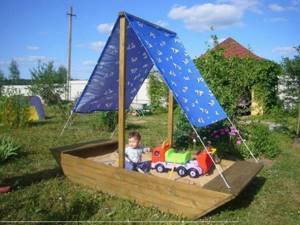
A children's sandbox in the shape of a ship will help decorate any interior in the country or at home. It looks especially good near the pool. It turns out to be a themed play area.
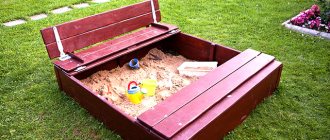
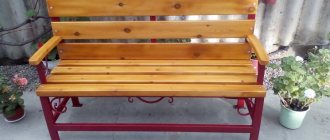
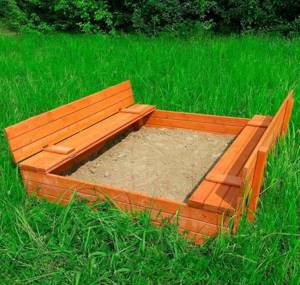
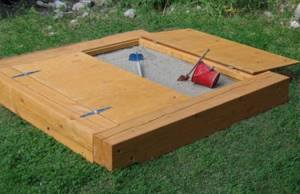
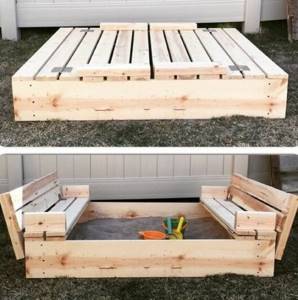
If you have very little time, and you need to make a children’s sandbox urgently, then you should consider simpler options that are easy to make with your own hands. A transformable design is suitable for a common yard. It is very convenient; it closes at night to prevent the sand from getting dirty or wet when it rains. The lid of the children's sandbox is designed so that when opened it creates benches.
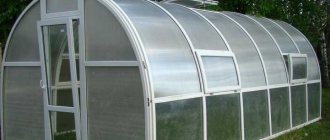
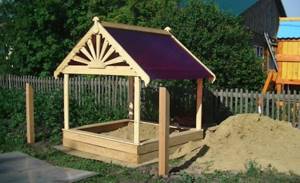
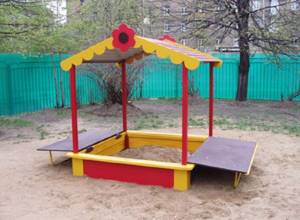
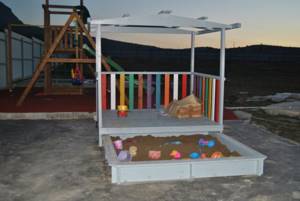
In open sunny areas, children's sandboxes with a roof should be installed. The canopy will create the desired shade. Children can play at any time of the day. The sand won't get very hot.
Types of children's sandboxes for the garden
There are simply a huge number of ideas for creating children's equipment of this type. At the same time, sandboxes can differ not only in shape and size, but also in the type of material used, as well as design.
If we talk about the material of manufacture, then such a design can be made of:
- wood;
- metal;
- plastic;
- scrap materials, such as rubber tires.
Wood is the most common material for creating such a structure, since, unlike metal and plastic, it does not heat up when exposed to sunlight.
The tree is also considered environmentally friendly. With proper treatment and subsequent care it can last a long time.
Metal, unlike wood, is a more durable material for creating this kind of structure. But still, today there are practically no completely made sandboxes made of metal, and all because this material is prone to rapid heating. Usually a combination of metal and wood is used.
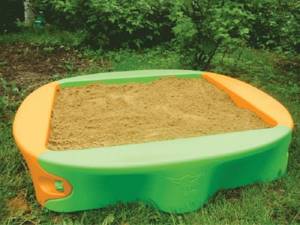
Plastic models are bright and very beautiful, but such a design is usually not performed independently. They can be purchased in finished form at a specialty store. They are produced in various shapes, but they are limited in size.
Important! Plastic is subject to rapid heating, and is also capable of fading and becoming brittle, so plastic sandboxes must be installed in the shade.
Often, materials such as rubber are used to make small children's sandboxes in the country. Typically, vehicle tires are used as a base.
According to their design, sandboxes are divided into:
- monolithic;
- collapsible;
- with bottom;
- with lid.
Monolithic sandboxes are a type of construction that involves installation without subsequent disassembly. For the dacha, the most practical are the collapsible models, which, if necessary, can be dismantled and put away for the winter.
The presence of a bottom and a lid is an addition that simplifies maintenance. These elements help keep the sand clean, preventing the ingress of soil, rain, debris, as well as unpleasant visits from animals.
As for the shape, there are no special restrictions, and also with the size. Sandboxes for a summer residence can be:
- round;
- square;
- rectangular;
- in the form of a flower, ship, car and other shapes.
How to choose a place for a children's sandbox
Having decided to build a sandbox for a child with your own hands, you need to prepare a project and choose a place for the structure. There are several nuances that you need to familiarize yourself with before starting construction:
- No drafts. The first step is to make sure that children can play in the sandbox at any time of the day. The place should be protected from cold winds and drafts.
- The presence of a lawn around the children's sandbox. This is a must, as children often like to play barefoot.
- The presence of trees on the playground, especially if the structure has no roof.
From this it is clear that it is better to install a children's sandbox on the south side of the site, where it will dry well after rain. Avoid damp and low areas where moisture accumulates. This is unsafe for the health of children playing. You should not build a structure near utility rooms; children should always remain in sight. However, there is no need to install it under old rotten trees.
Important! The place is chosen so that children are not exposed to the open sun and do not become hypothermic.
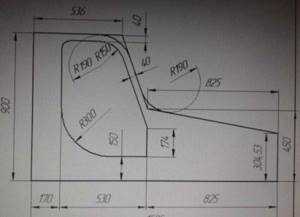
Drawings of children's sandboxes
To design your own children's sandbox, you need to know the dimensions. They are standard, but can be changed at your discretion. After this, prepare a drawing with your own hands or choose a ready-made one.
The size of the children's sandbox depends on the age of the kids and their number. The more guys play at the same time, the wider it becomes. The standard dimensions of the structure for children from 2 to 5 years are as follows:
- 160 x 160 x 25;
- 150 x 150 x 30;
- 120 x 120 x
For children from 2 to 3 years old, the height of the sandbox should not be more than 20-22 cm. Otherwise, they will not be able to cross it on their own. Older children under 5 years of age can easily overcome the higher side.

The depth of the box is made such that children cannot reach the ground. And the height so that when they get up, they don’t hit their heads on the canopy. This applies to children's sandboxes with a roof.
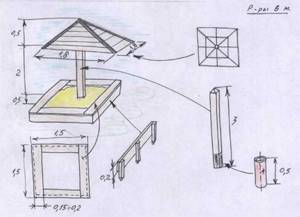
Drawings of children's sandboxes for the garden
Despite the fact that the design is quite simple, a detailed drawing will allow you to correctly calculate the amount and dimensions of the required material. To make a good sandbox at your dacha with your own hands, you can resort to the following photos and drawings.
How to make a sandbox with your own hands
You can make a beautiful children's sandbox with your own hands from almost any material. The most popular are timber and boards, as they are easy to obtain, they are environmentally friendly, and it is easy to build with your own hands from wood. But you can consider other options that are no less attractive.
How to make a sandbox out of wood
To make a wooden children's sandbox with your own hands, you will need an edged board or OSB boards. Their quantity is calculated according to the product diagram and photo. It is better not to use chipboard for these purposes, as it absorbs a lot of moisture and then crumbles.
Cabin parts that will need to be fastened together are cut out of solid OSB sheets. It is better to cut with a jigsaw to maintain accuracy. All dimensions are transferred from the drawing.
The most convenient way to make a car body is to make it yourself from a board. It is better to choose pine, it is easy to process. However, before construction, the board must be coated with antiseptic compounds so that it does not turn black later. The thickness of the board is about 2.5-3 cm.
It is better to make the wheels of a children's sandbox car from old tires. They need to be dug halfway close to the structure. You can take wheels from an old car to make it more interesting for your child to play.
After the entire children's sandbox is assembled, it needs to be painted in bright colors. Then it was time to install small parts: steering wheel, driver's bench, headlights, etc.
How to build a metal sandbox with your own hands
Today, metal sandboxes are almost never made with your own hands. Good raw materials are expensive, and step-by-step instructions are very difficult to find. In addition, metal quickly gains temperature in the sun and can cause burns. And the service life of such a structure is short, since metal products are subject to corrosion. It’s worth thinking before you decide to build such a children’s structure with your own hands.

How to make a children's sandbox from tires
Children's sandboxes made from old tires are much more practical. They are easy to build with your own hands and don't require many tools. And such a product will last for many years. Tires do not rot or deteriorate in snow and rain. And the risk of injury when playing in sand is minimized, since the rubber is quite soft.
To make it yourself you will need small or large tires. The latter make the task easier, since you can simply get by with one wheel. It is dug in, painted and filled with sand. Separate fragments are assembled from small tires, which are then combined into a whole structure.
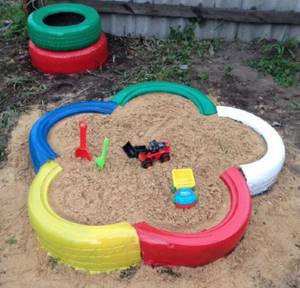
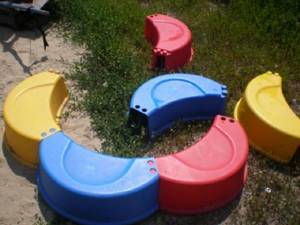
It is very easy to make a children's sandbox in the shape of a flower. You will need several old tires from a passenger car:
- Cut the tires into 2 equal parts. It is good to clean the cut areas so that children do not get hurt.
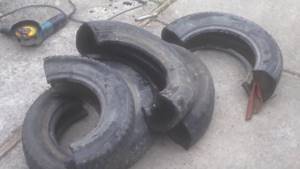
- Assemble a flower-shaped structure from individual parts. Lay out the tires according to the planned pattern. Cover the bottom with suitable material and then fill it with sand.
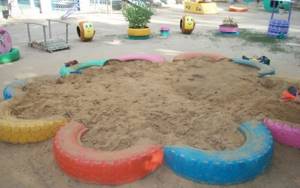
This option is suitable when you need to quickly create a large play area, but there are not enough funds. After installation, the tires are painted in the desired colors.
If your imagination and skills allow, you can make colorful figures from tires with your own hands that will decorate a children's sandbox.
Warning! For a children's sandbox, you need to choose slightly worn tires, without fuel oil or oil.
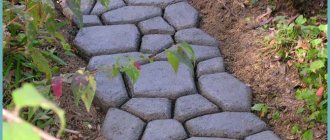
How to make a sandbox for a child from bricks or concrete blocks
A brick sandbox will last a long time; you can make it yourself by looking at step-by-step photographs and instructions. However, it is worth considering that a board will be required for finishing, since the brick is sharp and the child may be injured during play.
How to do:
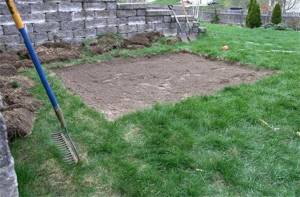
- Dig a hole in a previously prepared place - no more than 60 cm.
- Lay a brick around the perimeter, put cement and a second layer of brick on it. Lay out the sides to the desired level.
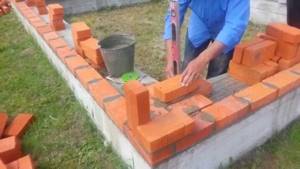
- Allow the masonry to dry thoroughly, then apply sealant. This is necessary so that the sides do not crack.
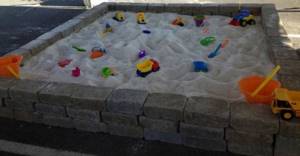
After a week, sand can be poured into such a sandbox. Using the same principle, they build a play area from a concrete block with their own hands.
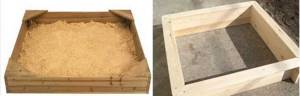
Before pouring sand, the bottom must be covered with non-woven material; it allows moisture to pass through well, but does not allow weeds to germinate. And the sand will not mix with the ground during the game.
DIY sandbox: step-by-step photo reports
No matter how simple the design may seem, when it comes to implementation, questions arise. To make there fewer of them, we are publishing several models of homemade sandboxes with step-by-step photos depicting the main components.
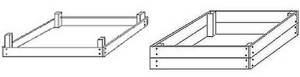
Simple design
The simplest thing you can do is knock down a rectangle or square from the boards. For a sandbox, the normal side of a square is 1.7 m. So you will need 4 or 8, 12 boards of this length. Make the sizes larger or smaller - the choice is yours. The number of rows of boards depends on their width and how tall you want it to be.
Simple sandbox box
If, as described earlier, you dug a pit 25 cm deep, then poured in 5 cm of sand, you get a 20 cm deepening. If you want the sides to protrude 10 cm from the ground (for 2-year-old children this is convenient, for older ones it can be from 20 cm and above), the total height is 30 cm. If the board is 10 cm wide, you will need 3 tiers (boards, respectively 3 rows * 4 pcs = 12 pcs).
You will also need a block with a cross section of 40*40 mm. It will need to be cut into pieces equal to the height of the sides of the sandbox. In our case it is 30 cm. You will need 4 pieces. The total length of the required timber is 1.2 m. All lumber is sanded well, then impregnated with protective impregnations, otherwise the wood will quickly lose its appearance.
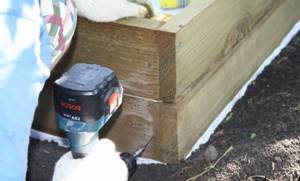
We take two boards and fold them at an angle of 90°. We place a block at the joint, nail both boards or screw in self-tapping screws - two for each fastening. We attach the next board to one of the ends, place the block and repeat the operation. This is how we assemble the first row. It will look like in the photo on the left.
Sandbox assembly procedure
The second and third rows are assembled in a similar way. For each connection we place two hardware (nails or self-tapping screws). Just make sure that the heads do not protrude and the points do not stick out.
We twist the boards
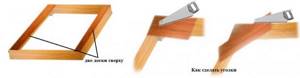
After the required height has been collected, we can consider that the sandbox is made with our own hands. But, as always, now I want to add something to make it more convenient for the children. They usually like to make Easter cakes, and they need a platform for them. You can nail small triangles made of plywood or also assembled from cut boards in the corners. Another option is to nail two longitudinal boards. They fit perfectly on the bars in the corners. We hammer nails into them.
Adding comfort
Continuing the theme of “improving” sandboxes. Carrying toys home that are stained with sand every time is not very pleasant. The problem can be solved simply: fence off the part for toys. Convenient for both you and the child. An additional wall is installed, which is also attached to the existing ones using bars.
Separate the compartment for toys - put an additional wall
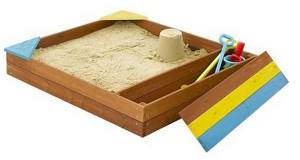
And so that there is no temptation to pour sand there, you can come up with a lid. You can sit on it, or you can build Easter cakes.
A couple of boards, a little imagination and an ordinary box turns into a car. The boys will definitely like this one.
Sandbox machine

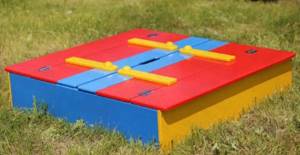
Transformable sandbox with folding lid
Construction begins in exactly the same way as described earlier: a box of boards is assembled. The trick is in the design of the lid. You will also need boards for the lid and hinges - four regular door ones and four with one long shelf.
In our example, there were 6 boards on each side of the lid. They were attached in pairs. First, two boards were nailed to the finished box on one side and the other.
We nail two boards each
A short shelf of a loop, similar to a barn one, was screwed to them. Two boards were also attached to the long shelf. It is important that the second one is attached at least half the width, otherwise it can be twisted.
We fasten the hinges with long shelves

We screw the following board onto regular door hinges. The shelves are on the other side. Then it turns out that the second part of the lid tilts in the other direction. The second board is attached to the fixed one using an auxiliary block. It is stuffed on both sides at a distance of about 15 cm from the edge.
How to attach the last part of the lid
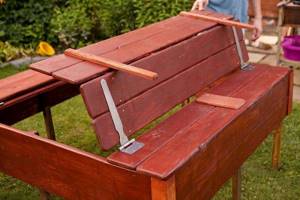
To prevent the folded lid from pressing on the hinges, an additional piece of board is stuffed onto the first two boards. It serves as a support; when loaded, the board does not bend.
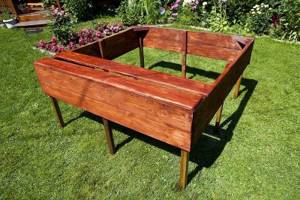
When folded down, the sandbox looks like this
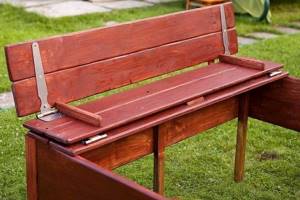
Based on operating experience, we can say that children almost never play under the seats: it’s uncomfortable. To use this area more efficiently, it can be fenced off as a compartment for toys. Another advantage of this solution is that less sand will be required.
When folded down, the sandbox looks like this
Based on operating experience, we can say that children almost never play under the seats: it’s uncomfortable. To use this area more efficiently, it can be fenced off as a compartment for toys. Another advantage of this solution is that less sand will be required.
This is how the lids close
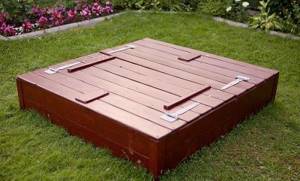
In this example, the docks are painted with an impregnation, which at the same time gives color to the wood. If desired, you can use regular opaque paint. Only take it for wood, for outdoor use. Otherwise, after a couple of rains, it will bubble or crack. Using paint, you can paint the sandbox in more “girlish” colors, although the impregnations can also be of different colors, but they just give a tint.
The same model in a different color
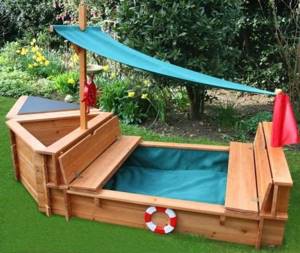
Sandbox-boat
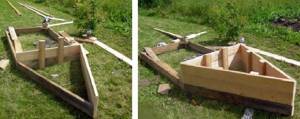
For boys you can make a sandbox-boat or ship. The main “body” is built as usual, all other superstructures are attached to it.
In this version, it was decided to make the sandbox low. A triangle was attached to the downed hull - the bow of the future ship. It is significantly higher than the main part. To ensure that the boards hold tightly, two boards are driven into the ground 60 cm deep on each side. The boards were nailed to them. In the corners they are also fastened, but only to each other - with nails (they were hit diagonally).
How to make a sandbox ship
Since the height difference turned out to be significant, a staircase was made from the “deck” to the bow. The top is covered with boards and the masts are reinforced.
Almost done
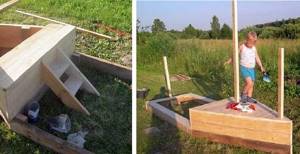
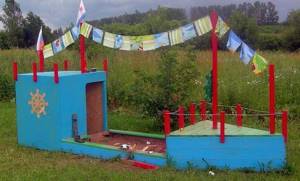
All that remains is finishing work and equipment. After some time, it was decided to build an extension at the stern - a place to hide from the sun, and put a toy box there. They installed poles made of timber and covered them with plywood cut to size. In the final version the ship looked like this.
Homemade sandbox-boat
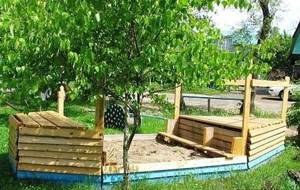
Another boat was built using approximately the same technology.
Another sandbox option for boys
How to choose sand for a children's sandbox
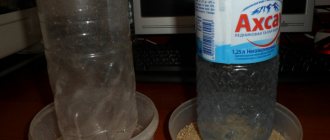
Sand for playing must meet all necessary requirements. It should mold well and keep its shape, which is the most important thing for children. It is better to choose purified material of a large fraction. Fine sand crumbles, can clog your eyes, and quickly becomes dirty.
You should also not choose quartz sand and red sand extracted from ravines. It quickly gathers dust and many microbes develop in it due to the high clay content. Quartz sand is too coarse, it scratches delicate baby skin.
The best choice for a children's sandbox is yellow river sand. It contains a small percentage of clay. It does not injure the skin, holds its shape well, and harmful bacteria do not multiply in it.
How to design a children's sandbox
Before building a children's sandbox, you definitely need to think about the design of the structure. Children get tired of monotonous games in the sand, they begin to come up with something new. That is why the play area is not limited to just the sandbox. You can add a slide, benches, swings or a small children's pool to it.
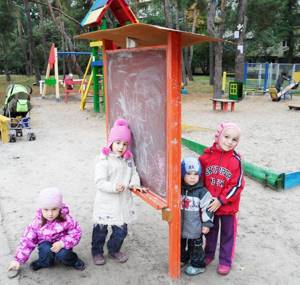
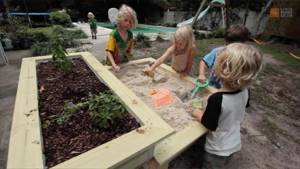
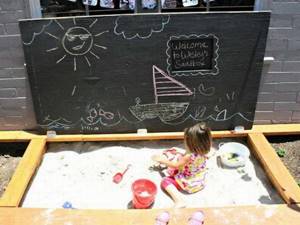
For older children, a large chalk board is installed nearby. You can give simple tasks for kids, drawing figures that they must sculpt from sand. This is good for training fine motor skills.
A children's sandbox car can be decorated with a real steering wheel and headlights. Be sure to install different light bulbs and flashing lights in the cabin; old toys will do.
DIY sandbox photo ideas
Children's sandboxes in the form of ships and cars will appeal more to boys. They are easy to make from a picture in one evening. For a classic box, an edged board is suitable. Next, a triangular structure is attached to it, imitating the bow of a ship. Then the mast is installed and the sails are tensioned. They can be very diverse.
The simplest children's sandboxes for boys can be designed in the form of a racing car or truck.
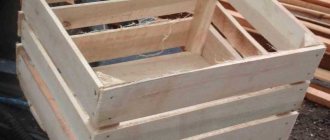
During construction, all available materials are used. If there is construction going on on the site, then you can make a cozy small structure for children from empty pallets. It will harmonize well with garden furniture in the same style.
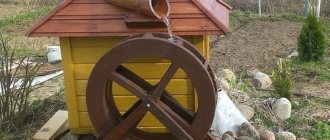
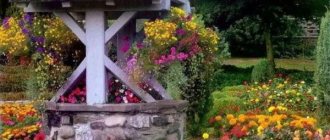
For girls, a children's play area with a flowerbed where you can grow your favorite flowers is suitable. It will fit well into garden design.
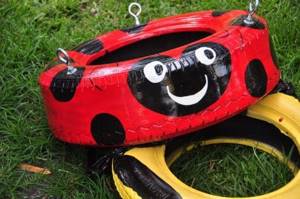
The ladybug sandbox is suitable for kids of any age. The circle can be made from plastic or tires with your own hands. In addition, make a cover out of wood that will cover the sand from dust and dirt. All that remains is to paint the finished children's design red and draw black spots.
If there is not much space on the site, you can make a standard children's sandbox with a lid. The reverse side is designed in the form of a drawing board. This option is suitable for children under 5 years old. After playing with sand, you can start drawing.
A transformable sandbox in the form of a gazebo is a good option. The sand box is made movable; it is hidden under the floor of the gazebo. If necessary, it can be taken out or hidden.
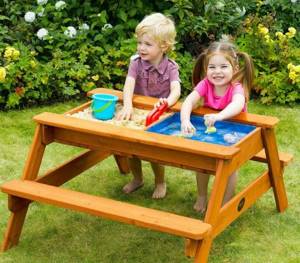
A children's sandbox in the form of a play table with benches looks very interesting. This option is more suitable for older children.
Sandbox with lid: design features
When starting construction, think through the main details in advance, starting with size. The sandbox should be deep and roomy enough so that a one-and-a-half-year-old baby can climb into it without any problems, but so that even a five-year-old child doesn’t feel cramped there. For this purpose, dimensions of 1.5 m x 1.5 m are suitable: such a sandbox will not take up much space and can comfortably accommodate 3-4 children.
Calculate the height of the structure so that the sand layer is at least 15 cm. Do not forget to leave space on top for sitting. With a board width of 12 cm, you can build a sandbox using two boards, that is, 24 cm high. This is quite enough for the child to not only sculpt Easter cakes on his “construction site”, but also build a sand castle.
But does the sandbox need a lid? For those who love order and care about the health of children, the answer is obvious.
The cover protects the sand:
- from being scattered throughout the territory;
- from excessive getting wet during rain;
- from debris, branches, rotten fruits;
- from the encroachments of dogs and cats, arrange a toilet there.
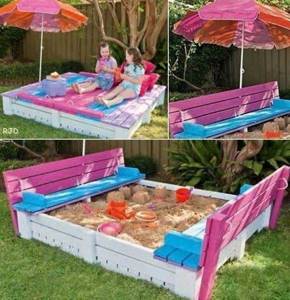
The lid will protect the sand from contamination and become a convenient bench
The simplest cover is a shield made from boards, which is used to cover the sandbox after the game. It is the easiest to make, but such a cover is very heavy and bulky, it takes up additional space on the site during the day, and it is quite difficult to move it from place to place. Therefore, we suggest choosing a transforming lid: its construction will take more time, but the result will be justified. Build a lid that, when opened, turns into a table and/or a comfortable bench with a back: not only will the child like them, but they will also entice adults to join him.
Design of a transforming sandbox (photo gallery)
Sandbox with a lid-bench Sandbox with a retractable lid-table Sandbox with doors Sandbox with a colored bench Colored sandbox with convenient handles for pulling out