What is tandoor used for?
A vertical tandoor is perfect for cooking in the country. In such a stove you can fry shish kebab, cook samsa or belyashi, even bake bread.
It is believed that a tandoor with a horizontal position is less functional and is only suitable for baking bread. Portable tandoors can also be used for heating premises.
The sun in the tandoor: how the national oven is made
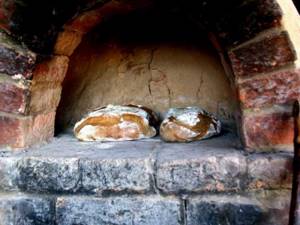
If you want to truly feel the atmosphere of the East, we recommend trying delicious national flatbreads, fresh from the hot tandoor. We learned about how the national stove is made when we visited the Kanibadam master Isroiljon Yusupov.
A large clay vessel-shaped oven called a tandoor is one of the types of national ovens. Once you taste the ruddy, aromatic, steaming flatbreads cooked in it, you will know what their taste should be like.
18:44 November 3, 2017
Beauty is overhead. Master of national painting
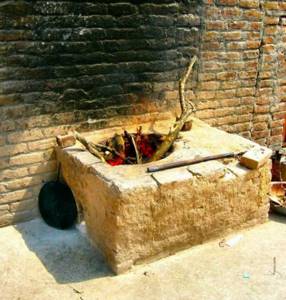
The tandoor is an ancient invention; bread is baked in it in the countries of Central Asia and Transcaucasia. In Tajikistan, in every yard you can see a tandoor attached to the wall or its mouth sticking out of the ground. It is believed that any housewife should be able to bake flat cakes well, as her mother and grandmother did.
In order to find out how tandoors are made, we went to Kanibadam, where there is a street of potters. There, as we were told, the most skilled craftsmen in the manufacture of national stoves live. Isroiljon Yusupov is one of them, he continues the tradition of his ancestors in the fourth generation. We visited there in the summer, since it is at this time of year that this type of ancient craft is practiced.
Secrets of mastery
There are several ways to build a tandoor: they are dug into the ground or made above ground. In the north of Tajikistan, ground-based tandoors are mainly used; they are mainly installed near the wall. At the same time, craftsmen use several techniques for constructing a tandoor. In Kanibadam, the so-called tape method is still used. The clay from which the tandoor is built must certainly withstand high temperatures and have good plasticity. Dry clay is scattered in the form of a large cake with sides around the perimeter, then filled with water for a day.
The tandoor oven is one of the most ancient hearths that humanity has invented. The geography of tandoors is Central Asia, Iran, Afghanistan, Pakistan, India, the Caucasus, etc.
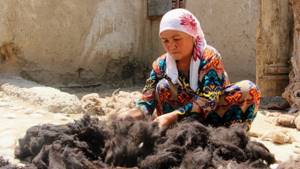
Before molding, a mountain plant called gulbutta and lamb's wool are added to it for strength and stickiness. Then the clay is compacted with ketmen, kneaded with feet and the finished “dough” is covered with blankets and left to “rest” for a while. Everything happens like with baking dough, only in large volumes, and men do this work, since strength is needed to knead the clay.
18:23 October 27, 2017
How to hand weave a carpet in 4 days? Master class from Matparin craftswomen
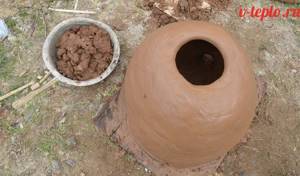
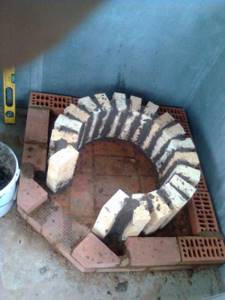
Master Isroiljon places clay on a smooth surface, where the tandoor is formed. He divides the clay into several pieces and rolls out rolls to about 10 cm thick and a certain size. The four of him and his assistants install the largest roller vertically, and from this roller they form a circle. The potters place the next smaller roller on the first tier and pinch the edges to create a cylindrical shape.
Both tiers are pinched and sanded to create a smooth and uniform surface.
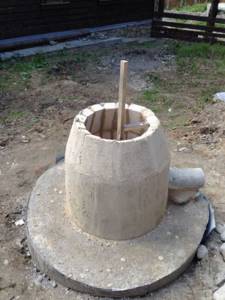
Usto Isroiljon and his student take two tools in their hands - a rubber circle called gundak, and a ribbed mallet - tovoncha - and manually polish the walls of the future tandoor: from the inside - with a gundak, and from the outside - with a mallet. The sounds of clapping are heard evenly every second, and, according to the master, this is correct. But the work is not finished yet. The third and smallest part of the prepared clay, from which a roller is also rolled out, is for the neck of the tandoor, covered with a rag and left overnight.
The next morning, the rolled out roller is lifted from the ground and placed on two finished tiers, securing something like a small neck around the cylindrical tandoor. Some masters, as Usto Isroiljon says, decorate this neck in their own style - some with carvings, others with flowers.
If the hostess is happy, the master is happy too
20:01 October 20, 2017
Feeling the rhythm: Who makes musical instruments in Tajikistan and how
By the way, about the height of the stove. “The height depends on the tiers of the laid out tandoor,” explains Isroiljon Yusupov. — A low stove can be 70-80 centimeters high, and a high one can be more than a meter. We usually make low ones for use in everyday life, so that it is convenient for housewives, and they order tall ones for us for sambus and flatbread shops.”
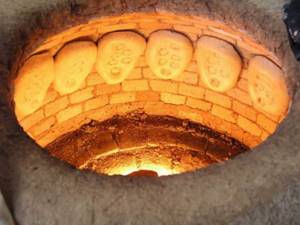
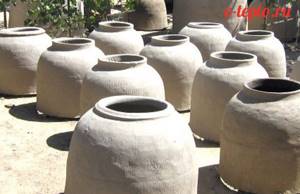
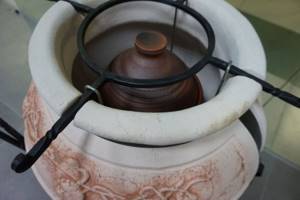
As we have already noted, tandoors are made in the hot season to completely dry it in the sun. If you look at tandoors from above, you get the impression that these are solar circles-vessels. The tandoor must dry for at least 14-15 days, otherwise it will tear when first ignited.
In the courtyard, on structures constructed from bricks and sticks, the craftsman has 10-12 finished products waiting for their customers. One of these tandoors was purchased by a local resident, Bobokhon. He was pleased with the purchase. The master is also happy. He sells his tandoors for 80-100 somoni. But after looking at how much effort and time Usto spends on making one stove, we thought that he underestimated his work.
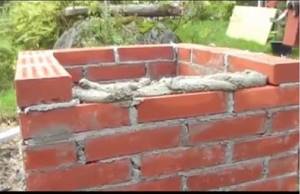
But it turns out that the functional responsibilities of Isroiljon did not end there. After making the tandoor, the master, at the request of the client, must install it in the place intended for him. Usto placed the stove on a stand, additionally covering it with clay bricks and compacting them with raw clay, after which he allowed the tandoor to dry again.
19:02 October 13, 2017
Pottery master
At the last stage, firewood is placed in the tandoor and heated for 20 hours, that is, almost a day. Master Isroildzhon came the next morning to check how the stove heated up and whether the walls were cracked. Because if the fire is too strong, then the tandoor from a very high heating temperature, according to usto, can explode and fly into pieces, and if there is not enough fire, then the oven will remain damp and baking bread will be problematic.
The owner of the house, after installing a new tandoor, baked thin fatyrs - puff pastries - in it and was satisfied. They turned out crispy and golden brown. The master is also pleased: it means that his work was done with high quality and the tandoor will last for many, many years. According to users, at least 12-15 years.
You can watch other stories on our new project “Crafts of Tajikistan” here
Benefits of tandoor
This type of stove originated and is traditionally used in regions lacking wood. Therefore, it is distinguished by such qualities as:
- efficiency. Tandoor requires relatively little firewood;
- good heat capacity;
- relative compactness.
What to make a tandoor from
A master who decides to install the right tandoor will need:
- fire brick;
- clay;
- sand, cement and reinforcement for making the foundation.
Drawings of tandoors can be easily downloaded on the Internet. But a master who has a certain skill in bricklaying can sketch a drawing on his own, knowing the basic rules for constructing such stoves.
Step-by-step instruction
The process of building a tandoor in the ground includes the following:
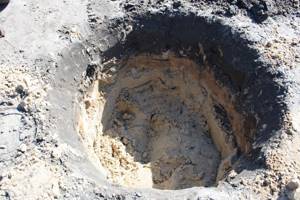
- Choose a suitable place, dig a small depression and fill it 10 cm with fine sand, and then tamp it down - this will help maintain heat in the oven.
- Make a foundation: to do this, install a steel grate on top of the sand layer and fill it with concrete mortar. Level the surface and check with a building level. When the base has completely hardened (after 7–8 days), proceed to the main work.
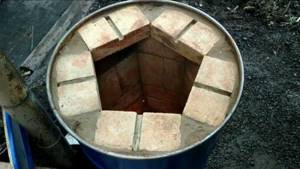
- Draw a circle on the surface of the foundation. It should be lined with fireclay bricks and the inside of the oven should be filled. When creating the first row of bricks, leave a small space for air circulation. Place the end of an asbestos-cement pipe in it with a slope of 45 degrees.
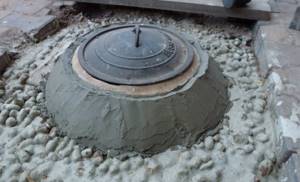
- Make a cover for the pipe in the tandoor to block the air when burning. The second end should protrude above the ground.
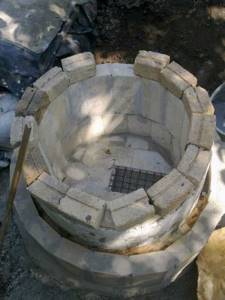
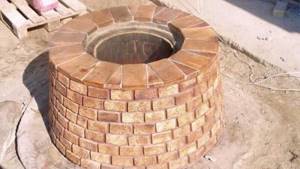
- Place the second brick row in a circle, but with a half shift, without gaps. Install the grates and return to laying bricks using the “vertical” method. On the eighth row, the bricks need to be moved 0.5 cm inward - this will narrow the tandoor and create a dome shape. The hearth hole should have a diameter of 50 cm (provided that the base is 1 meter).
- When everything is dry, coat the joints with kaolin. Moisten the bricks during the process to prevent them from absorbing moisture from the mortar. The second layer should be made of clay mortar and straw.
- At the end, a final treatment with a cement-clay mixture is required.
- Fill the gaps between the walls and bricks with clay, sand or salt - these materials accumulate heat.
- When everything is completely dry, the oven should be hardened. To do this, fill it ½ full with dried hay or brushwood, then set it on fire. When the walls have cooled, lay the bricks vertically from the front side.
- Install a sheet of iron with a handle on the finished stove, which will act as a lid to retain heat as much as possible.
If all conditions and recommendations are met, making an earthen tandoor will not create difficulties even for those who do not have special skills in construction. A homemade oven will last for many years and will give the family warmth and joy from delicious dishes.
How to make a base for a tandoor
A master deciding how to make a proper tandoor must take into account that this oven has a fairly large mass, so a foundation for it must be made.
We recommend reading:

Do-it-yourself furniture from pallets - detailed instructions, as well as an overview of the best ideas for creating unusual and original furniture for the garden (120 photos)
Garden gnomes: TOP-150 photos of exclusive options for a summer cottage. Instructions on how to select and place decorative gnomes on your site
- Figurines for the garden: TOP-200 photos of the best ideas. Choosing a place, instructions on how to do it yourself, video. Only original options from the gardener!
To make it you need:
- dig a pit. Its depth should be 40-60 centimeters, and its diameter should exceed the diameter of the oven by at least 20 centimeters;
- It is advisable to cover the bottom of the pit with geotextiles, then cover it with a layer of crushed stone and sand. The thickness of the crushed stone layer should be approximately 10-15 centimeters. Waterproofing material can be laid on top of the sand layer;
- install fittings;
- make concrete mortar and pour it.
Depending on the owner’s preferences, the foundation of the stove can be made slightly recessed or slightly raised above the ground.
Option #1. Traditional clay tandoor
According to the ancient technology mentioned earlier, a true tandoor should be sculpted, not built. Moreover, kaolin clay (ideally of Akhangar origin), which has excellent thermal insulation qualities, should be used for this. To prevent the furnace body from cracking under the influence of high temperatures, sheep or camel wool is added to the clay. Making an authentic tandoor is extremely difficult, since Asian craftsmen are not very clear about the exact composition of kaolin clay. Simply put, you will have to perform all manipulations “by eye”, constantly conducting experiments.
An approximate manufacturing technology for the classic version of the described furnace looks approximately as follows.
Step 1.
To make a tandoor with your own hands, you need to mix clay with wool (the length of the fibers of the latter should be about 1-1.5 cm). The result should be a fairly viscous mixture, reminiscent of sour cream in consistency.
Step 2.
Next, you need to wait 7 days for the resulting composition to dry and achieve the required condition. During all these days, the mixture should be stirred periodically so that drying occurs evenly. All water that accumulates on top must be removed immediately (it cannot be mixed into the composition).
Note! The lower the moisture concentration in the composition, the lower the risk that the oven will crack during drying or firing. When the preparation period is over, the consistency of the mixture should resemble dense plasticine, suitable for modeling.
Step 3.
From the resulting “plasticine” you need to mold long sheets of oblong shape with a thickness of at least 5 centimeters. From these plates, gradually moving in a circle, you need to build a tandoor.
Traditional dimensions look something like this:
- the neck should be 50-60 centimeters in diameter;
- before narrowing, the diameter should correspond to 100 centimeters;
- The recommended height of the structure is from 100 to 150 centimeters.
It is necessary to leave a hole in the bottom side of the case through which air will flow inside.
Step 4.
When the oven is ready, it is transferred to the shade and left for another 30 days to dry.
Step 5.
The walls need to be covered with fireclay bricks, and the adhesive composition in this case can be either kaolin clay itself or a special clay oven mixture that contains plasticizers and quartz sand. Sand or salt must be poured into the cavity between the resulting layers, periodically compacting while filling.
Step 6.
The inner surface is coated with cotton oil.
Step 7
After this, all that remains is to fire the finished kiln, that is, to bring the material to the state of ceramics. The temperature should increase gradually and not very quickly. The duration of firing can reach 24 hours, this is explained by the fact that if raw clay is subjected to sudden heating, it can crack.
Video – Traditional tandoor: technology and interesting facts
Laying out the first row
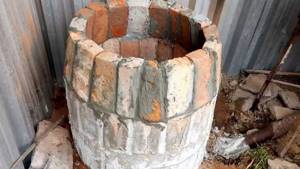
The body is made of refractory brick. Its first row is laid out something like this:
- “dry” place all the bricks vertically, using a pre-made template;
- check the evenness of the row;
- prepare a solution by mixing sand, water and clay, adding a tablespoon of salt to a bucket;
- To test the solution, flatten a piece of it into a ball and drop it from a height of about 30-40 centimeters. When dropped, it should be flattened and cracked, but not crumble;
- a brick is taken out of the row, dipped into water and kept there until the active release of bubbles stops. Then the brick is coated with a raster from the bottom and sides and placed back in a row according to the level.
The wall thickness should be “half a brick”.
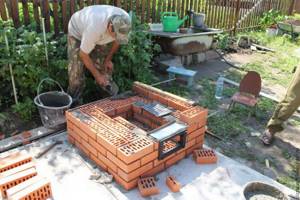
DIY technology for making a square tandoor
You can create a square tandoor with your own hands. But it is necessary to take into account the technology of its manufacture, otherwise the stove may turn out to be of poor quality.
There must be a hole at the bottom - an air vent. The clay base is covered with brick, leaving a small air gap, which is covered with salt or sand. Traditionally, the hole in the tandoor is made from the top, but it can also be located on the side.
It is also recommended to install a grill. It will be convenient to bake shashlik, fish or various vegetables on it.
If tandoor manufacturing technology is followed and high-quality materials are used, the stove will accumulate heat perfectly. It can be heated to a temperature of 400 degrees.
Construction of the taedir
Making a square tandoor in the ground
To independently make a square tandoor from brick underground, you need the following materials and tools:
- fire brick;
- sand and clay;
- metal grill;
- Bulgarian;
- cement;
- asbestos pipe;
- putty knife;
- shovel;
- masonry mesh;
- facing tiles.
To build a tandoor, fireclay heat-resistant bricks are used.
First, you need to decide on the size of the tandoor. If you plan to use it rarely and for a small family, it is enough that the length of the edge of the square is 40-50 cm. If dishes in the tandoor will be prepared for a large number of guests, then the length of one side should be within one meter.
It is also important to choose the right place to install the tandoor. It is advisable to place it so that the device does not interfere. A vegetable garden is suitable for this. It is not recommended to install the structure near the house. Sandy soil is best suited for tandoor - it will retain heat well.
When creating a square tandoor from brick with your own hands, you must follow the following sequence of actions:
- Dig a pit of the required size; if the soil is not sandy, add sand to the bottom so that the layer is 10 cm thick. Compact thoroughly. The depth of the pit should be 80-100 cm.
- On one side of the pit it is necessary to dig a trench into which the asbestos pipe will be installed. This is necessary for air venting.
- Pour the foundation. Place a metal grate of a suitable size on the sand bed and fill it with concrete mixture. Level thoroughly and, if necessary, check with a building level. Until the foundation completely hardens, it is better to postpone construction work. It is necessary to leave the tandoor for about a week - during this time the foundation will harden.
- Draw a square on the surface of the foundation. Lay it out with fireclay bricks. After this, you can begin filling the inside of the oven. When laying the first row of refractory bricks, it is necessary to leave space for the installation of asbestos pipe. It must be positioned at an angle of 45 degrees. One end of the pipe should be above the soil surface, the second - 5 cm above the brickwork. It is necessary to install a hatch on top, which will allow air to enter the tandoor when necessary.
- The second row of bricks must be laid with a half shift, due to which the oven will be more durable. Lay the grate bars, and then continue the vertical laying of refractory bricks.
- Starting from the eighth row, it is necessary to move the bricks 0.5 cm inward. This will allow you to get a dome-shaped tandoor.
- The finished oven must be left for several days until completely dry. After this, seal all seams with white refractory clay. It is recommended to pre-moisten brick walls with water, otherwise they will absorb liquid from the solution.
- When the first layer of clay has dried, you will need to apply the next one - a mixture of clay and straw. It will act as an insulating material.
- At the end you will need to make another cement-clay layer.
- Fill the voids between the brick and clay with salt or sand. It is better to use salt as it retains heat well.
The finished tandoor must be left for 3-4 days until it dries. After this, it will need to be hardened. Fill it with straw and set it on fire. Leave the tandoor until it cools completely.
Place an iron sheet on the finished tandoor. It should have a welded handle on top. The iron will be the lid of the tandoor, and thanks to it the heat will be better retained inside the oven.
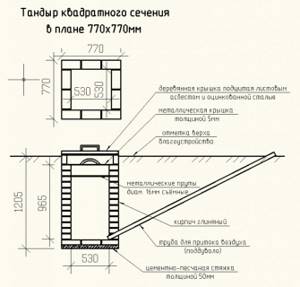
Drawing of a square tandoor in the ground
Making a ground tandoor
When making a ground-based tandoor, the same materials and tools will be required. Only the process of creating it is slightly different:
- The foundation needs to be poured. It should be more reliable and durable, since the stove will be located in the open air and will be more exposed to environmental influences. When erecting a structure on clay soil, a reinforced foundation may be required so that the tandoor does not move. In this case, a columnar foundation may be required. When installing the stove on sandy soil, it is enough to pour a concrete monolithic slab. Since the area of the tandoor will be 100 by 100 cm, the thickness of the monolithic slab must be at least 10 cm to support such a structure. Under the foundation it is necessary to dig a pit 15 cm deep, in the corners it is necessary to make recesses necessary for reinforcement. Reinforcement with a diameter of 6 mm is used, which is filled with concrete. For the foundation, it is necessary to make concrete of the following composition: three parts sand, one part each gravel and cement. To prevent concrete from spreading, you can make wooden formwork. Be sure to lay a layer of sand on the bottom and water it, which will prevent the formation of caverns. Then the concrete mixture is poured and left for several days until it hardens completely.
- For the base you need to use fireclay bricks, since ordinary material may not withstand such a high load. Mix a special refractory mixture for fireclay bricks and apply it.
- Then you can begin assembling the walls. The bricks are laid out vertically. They must be laid out as closely as possible to each other and covered with cement mortar. All bricks must hold together well.
- The first three rows must be tied together with vertical wire. The ends of each wire should be twisted and hidden in the seams.
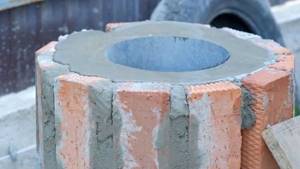
- The height of the tandoor depends on the size of the base. Usually it is about 1 m. After the tandoor is built, you can proceed to plastering it using a special oven mixture. The plaster layer must be at least 10 mm. When the plastering work is completed, the oven must be covered with plastic wrap and left until completely dry.
- Then cover the tandoor with fireproof paint. You can also use whitewash. If desired, the tandoor can be decorated with facing tiles.
The inside of the tandoor can be covered with white refractory clay. After each use of the oven, it will need to be cleaned from the inside of the oven.
Construction of the walls of a ground tandoor
Second row
The second row is laid out using the same technology. To increase the strength of the structure, the bricks of the second row should be placed in relation to the bricks with ligation and an offset of approximately half the width of the vertically standing brick. A blower is installed in the second row.
We recommend reading:
- A hedge on a property: TOP-best ideas on what to use to make a beautiful hedge on a plot. Photo, diagram, instructions, tips from the gardener
Do-it-yourself rock garden: step-by-step instructions on how to create a beautiful rock garden (145 photos and videos)
- DIY stone flowerbed - 140 photos of stylish and beautiful ideas on how to build a stone flowerbed
Third and subsequent rows
In the third row, the narrowing of the body begins. To do this, the bricks from below must be sawed at an angle according to a pre-selected template. If the bricks of the third row are sawn correctly, there will be no need to saw the bricks of the fourth row.
Since there are fewer bricks in the third and subsequent rows than in the first two, they must be mixed by about a third of the width of the vertically standing brick. After finishing the masonry, the oven must be dried until the mortar is completely dry.
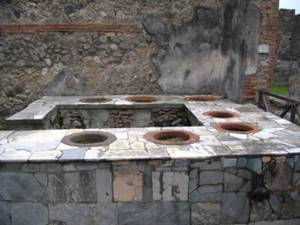
What is a horizontal tandoor?
The Central Asian stove, in which there is no top hole, is also very interesting. Its mouth is located on the side, which makes this design similar to a Russian or Pompeii stove. A tandoor of this design is traditionally made from clay mixed with straw or sheep's wool. It is convenient to warm up near such a fireplace in the winter cold; it is often installed under a roof, indoors. But building a brick tandoor is possible in this case too.
To create it you will need a circle, or a template made of plywood and boards. It will help you quickly build a tandoor with your own hands, ensure ease of laying the vault and provide support for the bricks until the mortar sets. A template is made in the form of 2 connected arches, the width of which is equal to their height. You can draw a circle of the required size, draw a horizontal diameter and drop 2 straight lines from the points of intersection of it with the circle. Transfer the resulting figure to plywood and cut out 2 identical parts.
Connect them with bars along the top edge. The length of the slats is equal to the desired depth of the oven. Cover the top edge with thin plywood, bending the sheet along the contour of the arch and attaching it to the bars.
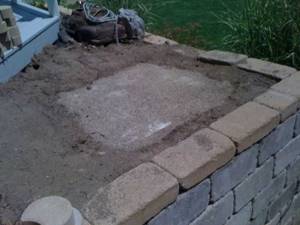
Prepare the oven base. Traditionally, it is built in the form of a table about 1 m high. For the base, you can use cinder block, brick, or natural stone. You can weld a structure from a steel corner and put a metal tabletop on top.
A layer of bricks with clay mortar is placed on the finished base, forming a furnace with a channel for blowing. On the next row you need to block the channel, leaving a hole in the center.
After this, place the circle on bars 3-5 cm thick and level it horizontally and vertically. For masonry, it is best to use wedge-shaped bricks, specially designed for making vaults and arches. If they are absent, cut off part of the ordinary masonry stone, giving it the desired shape.
Spoon uncut stone along 1 row to the left and right of the template, close to its plywood arch. Shifting the bricks to bandage the seams, raise both sides evenly to the beginning of the arch. After this, use only cut or wedge-shaped stones, gradually closing the arch in the middle. Leave a small hole for the chimney. Dry the masonry for 4-5 days.
Carefully knock the bars out from under the circle. At the same time, it will lower slightly, which will allow you to freely remove the template from the firebox. Place the grate.
Cover the open back of the arch with bricks. You can make a damper or decorative doors on the facade. Seal the chimney pipe and lead it outside if the stove is located indoors. A chimney is not necessary for an outdoor stove.
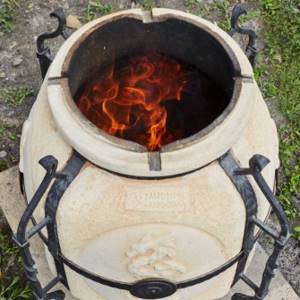
Burning
After the initial heating, the furnace must be fired from the inside. For firing, you need hardwood firewood, which when burned produces a lot of coals.
We recommend reading:
- Living fence at the dacha - 150 photos and videos of step-by-step instructions on how to create a tall and beautiful fence

The best flowers for the garden: 155 photos of simple and stylish solutions for creating flowers

Do-it-yourself landscaping - the best ideas for beautiful and functional site planning. Instructions, diagrams, photos, videos
The first batch of firewood is placed on about a quarter of the stove, set on fire and wait for coals to form. Then they add the next portion of firewood, gradually filling the stove 2/3 full.
After the flame disappears and the resulting embers begin to smolder. The oven is closed until it cools completely. Then they take out the coals and ash and sweep the walls of the tandoor. After this, you can cook food in the oven.
What is tandoor
A tandoor is an oven that is identical in function to all variants of this format, but it still has some features.

Various types of solid fuel are used as kindling material. To put it simply, a brick tandoor can be heated with firewood, coal, branches, etc.
The internal basis of the furnace is made of ceramics, that is, baked clay. The appearance of a brick or stone structure of this type resembles a jug, which is lined around it with finishing from the selected material.
The fuel is placed directly on the bottom of the tandoor and as the wood burns or the coals heat up, you can cook food in it.
In order to make it convenient to cook shish kebab in an oven of this type, a certain perch is installed on top. Using a hook, the skewer is placed on this bar, and the kebab hangs over the heat.

Other dishes are usually prepared directly on the walls of the tandoor, placing them after heating the inside. Most Asian cuisines prepare a lot of dishes using this invention.
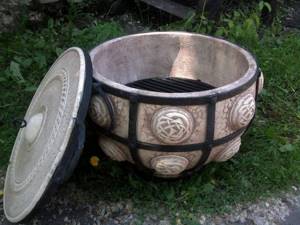
Photo of brick tandoor
Did you like the article?
1+