Barbecue place
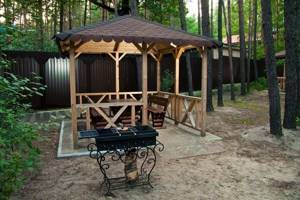
Where to place the grill? You can install it inside or outside the gazebo. Each location has its own advantages.
Outside
The good side:
- There is no need to solve the chimney problem;
- If you already have a gazebo, then installing a barbecue next to it is the simplest option that does not require risky alterations to the roof of the gazebo;
- You can choose a convenient place for a barbecue, focusing on the wind, the location of buildings, aesthetics and some other criteria.
Possibly bad sides:
- I'll have to walk more. It's not that fun, especially given the steps at the entrance to the gazebo;
- If it rains even a little, you can forget about comfort;
- The wind may change so that smoke will blow onto the gazebo.
Inside
The good side:
- Rain protection for all participants;
- Smoke won't bother you anymore;
- The shish kebab is fried right there, and your cook is not separated from the company;
- No running around.

Possible bad sides:
- Such a gazebo will be larger and more expensive;
- Fire safety requirements must be met;
- The hood or chimney must be good, otherwise the holiday will be ruined.
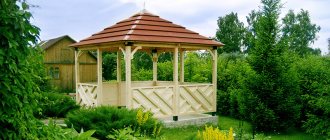
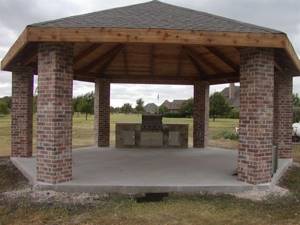
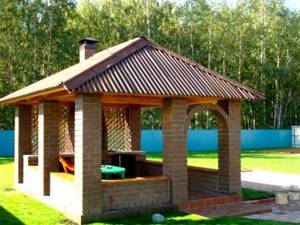
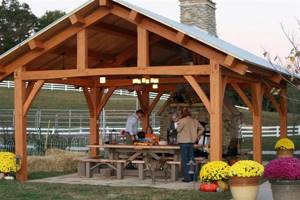
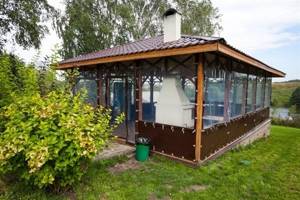
In an open gazebo
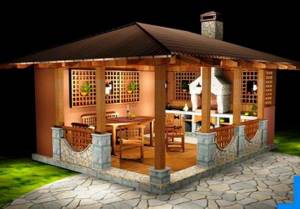
A gazebo open on several sides is the most common and cost-effective option. Does not require special design solutions:
- On a sufficient foundation, without violating the technology, build a brick grill, and just carefully place the metal one.
- Meet fire requirements.
- Install a hood or chimney. Small errors in the performance of the chimney will not be noticeable due to the design of the gazebo.
- Arrange the furniture comfortably.
That's the whole recipe.
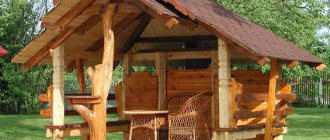
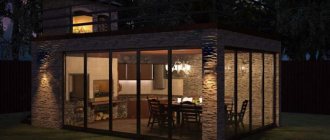
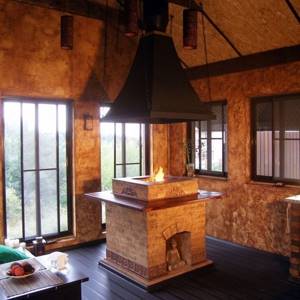
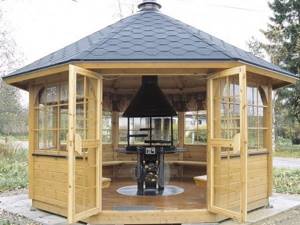
In a closed gazebo
A fully enclosed gazebo will protect you from bad weather, insects and keep you warm during the colder months. It really expands the season. Your fun inside will be less audible to your neighbors (and the inside of your home will be quieter too).
You can have barbecue days even in January.
But at the same time, a closed gazebo is more expensive, and the requirements for ventilation are stricter. And preparing for the off-season is more labor-intensive.

How to build a barbecue gazebo with your own hands
The simplest is a frame structure on a columnar foundation. You will need:
- Wooden beam with a section of 100x100 mm - 5 pcs. for the base of the gazebo, 50x100 mm for the walls and roof frame.
- Silicate brick - for making pillars.
- Cement-sand mortar.
- Nails, screws.
- Tools - wood hacksaw, screwdriver, shovel, axe.
Preparatory work
It is recommended to choose a place for the gazebo closer to the main house. In this case, you need to take into account the wind rose on the site so that smoke from the barbecue does not enter the room. It is also recommended to consider a location surrounded by trees or near a body of water.
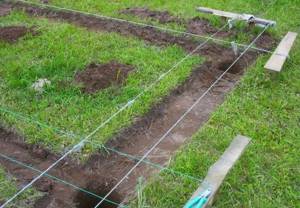
Marking the area for a columnar foundation must be careful
You need to decide in advance on the size of the building, and then make a drawing. Prepare all the necessary tools and materials in abundance.
The main stages of construction of a wooden lightweight gazebo
There are standard stages of work:
Marking out the site is an important process that requires you to spend a little more time on to ensure that the calculations are correct.
The construction of the foundation depends on the massiveness of the structure. For a wooden gazebo, even if it has a terrace, a columnar option is suitable. The strip base is used for buildings made of brick and metal.
Laying the floor of the gazebo - for such a construction, a layer of gravel is enough. If you choose a concrete surface, it is recommended to cover it with tiles
Pay attention to moisture drainage in an open structure, ensuring the necessary slope of the floor.
Walling. They can be deaf or lattice
The first ones are suitable even for winter gazebos. The walls are not load-bearing.
Roof installation. There are several options that are suitable for a barbecue gazebo: lattice, inclined single-pitched (with an angle of 5–10˚) or ridge. For the last two, polycarbonate, metal tiles or ondulin are used as a coating. The lattice option is interesting because climbing plants can be planted next to the structure. But remember that in rainy weather such a roof is useless.
Exterior finishing. It may be minimal. You can simply apply a protective impregnation to the wooden beam, and then varnish.
Video: building a large gazebo with a seating area
https://youtube.com/watch?v=y9Q46Qp5vz8
Built-in grill
This part of the gazebo can be made with your own hands or purchased ready-made. In the first case, you need to prepare the following materials:
- Stove heat-resistant brick for the construction of a chimney and the barbecue itself.
- An aerated concrete block, which is suitable for the construction of a lower stove base and a niche for firewood.
- Cast iron grate. This material is durable and also resistant to high temperatures.

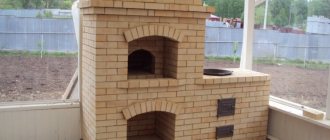
When building a barbecue made of bricks, you need to strictly follow the order
Detailed instructions for building a grill oven with your own hands
To make your own stove for a barbecue gazebo, you need to complete several stages of work:
- First you need to build a separate base of red brick for the stove and strengthen it with reinforcement. You can use cement-sand mortar of a grade not lower than M300. Waterproofing sheets must be placed on the frozen foundation.
- For construction, you will have to use two types of bricks: heat-resistant for arranging the inside of the fireplace, and facing made of red clay for decorating the outside.
- Now you need to prepare the masonry mixture. To do this, you need to mix clay and sand in a ratio of 1 to 3, dilute with water until a thick sour cream is obtained.
- After completing the preparatory work, you can proceed directly to the construction of the walls of the barbecue. There are two ways of laying out: in the shape of the letter “P” or “E”. The optimal height of the structure is 1 m. In a simple version, two cast iron grates should be installed between the sides of the barbecue. On the top you can cook, on the bottom you can maintain the fire (you need to remove the chimney above it). There should be a distance of 250 mm between them.
- The complex configuration (in the shape of the letter “E”) allows you to make two niches for firewood. In this option, it is possible to use gas silicate blocks for the lower rows, but for the upper rows it is necessary to use exclusively refractory bricks.
It is not necessary to stop at building only a barbecue. You can always expand its functionality by adding cutting surfaces.
085ffcfee2a2e1b5a8a01a3974969591.jpe
The gazebo can have everything for a good rest, right down to the cutting surface
What types of gazebos are there?
Gazebos vary in type, style and material from which they are made.
The climatic zone of your site dictates which type you choose: open, semi-closed or closed gazebo.
In warm places with slight temperature changes, it is more rational to install an open gazebo. This is a simple structure: a support platform and a roof.
This gazebo is suitable for warm and clear weather.
A closed gazebo is already a small house. This means you will need to work out the exterior and interior. Protects against bad weather, insects and wind. The room is often heated.
It is recommended, for the same size of company, to install a larger one than an open gazebo.
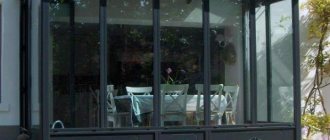
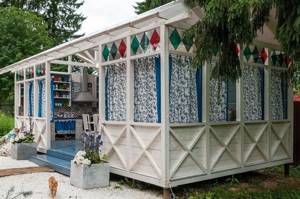
A semi-closed gazebo is a compromise: due to the large windows, it can be turned into either an open or closed one.
Protects from bad weather and cold worse than a closed one.
How to build a gazebo with a barbecue with your own hands - step-by-step diagram
Step 1: Bottom Trim
When the foundation has gained strength (5-7 days in the case of reinforced concrete structures), it is time to begin assembling the frame. In all wooden structures, the frame can be divided into 5 main elements: lower frame, risers, joists, top frame, rafters. This is the skeleton of your future gazebo. The first to appear is the bottom trim - a rectangle or square made of 100*100 mm beams
It is important to isolate the beams from moisture and the development of fungus, for which they are treated with an antiseptic, and roofing felt or plastic film is placed on the foundation. If the area of the gazebo is large, the frame is reinforced from the inside with a cross made of the same timber
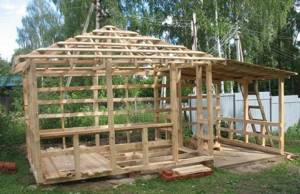
Assembling the frame of the structure
Step 2: Risers and joists
When the lower frame is completely ready and fastened, we install corner and intermediate risers, for which we take the same beam. Use temporary jibs to secure them in position. After the risers, logs are made - 100*50 mm bars, which are laid on the edge on top of the bottom frame. They will support the weight of the floor and people. They are installed at a distance of no less than 50 cm from each other. For the convenience of further work, boards are laid over the fixed logs - this will make it easier to install the bars of the upper trim.
Step 3: Top Trim
Fundamentally, there are no differences between the lower and upper frames - all the same timber, all the same fastening methods, which are described in detail in the article on the construction of wooden gazebos. True, it will be more difficult to work at heights - here you will need the help of a friend, as well as a good ladder or stepladder.

Attaching the top frame beam
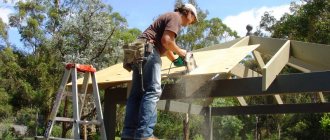
Step 4: Rafters and Roof
To avoid troubles with the weather, try to complete the construction of the frame as early as possible, completing the first stage of construction by installing rafters and laying roofing material. The roof is made of 100*50 mm timber and boards. First, identical structures from prepared rafters are assembled on the ground, then the finished “cocked hats” are lifted onto the roof and secured. If you want to make the room warmer, we recommend laying a continuous plank sheathing on top of the rafters, which is covered with waterproofing and wind protection. A thinner counter-lattice is placed on top of these materials to install roofing sheets.
From this stage, a large number of variations begin with the decoration and area of the walls - you can make both a closed and open or semi-open structure, insulate it from the inside for a comfortable stay at any time of the year, or leave it as is. The construction of various gazebos with and without barbecue is covered in detail on our website, you just have to choose the right direction.
Differences in materials
It is important to understand that the choice of material for a gazebo is primarily dictated by design. The material should be in harmony with the look.
The choice is not as wide as it might seem. For gazebos the following materials are used: wood, brick (less often rubble) and rolled steel (sometimes forging). There are only three: wood, stone, iron.
Let's figure out what's best for what.
Tree
This is a universal material, suitable for almost any project.
Advantages:
- Undemanding to the foundation (it is possible without a foundation at all, with a decrease in service life);
- Assembly of wooden structures is simple;
- Wooden building materials are cheap;
- The natural pattern of wood is beautiful and familiar;
- Good thermal insulation, which is useful in hot weather.
Flaws:
- Low resistance to moisture and pests - additional treatment is recommended;
- The tree is on fire. Regular impregnation with fire retardants (fire-retardant compounds) will be required.
Brick
Brick buildings have their own beauty. Such a gazebo looks more substantial, some say more expensive.
Advantages:
- Fire resistance;
- The strength of the entire structure and resistance to negative influences.
Flaws:
- The cost is higher than if made from wood;
- A reliable foundation is required;
- Laying brick is a more labor-intensive process than assembling a wooden building.
For a higher price we get greater reliability.
Metal
Usually rolled steel is used, less often - aluminum, and very rarely gazebos are made by forging. Rolled aluminum is used for very small pavilions, and a forged gazebo has only one advantage - beauty. Therefore, let's consider rolled steel.
From metal, like from wood, you can make both a small and a large building. And the steel frame can be easily disguised as “noble” materials: hidden under wooden cladding or covered with decorative brick. Such finishing will not bear a load, only decorative functions.
Advantages:
- Strength, especially to shock loads;
- Does not burn;
- Light pavilions do not require a foundation;
- Satisfactory durability, good with timely care.

Flaws:
- Conducts heat well: it is bad both when it is hot and when it is cold;
- To maintain an attractive appearance, it requires regular cleaning and painting.
A combined option can be used: the wall near the brazier is made of brick, the roof and interior are made of wood, and a steel profile is used for piping.
The main stages of constructing a gazebo
Regardless of the project, any structure is built step by step. In order for the gazebo to serve for a long time and delight you with wonderful evenings with family and friends, it is necessary to follow generally accepted construction technology:
- Selecting a site, cleaning and leveling the site, removing the top layer of soil.
- Construction of the foundation. If the structure is metal or wooden, columnar is recommended. If it is brick or stone, then it is tape.
- Foundation tying.
- Construction of support pillars according to the project.
- Tying the poles at the top.
- Construction of a barbecue grill from stone or refractory clay.
- Installation of a chimney made of brick, tin or other suitable material.
- Roof construction. Practitioners advise starting work on installing the rafters on the ground, and then lifting the structure upward and continuing construction. Lightweight roofing materials are suitable for the gazebo: corrugated sheets, boards, flexible tiles.
- Facade cladding. Finishing the walls and porch with pre-selected facade materials.
- Interior decoration. Floor installation, wall or wall decoration. Covering the grill with tiles or other materials.
- Connection of existing communications.
- Furniture arrangement, arrangement, decoration.
A gazebo built in accordance with these steps will last for several decades. In addition, a well-thought-out building will become an element of landscape design and a favorite place for relaxation and parties.
What styles are there?
Appearance is important. The eyes should be happy, otherwise stress is guaranteed.
Before you make your choice, let's learn about the most popular styles for garden gazebos.
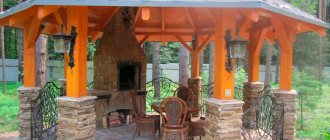
Chalet
This style came to us from the south of France. Combines coziness and untreated wood with natural stone.
This style is characterized by:
- Large extension of the roof beyond the walls, which provides good shade and good protection from bad weather;
- The roof is hipped or gable;
- Laconic interior decoration.
The chalet style uses the colors of natural stone and wood, with red or orange for color contrasts.
Roof beams are made of unpainted wood.
Classic
Almost antique. Flat, with a slight slope, roof on columns. Laconic design. Correct forms.
Peculiarities:
- Natural stone, wood and metal are used;
- Colors are natural, pastel (minimum bright);
- Trellis for climbing plants are used as decoration.
Oriental
Japan, China, the Middle East... In our conditions, Japanese-Chinese motifs are more practical than Arabic ones. Such gazebos look harmonious near a pond or on a hill.
Distinctive features:
- The gazebo always stands on a platform (approximately 50 cm);
- Stone, wood, bamboo and reed are used;
- Tiered roof with curved corners;
- Minimal furnishings and interior decor.

Modern
This is primarily the use of modern materials to combine aesthetic beauty and functionality.
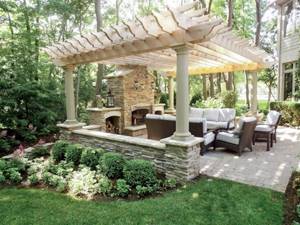
Provence
Another style from France. The gazebos come out cute and bright. Well suited for summer cottages.
Its features:
- Spacious pavilion with plenty of furniture;
- Curtains are widely used;
- Wooden, wicker or forged furniture;
- The color scheme is creamy with bright elements.
Selection of barbecue
It may seem that only a stationary grill is suitable for a gazebo. But no, portable ones are also used.
Which one to choose?
The portable grill is ideal for installation outside the gazebo. In good weather you will not feel the disadvantages of this solution. And if necessary, you can take it outdoors.
Portable barbecues are small and often for smaller skewers. Therefore, for a large company you will have to fry shish kebab in several batches or set up more than one grill.
Stationary. First of all, size. He's bigger. He has a reserve.
This type of grill, built into a gazebo, almost always has a hood or chimney. For ventilated open gazebos, you don’t have to make a chimney, but we don’t recommend doing so.
In addition to the size, the grill inside the gazebo boasts equipment and additional functions.

Arranging a place to relax
The purpose of combining a barbecue with a gazebo is to create a recreation area with the level of comfort to which we are accustomed in the city. You need to think about what you will use and how it will fit your needs. There are many options, so let's get started.
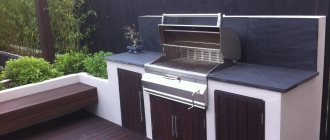
Cooking area at the grill
Add a table to the grill. It will contain what you can’t eat yet and a place where you will cook. The countertop should be at a comfortable height and the material should be easy to clean. Also, do not forget about storage areas for kitchen utensils. If possible, equip the gazebo with a sink and refrigerator. This will significantly add convenience.
Make practical use of space
A table with benches that slide under it is a convenient solution: you can seat many people and it takes up little space. When no guests are expected, you can replace the benches with more comfortable chairs.
When planning the arrangement of furniture, take into account the aisles and cooking area. If you force everything, it will be very inconvenient.

Reliability
Choose materials, furniture and decorative elements taking into account that they will be almost outdoors. Everything should be durable and easy to clean.
Remember the cook
Cooking with your back to the company and not participating in the conversation is a bad option. Turning the cook to face his friends will most likely not work. But you can cook sideways, glance at friends, and exchange phrases comfortably.
Keep warm
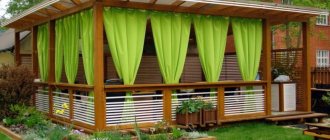
In cool weather, you can use curtains made of transparent plastic for an open gazebo. They are either bought ready-made or made to order.
You can use infrared heaters, heating stoves and roasters with individual hoods. This will extend the season and not be influenced by the weather.
Canopy over barbecue outside
You can make a canopy over the stationary barbecue outside the gazebo. Sudden rain won't stop you. It will be a little wet, but you won’t be left without barbecue.
Add an outdoor hearth
Looking at the flames is very peaceful. Fire gives warmth and comfort. So why not add a brazier to our gazebo? Don't forget about the hood for her.
You can also make a roasting pan in the center of the table so that everyone can fry something of their own for warmth. When not needed, you can close the lid.
Recreation area nearby
This can be a flat area with a lawn or a paved one. For starters, empty, that's enough. Here you can place playing children so as not to interfere with adult conversations, and when there are more guests than the gazebo can accommodate, everyone will be here.
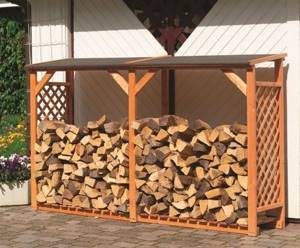
Drovnitsa
There should be a place for firewood in the gazebo itself or nearby. Walking around the site when you need firewood is not the best option.
Paths
Think about where you will go from the gazebo. Stand with your back to her and think about how you will walk at night. Make good paths in these directions. Then you will say thank you more than once.
The paths will be even better if they are backlit. There should be a switch both in the gazebo and at home.
Lighting
Of course, twilight gives its own atmosphere, but good light is better for relaxation. The cooking area should be brightly lit.
That is, the lighting will be correct by zone, with the ability to adjust the intensity.
Decorate everything
A gazebo with a barbecue is a place of relaxation, a place of celebration. Add to the interior something that cannot be found in gray everyday life and you will like it. In the recreation area around, you can set up a garden to suit your taste.
Creating a gazebo step by step - saving on builders
Most construction teams charge up to 50% of the cost of materials for work - taking into account rising prices, this entails a serious increase in costs. Isn't it better to think about how to build a gazebo with a barbecue without the participation of strangers? The time spent is worth it, and the help of friends will not hurt, especially if you decide to build a wooden frame structure. This option will cost less than stone, although it will require more careful maintenance in the future. You can settle on the golden mean, combining both materials.
For a wooden gazebo, we recommend a lightweight metal barbecue with a hood - in this case, it will be enough to make a standard columnar foundation. If you want to equip a permanent brick barbecue, you should make a high-quality strip base specifically for it, but the gazebo itself can be left on a columnar one. A strip foundation will definitely be required if your area has unstable soil or you decide to build a completely brick building. In all cases, we recommend that you read the article on foundations for gazebos - everything is described in detail there.

Standard column foundation
The construction of wooden gazebos with barbecues does not require much experience and special skills, which are indispensable when constructing permanent stone buildings. This is a definite plus - almost all the work can be done independently, except that when it comes to the top trim and construction of the roof, you will have to use someone’s help. First things first.
Step 1: Bottom Trim
When the foundation has gained strength (5-7 days in the case of reinforced concrete structures), it is time to begin assembling the frame. In all wooden structures, the frame can be divided into 5 main elements: lower frame, risers, joists, top frame, rafters. This is the skeleton of your future gazebo. The first to appear is the bottom trim - a rectangle or square made of 100*100 mm beams
It is important to isolate the beams from moisture and the development of fungus, for which they are treated with an antiseptic, and roofing felt or plastic film is placed on the foundation. If the area of the gazebo is large, the frame is reinforced from the inside with a cross made of the same timber
Assembling the frame of the structure
Step 2: Risers and joists
When the lower frame is completely ready and fastened, we install corner and intermediate risers, for which we take the same beam. Use temporary jibs to secure them in position. After the risers, logs are made - 100*50 mm bars, which are laid on the edge on top of the bottom frame. They will support the weight of the floor and people. They are installed at a distance of no less than 50 cm from each other. For the convenience of further work, boards are laid over the fixed logs - this will make it easier to install the bars of the upper trim.
Step 3: Top Trim
Fundamentally, there are no differences between the lower and upper frames - all the same timber, all the same fastening methods, which are described in detail in the article on the construction of wooden gazebos. True, it will be more difficult to work at heights - here you will need the help of a friend, as well as a good ladder or stepladder.
Attaching the top frame beam
Step 4: Rafters and Roof
To avoid troubles with the weather, try to complete the construction of the frame as early as possible, completing the first stage of construction by installing rafters and laying roofing material. The roof is made of 100*50 mm timber and boards. First, identical structures from prepared rafters are assembled on the ground, then the finished “cocked hats” are lifted onto the roof and secured. If you want to make the room warmer, we recommend laying a continuous plank sheathing on top of the rafters, which is covered with waterproofing and wind protection. A thinner counter-lattice is placed on top of these materials to install roofing sheets.

91ebc624ab3f4338f34fd79bcb282111.jpe

e9107cc6575812cbf06b24e45d96ac4c.jpe

792d792def129d51af7610e40cca639c.jpe

From this stage, a large number of variations begin with the decoration and area of the walls - you can make both a closed and open or semi-open structure, insulate it from the inside for a comfortable stay at any time of the year, or leave it as is. The construction of various gazebos with and without barbecue is covered in detail on our website, you just have to choose the right direction.
Where is the best place to put it and what size to choose?
Before construction begins, you need to choose a location.
Compost pits, toilets, buildings for livestock - all this should be as far away as possible.
And electricity and water are closer.
The place should be beautiful and comfortable. For example, staring at a fence or looking at an industrial area while relaxing is a bad idea.
Paths will need to be laid from the gazebo. And the path to it itself should not turn into a labyrinth.

Fire precautions
According to fire regulations, the distance to a wooden house must be at least 8 meters.
- The electrical network in the gazebos must be grounded;
- Electrical wiring must be done with a cable for external use;
- Wooden elements must be impregnated with a fire-retardant composition;
- Around the barbecue for 70 cm, the floor should be made of non-flammable material (for a wooden one, you need to cover this area with iron);
- The area around should be free of debris and old grass;
- The hood should be both convenient and effective (if it doesn’t work, then it should be effective, albeit less convenient);
- Keep children away from the fire;
- Do not fill the coals with water;
- Do not throw hot coals into the trash; they can smolder for 48 hours;
- Start a fire extinguisher and place it next to the grill.