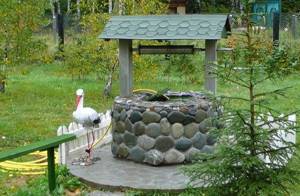
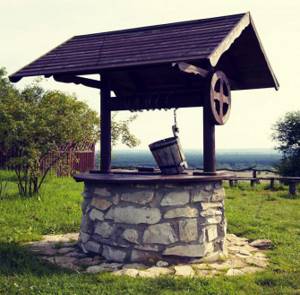
Every homeowner puts effort into beautifying their property. A well house is not only functional, but is also a decorative element. Even a cottage connected to the central water supply may have an area where there is a carved house for a well, as if it had moved there from a Russian fairy tale.
Even if the water intake structure is intended only for economic purposes, it needs protection. The well house serves as a reliable barrier to leaves and branches flying from the trees; curious animals will not fall into the water. If water is used for cooking, then the well houses must be equipped with a tight-fitting lid.
The demand for houses for wells is great, as country houses are being actively built. When a site is developed, one of the first structures erected on it is a well. Therefore, many companies offer to install a ready-made house on the well. However, when this product has a truly decent appearance, its cost is high. If well houses are offered at an affordable price, they often look unsightly. For this reason, many homeowners make their own houses.
- 1 Preparatory work
- 2 Construction of the frame
- 3 Installing the gate
- 4 We make a roof for a well house
- 5 Installation of the well door
- 6 Decorative design of a house for a well
- 7 How to insulate a well
Preparatory work
Before starting work on the construction of the structure, several issues need to be resolved. There are many options for making houses, so first of all you should choose a material that harmoniously fits into the style of the site. Most often the house is built wooden. There are many reasons for this choice. First of all, wood construction is easiest to do with your own hands. To do this you need to have minimal experience.
Wood always fits harmoniously into the surrounding space. Installation of any element can be done independently, since each of them has a small weight and dimensions. It is also not difficult to determine the size of the house, since they are initially tied to the outer diameter of the well ring.
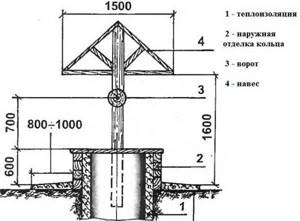
Having chosen the appearance of the future house, you will definitely need to make a drawing, which will indicate all the necessary details and their dimensions. Using this scheme when performing work will greatly facilitate the progress of construction. The use of drawings is especially useful for those who are building a well house with their own hands for the first time.
When starting construction, you need to ensure that you have the basic tools needed during construction work. You will need standard tools used for woodworking, since the chosen house is made of wood. You will need the following set of tools:
- saw;
- electric jigsaw;
- hacksaw;
- building level.
Today, self-tapping screws are often used to connect wooden parts, so you will need a screwdriver.
Since the design of the house provides that its base will be made of timber, you should purchase timber of the required section, boards and materials for covering the roof of the house.
How can you improve a well?
Popular finishing materials:
- tree;
- a natural stone;
- brick;
- plastic;
- ceramic tile.
The choice of material is based on its properties. It must be resistant to wear, negative environmental influences, temperature changes and moisture.
Tree
Wood is a traditional finishing material. For decoration, logs or their transverse cuts, planed boards, lining, timber are used.
Treated logs are considered the most expensive and durable material; they are used to assemble something like a log house. But if you properly prepare timber or planed boards, the structure will last almost as long as a log structure.
When using wooden lining, a frame is first made from timber or a metal profile. Then the elements are hemmed onto it, connecting them together according to the “groove and tenon” principle.
Material advantage:
- wooden decorations are easy to make with your own hands;
- wood does not tolerate moisture well, so you need to pre-treat the material with protective impregnations;
- To make the design look more interesting, it is decorated with carvings.
Stones
Decorating a well with stone.
Natural stone is an expensive material, but its finish will last a long time. Decorating with artificial stone can be a little cheaper.
For a beautiful design, large pebbles, rubble stone, and cobblestones of different sizes are used.
To make the finish look impressive, stones are selected according to color, size, and shape. They are attached using ceramic tile adhesive. If they are different shades, then you can lay out a simple pattern, for example in the form of rings of different widths.
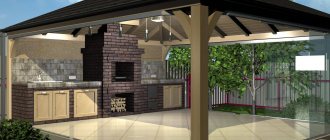
The site looks finished when the path leading to the well is paved with stone. The canopy over the head, trimmed with stone, is made on supports made of wood or metal and covered with tiles.
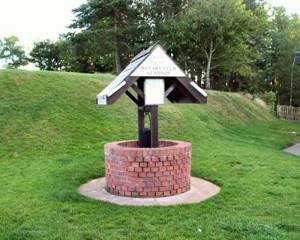
Brick
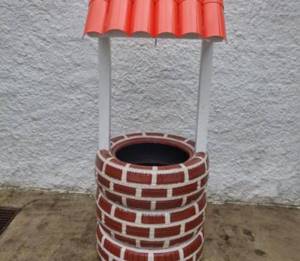
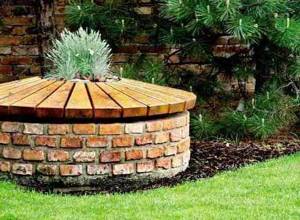
Another material option for finishing a garden well is brick. This decoration is similar to stone, but it is easier to do, since the brick has an even shape.
To do this, use facing bricks - they are resistant to precipitation and temperature changes. Over time, the brickwork will become overgrown with moss and lichens, but this will make the design even more interesting.
Siding and plastic
Plastic lining of a well is practical. Plastic panels, or siding, are easy to clean, they look attractive, but you need to choose them if the entire area is decorated in a modern style.
They are mounted on a pre-assembled frame made of wood or aluminum profiles.
Ceramic tile
A good solution could be finishing the head with ceramic tiles. First of all, it's practical. Secondly, many color options are available, which will allow you to complete the finishing in different styles.
This material is attached using special glue to previously prepared surfaces. But it should be taken into account that it is difficult to decorate round structures with tiles. It is better to first make a square or rectangular continuous sheathing, and then finish it.
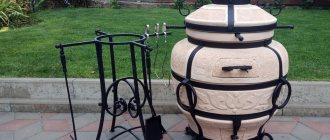
Tires
The most budget-friendly way to finish a hydraulic structure made of concrete rings is to use used car tires.
Making a well from tires.
The main thing is to choose tires of the appropriate diameter. Before performing the work, the tires are thoroughly washed, dried and the side parts are cut off. Then the resulting rings are put on the tip. Adjacent tires are fastened together using wire. Racks and a roof are installed above the tire well.
To make the finish look more elegant, the tires are painted. Then you can draw lines on them to imitate brickwork, or paint them with some patterns.
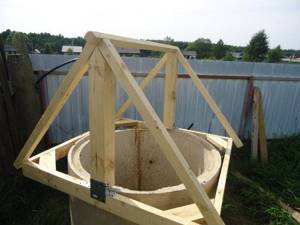
Construction of the frame
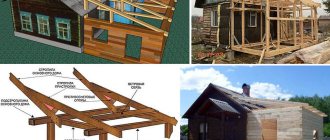
The first stage of work, from which you begin to build a house for a well with your own hands, is the construction of the frame of the future building. The frame must be strong and reliable, so all work should be performed in the following order:
- We form a platform from crushed stone necessary for installing the frame. A layer of crushed stone is poured onto the pre-compacted soil adjacent to the well and carefully leveled. It is better to use crushed stone with a cross section of 50 mm. The site must be level, this is checked with a level.
- The outer diameter of the visible well ring is measured. This size is used when calculating the distance between the sides of the frame. Then a frame for the base is constructed from timber with a section of 50x100 mm. It must be installed level, checking for correct installation is carried out with a level.
- 2 racks made of the same timber as the base are attached to the frame. Their height is determined by the height of the future house. For better fastening of the frame, you should use a metal corner.
- Next, the rafters are installed. For them, timber with a cross section of 50x50 mm is used. Before installing the rafters, it is necessary to cut part of the ends of the racks and frames at an angle of 45º.
- On the side of the future doors, a wide board is fixed for a shelf on which the bucket will be placed.
- Long boards should be installed on the remaining sides to provide stability to the structure.
This is how a frame is made, on the basis of which a house for a well is built with your own hands, and step-by-step instructions for its installation are useful for novice craftsmen.
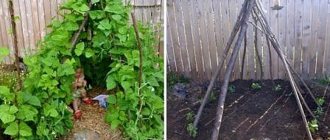
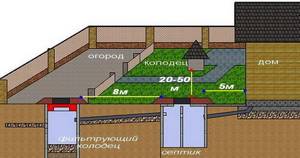
Plot
-17 votes
+
Vote for!
—
Vote against!
Until recently, any piece of land on which people lived had a well. To this day, they are dug in plots to provide themselves with water for household needs. They are indispensable in summer cottages, where water is centralized and supplied in limited quantities according to a schedule. But even with the construction of a country house and the arrangement of a well, wells do not lose their relevance. By lowering a submersible pump into them, it is convenient to use water for irrigation, especially when the groundwater level is high in the area. It is important not only to protect children and animals by closing it with a lid, but also to give it aesthetics. This article will talk about how to make a well head with your own hands.
Why do you need a well head?
- The head is designed not only to protect household members from accidentally falling into the well, but also to prevent debris from getting into the water.
- If the well is planned to be used and not turned into an art object, then it is necessary to provide a convenient cover and lifting mechanism. When thinking through a project, it is worth considering ease of use, and not just design and combination with the surrounding landscape.
- Well head designs can be closed or open. Their cost will depend not on the type, but on the materials used. But in an open well in winter, water can freeze, so for year-round use it is recommended to build it as a closed and insulated house.
- If desired, the open head of the well can also be made warm. In this case, not only the walls of the well itself are insulated, but also its lid. For this purpose, choosing a moisture-resistant heat-insulating material, such as foam plastic or penoplex.
Types of material for the well head
Traditional and modern finishing materials allow you to create not only functional, but also beautiful wells. They fit harmoniously into any landscape design, becoming its decoration.
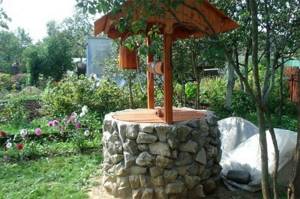
- Stone . This is a labor-intensive and expensive method of finishing the well head. But the result is very beautiful and solid. In addition, such finishing material does not require any maintenance and will remain in its original form for many decades. You can use stone to lay out an entire wall around the well, or just use it to decorate the head of a well made of concrete rings. In the second case, the cost will decrease several times, but the appearance will not lose.
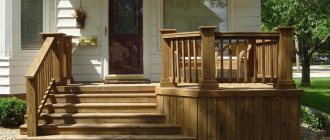
- Wood . It will fit especially well into the landscape if there are already wooden buildings on the site, for example, a wooden house or a bathhouse. Like stone, wooden heads can be of two types: made of real timber or logs, like the walls of a house;
- simply a frame sheathed with imitation timber or a block house.
- Regardless of the material chosen, a number of requirements are imposed on the head:
- Collar. Even if the well head is needed only for decoration or the water is planned to be pumped out with a submersible pump, it is recommended to provide a functioning lifting mechanism. There is always a chance that it will come in handy.
Construction of a well head in the form of a house
Why is a well house necessary:
- it will protect drinking water from dust, leaves, insects, branches and other debris;
- the water will not bloom or evaporate from the summer heat;
- when using spraying chemicals in the garden, they will not settle on the well cover and will not get into the water;
- on frosty days the water will not freeze;
- when creating a beautiful head on a well, it will become a decoration for the area. For this purpose, it is decorated with carved or forged elements, which you can not only make with your own hands, but also buy ready-made ones. And in the finishing use natural stone and high-quality wood.
Having made a design and created a project based on it, you can start working.
Required materials tools
- The easiest way to work with wood is, moreover, it is a natural material that will always fit into the garden landscape.
- Therefore, first of all, you need to purchase the required amount of timber with a section of 50x50 and 100x50 mm.
- For finishing, edged boards, block houses or lining are used.
- Any roofing material is suitable for the roof, but it is good if it matches the roof on the gazebo or house. The lighter it is, the better - this ensures that the supports will withstand even heavy snowfalls.
- For the lifting mechanism (gate), you need a rounded log and a strong metal rod.
Well head drawing
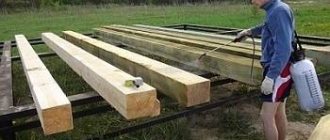
- Considering that all wooden elements will be outdoors all year round, you need to stock up on special protective equipment.
- To fasten wooden parts in places where the greatest load will be placed on them, you need to buy metal corners.
- Deadbolt, handle, door hinges and fasteners (screws or nails).
- Bucket and chain.
- Saw or jigsaw, level, tape measure, screwdriver or hammer, pencil.
Stages of work on creating a well house
- Depending on the chosen design, the frame of the walls and roof is made. He will bear the entire load. It is easier to assemble it on the ground and attach it ready-made to the well.
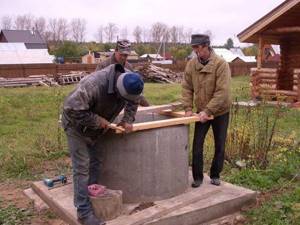
- To calculate the size of the head around the concrete rings of the well, it is necessary to measure their diameter. Based on the results obtained, a frame is assembled from a board with a cross-section of 50x100 mm. When fastening parts, you must constantly check the vertical and horizontal levels to avoid distortion.
- At the corners of the frame, vertical bars are attached, equal to the height of the house-head. In addition, 2 more vertical bars are attached to the frame from two opposite sides and connected horizontally from above with a board, resulting in the ridge of the future roof. All vertical posts are also connected to each other with bars with a section of 50x100 mm.
- Rafters made of 50x50 mm timber are attached from the ridge to the side frame in increments of 40-50 cm. For reliable and beautiful fastening, where they are connected to the ridge, the timbers are cut at an angle of 45 degrees. This can be done using a miter saw. For additional strength, these places are fixed with metal corners. Excess rafters are cut off, not forgetting to leave an extension.
- On the side where the door will open, you need to nail a strong and wide board (at least 300 mm). In the future, it will be convenient to place a bucket filled with water on it. On the remaining sides you can use narrower and thinner boards. Their function will be to securely fix the head on the well rings. This completes the assembly of the frame. It must be smooth and durable.
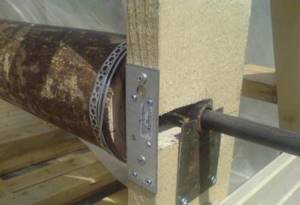
- If the well head provides insulation, then sheet moisture-resistant material is attached to the frame. In turn, slab insulation with high moisture-resistant characteristics is attached to it. It is desirable that they have a tongue/groove connection, which will eliminate cold bridges and through freezing in these places.
- The next step is to install a mechanism for lowering and raising the bucket of water. It is most convenient to make it from a piece of rounded log, the diameter of which should be 15-20 cm (the larger it is, the easier it will be to lift a full bucket). The length is selected individually and depends on the size of the well head. On average, it should be only 5 cm shorter than the internal distance between walls or studs. This will allow the gate to rotate freely.
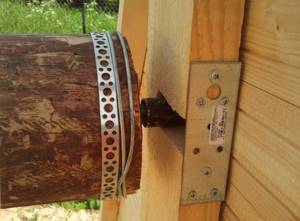
- If there is no rounded log, then take a simple one and clean it of wane, remove all the irregularities, knots and sand it. The resulting workpiece is shortened to the required size, and the edges are tightly wrapped with steel wire.
- Holes 20 mm in diameter and 50 mm deep are drilled from the ends. To protect the wood in these vulnerable areas from rotting, metal plates must be screwed on. The holes on them must match in diameter and location with those already drilled on the log.
- On the racks to which the lifting mechanism will be attached, similar holes are made with protection from metal plates. The only difference is that on the side with the lever you need to make a through hole.
- Metal bushings are inserted into both holes on the racks. And metal rods are driven into the log from the ends, slightly smaller in diameter than the bushings. One will simply fix the log, and the second has an L-shaped handle for rotation. Then the chain is fastened and wound, tying a bucket to the other end.
- The finished frame is sheathed with finishing material. If it is a block house or lining, then they have a tongue/groove connection, which ensures their tight fit. When using edged boards, even with the most careful adjustment, the formation of gaps cannot be avoided due to seasonal shrinkage of the wood and its cracking.
- Special stains or antiseptic impregnations will help protect wood from rotting. It is also allowed to apply varnish, but only one intended for use at sub-zero temperatures, otherwise it will all crack and begin to crumble.
- Alternatively, you can use plastic or metal siding. The latter not only completely replicates the appearance of the natural material, but even has a similar texture.
- Next, they make sheathing on the roof and be sure to attach a vapor barrier fabric. It will protect the roofing material from high humidity and condensation.
- Then the door is secured. To do this, you need to choose dry wood to avoid deformation and curvature during further drying. Boards are nailed onto the frame to act as a door frame.
- Having measured the size of the resulting hole, the frame of the future door is assembled on a flat surface, which should be slightly smaller. It should have right angles without curvature. The canvas is made from the same material that the house itself was sheathed with. To give the frame rigidity, a rail with a cross-section of 20x20 mm or larger is screwed diagonally from the inside.
- Door hinges are attached to the wall and to the door, then it is hung and leveled. It is necessary to ensure that it closes easily and does not jam. After that, a handle and a lock are attached to it.
- The final stage is decorative finishing, if provided for by the design.
Make a well head from stone
- Let's consider a method where the walls are laid out of brick, later facing it with natural stone. In this case, the walls of the head will be built according to the same principle as the walls of the house.
- The concrete ring protruding above the ground is cut down to the required level with a grinder. And the foundation is poured along its perimeter.
- Waterproofing, for example roofing felt, is placed on the concrete base. They begin to make brickwork on top in the traditional way using 1 brick, with bandaging of the seams.
- After finishing the construction of the walls, they are covered with film and left until the solution sets. Thus, the base of the well head is made with your own hands. It's time to install the gate. If the support columns for the lifting mechanism are also planned to be lined with decorative material in the future, then they are made of hollow brick, cinder block or foam concrete.
- If the well is made of modern concrete rings, then it will be difficult to line it. The fact is that factory-made concrete is denser than when mixing the solution yourself, therefore, its surface is smooth, without pores or roughness.
- To give the necessary adhesion, you will have to anchor it yourself. From the outside, holes with a diameter of 5 mm are drilled in a chaotic manner to half the thickness of the concrete ring. The distance between them should vary between 10-15 cm.
- If you go deeper, then over time the anchor may become exposed in this place. Then you will need a masonry (reinforcing) mesh with a cell size of 4-5 cm. It must be completely wrapped around the ring, and the resulting allowance must be folded. But it should not fit tightly; the gap between the metal mesh and the concrete ring is left 1 cm. Curved pieces of wire with a diameter of 5 mm are driven into the prepared recesses. A mesh is tied to the resulting anchors. Such preparatory work will ensure that the base will withstand facing material of any weight - from slab sandstone to boulders.
Lining a concrete well with wood
- Thanks to the heat-saving properties of wood, there will be no problems with condensation in winter. It is thanks to these properties that since ancient times wells were made from logs.
- First you need to make a frame around the concrete ring to attach the wooden planks. A solid shield is made on each side of the future well. To do this, assemble the frame. Edged boards 25 mm thick are tightly nailed to it. When all 4 shields are ready, they are coated with primer in 2 layers.
- They are applied to the well and the points where the shields come into contact with the base are marked. In the marked places, holes are made using a hammer drill and wooden blocks are attached.
- Place the shield and screw one top corner. Then, aligning it horizontally, screw the second side. The entire frame is secured in this way. The resulting voids can be filled with cement mortar with shavings. This guarantees protection even from severe and prolonged frosts.
- Finishing material begins to be attached to the resulting frame. The choice is not limited in any way and depends only on the style of the site or personal preferences.
- It’s easy and quick to make an imitation of logs or beams using wooden block house panels.
- It is better to start installation from the top. Since it is made from natural wood, panels that are identical at first glance may turn out to be of different widths when installed. This may be a very minor difference, but asymmetrical joints are formed at the corners. Therefore, you need to slowly adjust the panels, trying to avoid distortion in the design.
Head for a well made of siding or metal
- Unlike a wooden block house, plastic panels have ideal dimensions and always connect smoothly at the joints. But you need to remember that the richer the color of the panel (for example, dark wood), the higher the likelihood that it will fade in the sun. When the well is in the shade of trees, this is not a problem, but for sunny areas it is better to choose light colors of the material.
- The frame for cladding is prepared according to the method described above.
- The siding begins to be attached from the bottom. First, screw on the starting bar. Its horizontal level must be checked with special care. If there is a slight distortion, it will immediately be reflected in the appearance.
- Next, the corner outer profiles are attached to the self-tapping screws. Their verticality is checked with a level.
- Now I came through the fastenings of the planks themselves. They come in a standard size of 3 m, so first measure the required length and cut it. At the same time, we must not forget about allowances of 1.5-2 cm, which will be inserted into the corner profiles. The first bar from below clings to the starting one, and is screwed on top with self-tapping screws. The next one is inserted into it and snapped into place, which is held from below by the previous plank, and attached to the top with self-tapping screws. This is how the entire well is sewn up. The top is finished in accordance with the intended design.
Sewer well head
- Most country houses have an autonomous sewer system, and its installation often requires that the upper part of the sewer well remains above the ground. In this case, it also needs decoration.
- The principle of wall cladding remains the same. The only difference is that there is no need to make stands for the lifting mechanism, and the height of the walls is much smaller.
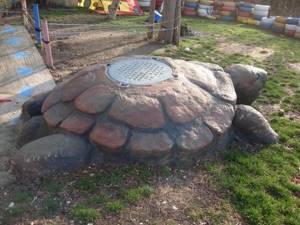
- Sometimes it is enough to surround it with large stones and make a decorative cover.
- Or they make circular brickwork, and lay a factory-made sewer hatch on top.
In any case, it is not only beautiful, but also functional, as additional insulation is provided.
Well head design
When choosing a well design, you should rely on the stylistic direction that already exists on the site.
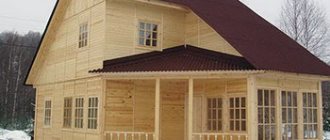
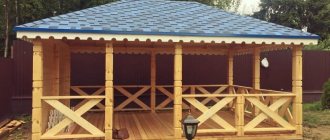
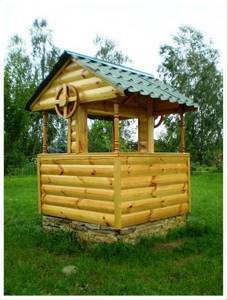
- Russian style. The most characteristic of this style is the well head in the form of a tower. For it, only real logs are used, and not their imitation. Carved wooden elements can be an additional decoration. It is better to put the same roofing material on the roof as on the house itself.
- Modern style . Its main feature is the use of modern rather than traditional materials. Such a well head would be appropriate only if the house itself is made in high-tech style. Tiles are used for cladding, and the racks are made of metal.
- Chalet style . This is a European rustic style, so a combination of natural wood and stone is best for a well head. All materials should be deliberately rough, thick metal, stone boulders, textured wood. You can make the design lighter using forged lightweight elements.
- East style . The most popular among landscape designers are wells designed in a minimalist Japanese style. The main feature is the cap with a hipped roof. Large stones and wood are selected to finish the well. But the Chinese style is the opposite, it is filled with a lot of luxurious and exquisite jewelry. Therefore, bright colors are chosen for the walls of the head, and the posts are made in the form of carved figures of mythical characters.

In addition to traditional style solutions, there are many design options for the well head. They are distinguished by their versatility, which allows them to look good in any landscape design.
- Fairytale tower . These are deliberately bright, almost doll houses. They can be of unusual shape, decorated with bright finishing materials. You can strengthen associations with the help of arranged garden figurines of gnomes or fairies.
- Sea style . Creating it is quite simple; for this you need to take self-explanatory attributes, such as: a rope, a barrel (which can be used instead of a bucket), an anchor, aged wood, a steering wheel instead of a lifting mechanism handle. Figurines of anchors and sea animals are perfect for decorative decoration.
- Painting with paints . This is the most budget option, which does not limit artistic motives. It is enough to simply prime the concrete rings of the well with white and paint them. Or paint a brick or wood head with white paint and paint over it.
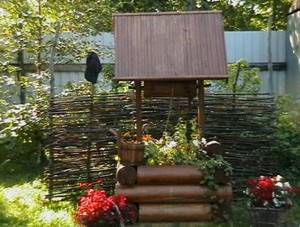
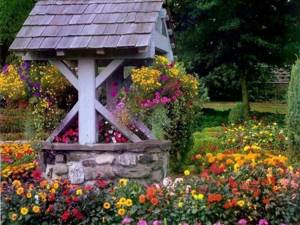
But no matter how beautifully the head of the well is made, in order for it to look harmonious, it must be surrounded by plants. To do this, you can plant low-growing flowering shrubs around it or create new compositions from flowering annuals every year. In addition, flowers can be placed in large flowerpots. In this case, they can be rearranged several times during the summer. Plant compositions are suitable for a well made in any style.
Installing the gate
Construction of the house continues with the installation of a log gate. Even if water is drawn by a pump, a lift gate is necessary, since power supply interruptions sometimes occur. Installation recommendations:
- the log for the lifting gate is selected with a diameter of at least 20 cm. It is necessary to remove the bark and sand the surface;
- cut the log so that its length is 4 cm less than the distance between the posts. This is necessary so that there is a gap of 2 cm between the collar and the posts, which does not allow them to cling to each other;
- to prevent the log from cracking, its ends should be wrapped with wire;
- 2 holes with a diameter of 2 cm are drilled at each end of the log. Their depth should be at least 5 cm. Plates with holes of the same diameter are attached on top of the holes;
- the same operation is performed on the racks, only the hole is drilled through. The plates are installed on both sides. Bushings must be inserted into the holes so that when the gate moves, its metal parts do not damage the wood;
- prepare 2 metal rods. We bend one of them, 1 m long, into the shape of a starter, and leave the second, about 0.5 m long, straight. Then, with their help, we install the gate in place.
Once the lift gate is installed, you can attach the bucket chain to it.
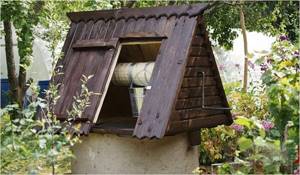
We make a roof for a well house
The construction of the roof should rightly be called the main stage of construction. After all, the roof is the main protection of the water in the well not only from debris, but also from melt and rain water. Therefore, it is necessary to know how its construction is carried out and what to keep in mind when installing it. These tips will definitely help novice builders:
- Initially, the roof base is formed from trusses made of 30 mm thick boards. In addition to boards, beams and crossbars are required;
- in the upper part of the rafters, previously cut to a bevel, are fastened with self-tapping screws;
- the base of the roof is strengthened with jibs, and its upper part is connected with boards. With their help, the roof ridge is formed;
- then a sheathing and a protrusion are made above the front and rear walls, protruding 10 cm;
- Waterproofing is installed on the sheathing. Roofing felt is usually used, but you can choose another option for waterproofing material;
- for roof cladding you can use slate, tiles or corrugated sheets;
- The roof gables are coated with a primer and then paint or wood varnish.
Options for wells without caisson
As you know, for the best protection and convenience of location of all system components, a protective structure is installed, which experts call a caisson. Most often it is deepened into the ground, and only part of it is visible on the surface. If you don’t have one, it’s better to make a structure that will take on protective functions.
Wooden structures
Undoubtedly, the most common and popular option for a number of reasons:
- Wood is very convenient to work with - designing a well with your own hands will not cause any difficulties for almost anyone.
- To work, you will need a simple set of tools: a hacksaw, a hammer and nails, or a screwdriver and self-tapping screws and measuring devices (a tape measure, a square and a construction pencil). With their help you can make almost any design.
- The price of the material is quite affordable, and for the structure you can use various scraps and short boards left over from other works and not applicable for anything else.
- Wooden structures look very attractive and fit perfectly into the natural landscape.
Entire structures are built from wood, reminiscent of ancient wells
The work is quite simple:
- First, you should prepare the base; from a practical point of view, the preferable option is concrete - this way you will reliably protect the well from sewage and create a strong and even base for your decorative structure.
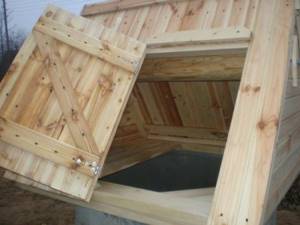
- Next, it’s worth considering the design and dimensions of the future structure. Remember that it must provide normal access in case of repair of system components. If the building is large enough, one half of the roof can be a door; if the element is made in the form of a log frame of a well, there should be an opening hatch on top.
- After this, the material is marked and cut into pieces of the required size. It is best to fasten elements using self-tapping screws - they are more resistant to atmospheric influences and hold much better than nails.
- The finished structure must be treated several times with a wood preservative, this will extend its service life by at least twice. Subsequently, it is advisable to repeat the treatment once a year.
Advice! If it is difficult to provide doors in a building, but it is quite light, then you can simply fix it on the base using pins or latches and remove it if necessary.
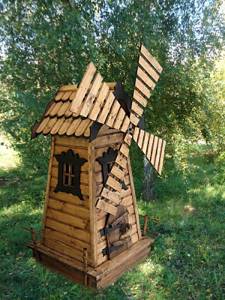
Such a mill will not only reliably protect the well and hide the pipes from view, but will also become the highlight of your site
Structures made of stone and brick
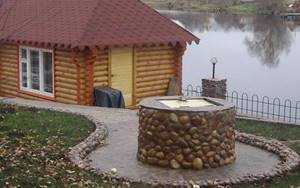
In the photo: stone elements look very reliable and solid
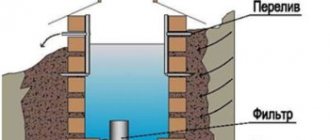
Most often, such structures are an improvised well, closed with a lid on top (also find out how to make a filter for a well).
Due to the characteristics of the material, there are certain specifics of construction:
- Due to the large weight of the elements, a strip foundation must be poured, otherwise after a year or two the entire surface will crack due to the structure subsiding into the ground.
- If the structure is made of stone, it should be approximately the same size, so it is much easier to lay it. It is best to take red brick - ceramics are resistant to moisture and will last a very long time.
- After laying the stone and drying the solution, the surface can be washed, removing dirt and coated with a special compound - this will make your improvised well look even better.
- Options that combine stone and wood look good. For example, a stone base and a wooden top, or stone walls and a wooden roof.
Brick goes well with solid wood elements
Helpful advice! A very practical solution is to make a water tap on a decorative structure; it can be used in the summer for watering the garden and other needs; in the winter, it must be shut off in the well to prevent freezing and damage.
Installation of a well door
The main work of creating the base is completed. After its final finishing, the house for the well will be ready, but a well that is completely closed on all sides cannot be used for its intended purpose. In order to access the water, a door is required. It must be made before all the walls of the house are covered with decorative finishing.
The door is mounted in the following order:
- parallel to the rafters, 2 beams are attached to the frame. 2 more beams are mounted horizontally on them. They should be of smaller cross-section. They form the frame for the door;
- To make the door you will need boards and bars. The standard size of the product is 85x55 cm. The boards are cut to the required size and connected with self-tapping screws using bars. Self-tapping screws are used on each side of the workpiece, placing 4 of them on each of the boards. To avoid distortion, one of the bars is attached diagonally to the door;
- Installation of doors is carried out by attaching door canopies to them, one part fixed to the frame, and the other to the door itself.
The construction of the well house is almost complete. It remains to complete the work by performing decorative finishing.
The procedure for installing the roof, cladding and doors

Wooden wells: a - cutting knife;
b - laying supporting logs under the frame; c - bell (tent); 1 - stone; 2 - wedge; 3 - log. The construction of the roof of the top of the well must begin with the installation of trusses: a fairly rigid structure onto which the sheathing is attached. It is better to use boards of sufficiently high strength (3 cm thick), the length of which is 180 cm. The height of the building will ultimately depend on the length of these boards. For installation of jibs and crossbars, a board of smaller thickness is used - 25 mm. In total there should be 8 jibs, 6 rafters, 3 crossbars. There should be the same distance between the sheathing elements.
The work is performed in the following sequence: the rafters are cut at an angle, their upper ends are connected to each other. Self-tapping screws are used as fastening elements. Additionally, you can fix the location of the rafters using a crossbar attached 30 cm below the top point. It is most convenient to perform these actions by placing the parts on the ground.
On the rafters, where they will be connected to the boards of the top trim, you need to make a cutout. The frame and rafters are connected using nails 12 cm long.
Layout of the sewer well on the site.
The installation of rafters is enhanced by installing jibs. The connection of the trusses is carried out using a kind of ridge - 2 boards, to which the sheathing is subsequently attached. The distance between the sheathing elements is 13-15 cm. There should be 10 cm protrusions above both walls of the building. The constructed roof is covered with roofing felt. Slate is mounted onto the roofing felt using special fasteners. The corner joints are secured with wind boards.
The door for such a well top is a kind of plank shield that you can quickly and easily make with your own hands. Boards are cut 15-20 cm wide and 85 cm long, folded one to the other and fastened to each other using wooden blocks with a section of 3x2.5 cm. 2 bars are enough - one on top, the other on the bottom. Self-tapping screws are used for fastening: 4 pieces are needed for each board. In order for the door at the top of the well to retain its shape when moving, and not “walk”, it is necessary to nail down 1 more block diagonally for additional rigidity.
The frame and base of the house are almost completely hidden under the roof, and the door is located above the base, above ground level. After covering the fronts, the latch and handle are nailed on, after which the door is hung on piano hinges. At the final stage, the boards are treated from the outside using protective agents against fungus and mold, painting with varnish or special paint for wood to match the colors of nearby buildings.
Decorative design of a house for a well
Before finishing the house, it is necessary to treat all wooden parts with an antiseptic. Then it will last much longer. You can come up with the appearance of the decor yourself or choose a suitable one from photographs from specialized magazines. The carved well house looks great, demonstrating the classic Russian style. The carving can also be made in the Russian style.
A good example would be cross stitch, which has long adorned women's sundresses and the collars of men's blouses. Only on a well house this pattern will be “embroidered” using a wood cutter.
The siding finish looks original; it looks like a rounded beam. Since this siding is made in a variety of colors, you can choose a color that imitates wood. This material will not only improve the well house, but will also protect it from bad weather, significantly increasing its service life.
Preparing for work
Before you make the top for the well, you need to prepare a tool for processing wood. So, before starting construction work you should prepare:
- jigsaw;
- hacksaw;
- an electric plane (ideally a professional woodworking machine on which you can easily and quickly prepare all the necessary parts);
- circular saw;
- nail puller;
- Phillips screwdriver;
- hammer;
- pencil;
- roulette;
- level.
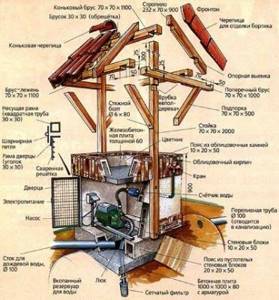
Diagram of a decorative well.
Prepare the necessary materials. You will need:
- edged board;
- timber (glued, rounded);
- fasteners (nails, screws);
- roof covering material (slate, flexible tiles, roofing felt);
- handle, latch and hinges (if there is a door).
It is more convenient and best to make a house for a well from wood: it is easy to process, inexpensive, and in villages located near forests you can even find free trees fallen by the wind.
For the construction of a house, glued and rounded timber is usually used. In addition to timber, you will need roofing felt and edged boards. The roof can be covered with tiles, slate, shingles, shingles, and sheets of metal. If desired, you can put straw and reeds on top of the waterproofing film and roofing felt.
Sewage well installation diagram.
Before you start building the top of the well, wooden materials must be sanded and treated with a special impregnation: biotex, aquatex, drying oil or any other of your choice. Wood coated with such compounds looks better and lasts longer.
The prepared boards must be planed (they will be used for doors and lining the top of the well). All building materials are pre-adjusted in size so as not to be distracted by this during the process of assembling the top of the well. The work begins with preparing the area around the well: it is filled with crushed stone or lined with tiles and stones.
How to insulate a well
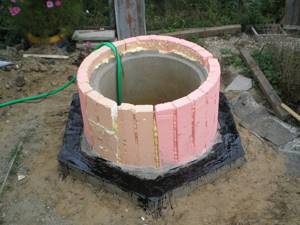
During a cold winter, even a house that covers a well may not save it from freezing. Due to the difference between the temperature of the water and the outside air, condensation forms on the door and internal walls of the well, which gradually turns into ice. It's difficult to remove. This phenomenon not only interferes with the use of the well, but also gradually destroys its concrete rings.
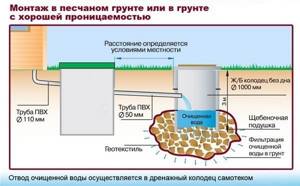
This problem should be eliminated before production of the house begins. For this purpose, you can use a plastic box whose size is larger than the diameter of the rings. Having dug a trench about 70 cm deep around the well, you need to install the box so that the rings are inside it.
Then the internal space between the box and the rings is filled with polystyrene foam, which is an excellent heat insulator. The resulting structure will reliably protect the well from freezing, and the house will complement the created protection.