Any gardener dreams of creating a place in his country plot where he can sit quietly, relax and unwind, enjoying the results of his work. Of course, this cannot be done without a DIY garden bench.
Making such a bench yourself will help you save a lot of money and bring your own ideas and plans to life.
There is a wide variety of manufacturing techniques and designs for garden benches, and every craftsman will find a model that he likes.
First steps in product design
First of all, you should decide on the following points when designing:

Decide on the sizes. If you do not want to design an individual model, you can make the design according to the standard dimensions specified in the finished drawings.
Decide how the back will be attached.
Decide on the design of the legs. The configuration of the legs depends on whether it will be stationary or you choose a portable option.
In the case of a stationary model, it is fixed in the ground with cement, making depressions in the ground at the location where the product is installed.

How to make it yourself
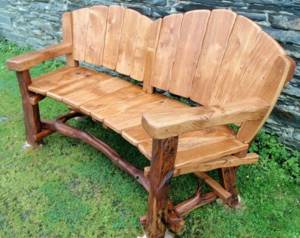
Making benches with your own hands is an interesting creative process that allows you to implement a variety of design ideas. Today, classic wooden and combined models, without a back, are in demand. Many craftsmen decorate areas with benches made from pallets, old chairs, logs, and complement the products with tables or flower beds.
Simple classic design
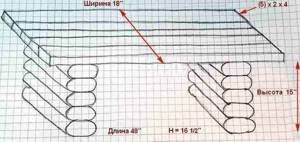
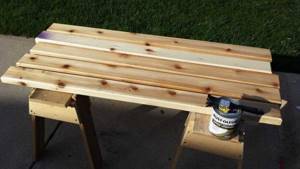
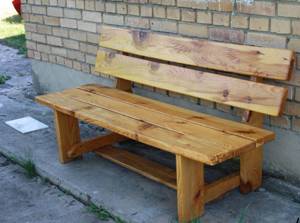
To create a bench you will need wooden boards 150 x 150 cm, the thickness of which is 30–40 mm, blanks for legs and backrest holders, elements for making seats. A beam of 40 x 40 mm is necessary to strengthen the structure. Self-tapping screws are used as fasteners. The tools you will need are a screwdriver, a jigsaw, a plane, and sandpaper for sanding.
- All parts are cut and cut using an electric jigsaw.
- The surface of the elements is polished, the ends are processed with a plane to give a rounded shape.
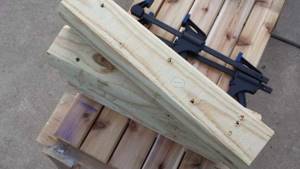
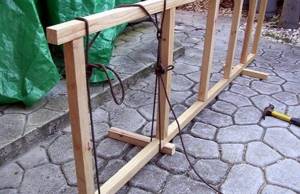
- The legs are assembled first; the distance between the front and rear elements should be 28 cm. They are connected using a beam, the strapping is done on both sides.
- The finished sidewalls are fixed to each other with boards intended for sitting.
It is important that equal gaps remain between the workpieces - no more than 2 cm. They serve to circulate air masses and remove moisture. After this, the bench made of boards is subject to strengthening and installation of the backrest. For the finishing coat, impregnation is applied, then varnish.

Cut out and cut out the necessary parts

Assemble the legs, secure the sides to each other with boards
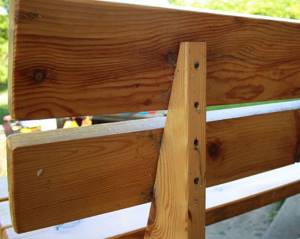
Attach the backrest

Apply impregnation and varnish
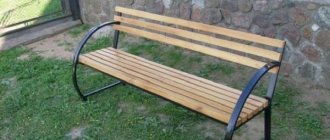
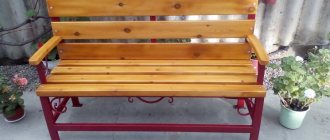
Made of metal and wood
To make a garden bench with your own hands, you will need tools for welding and cutting metal: an angle grinder, a welding machine, as well as consumables for them. It is necessary to prepare profiled pipes and boards from materials. In the process of work you will need: a building level, a tape measure, a file, a plane, paints, pliers, a hammer, bolts, nuts.
Metal profiles are also used to create a variety of garden structures. These can be fences, gazebos, arches, frames, canopies, swings.
Simple but elegant benches for a summer cottage made of metal can be made independently, without a drawing, following step-by-step instructions.
- 3 rectangles are formed from pipes, which are connected by guides and create a frame for sitting.
- Symmetrical holes are drilled in each element for attaching boards.
- The frame is treated with coloring compounds intended for metal.
- Wooden parts are covered with stain.
- After the elements have completely dried, assembly is carried out.
Iron benches are distinguished by their reliability and simplicity of design. The most convenient and practical will be a folding bench, the manufacture of which requires experience.
Bench without back
To make a garden bench with your own hands you will need timber, 40 mm boards, and pins. Tools: jigsaw, screwdriver, router, grinder. The model will be small, only 120 cm in length, suitable for 1-2 people.
- Boards for making seats are cut and processed, the edges are rounded.
- The bars for the legs are cut to the same length, and markings for fasteners are first made.
- Drill holes for the pins, depending on their diameter.
If the seat is fastened with nails, the joints can be easily masked using mastic mixed with sawdust. After drying, the material is smoothed with sandpaper until smooth. A layer of paint or varnish is applied on top.
Benches made of timber will be less comfortable compared to benches that allow you to lean on the back. But when installed near the wall of a house or in a gazebo, this problem can be solved.
Drawing
Cut boards, process, round edges
Cut bars for legs, make markings for fasteners
Drill holes for pins
Mask the joints, smooth with sandpaper until smooth.

Apply a coat of paint or varnish
Garden chair-bench made of pallets
One of the simplest options is a garden bench with a back made of pallets. Before you start work, you need to prepare materials and tools: screws, saw, bars for armrests and legs, boards or plywood, corners, tape measure, drill, screwdriver. For personal protection you will need construction glasses and gloves.
When creating a bench with your own hands, you may need varnish or paint, pillows. At the preparatory stage, the pallets are disassembled and cut into two parts so that the narrow side serves as a support, and the wide side as a seat. The surface is ground to remove all roughness.
- All elements are cut out based on the optimal dimensions of the bench and fastened with screws.
- The seat halves are connected and tightened tightly with self-tapping screws.
- The legs should not be too high, the standard is 45 cm. Metal corners are used to attach them.
A garden bench with a back, coated with paint, lasts much longer. If the surface is varnished, the product harmonizes perfectly with flowers and greenery.
From old chairs
To create a bench with a wooden back, you will need 2-3 unnecessary chairs, wide boards (1-2 pieces), bars, sandpaper, a saw, a drill. The elements are fastened with self-tapping screws, construction adhesive, and finished with varnish or paint. All actions are carried out according to the instructions:
- The upholstery and armrests are removed from all chairs, wood and metal parts are cleaned;
- remove the seat frames and, if necessary, trim the legs to the same length;
- a frame is assembled from the beams, secured with self-tapping screws to the base of the seats;
- boards are fixed on top of the finished frame, a layer of filler is applied to them, which is then covered with upholstery;
- After assembly, all holes are closed with putty, the product is sanded and coated with paint.
In this case, a drawing of the bench will not be needed. The structure is decorated with pillows and installed in the shade of trees or in an open area.
Remove upholstery and armrests, clean wood and metal parts
Assemble a frame from beams, secure it with screws to the base of the seats
Close the holes with putty, sand the product and paint it
Fix the boards over the frame, apply a layer of filler, and cover with upholstery
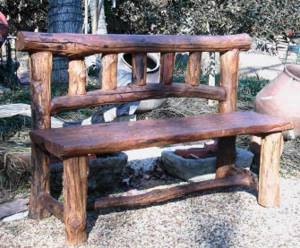
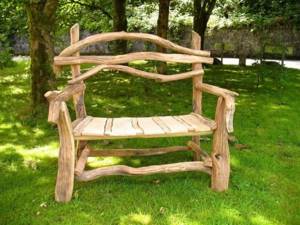
From logs or curved branches
To make a bench for your summer house with your own hands, you need to prepare a log, suitable branches, a saw, pins, a tape measure, and a hammer. Protective compounds for wood processing will also be required. The workflow includes the following steps:
- The tree trunk is sawn lengthwise. This is done exactly in the middle or with a slight offset.
- The thick element serves as a seat, the thinner element as a backrest.
- At the joints, holes are made for installing pins.
- The back is placed on the base and hammered in with a hammer.
If desired, a comfortable bench is complemented by a backrest made of curved branches with different diameters. Before assembly, the parts are cleaned of bark and sanded, then fixed with screws or nails.
A tree trunk is sawed lengthwise
At the joints, holes are made for installing pins
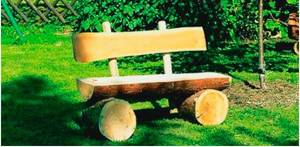
The back is placed on the base and hammered in
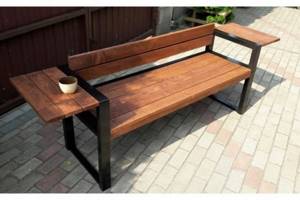
Bench with table
You need to start working on creating a wooden bench with a back and a table with your own hands by selecting tools and materials. You will need boards with parameters 40 x 140 mm, 25 x 80 mm, 40 x 80 mm, a miter saw, drill, jigsaw, screwdriver, tape measure, nails 50 and 80 mm, construction glue. All actions are carried out in stages.
- Two elements 60 cm long and two more 58 cm long are cut out of the boards.
- Grooves are cut out in the workpieces, with the help of which the parts are connected and fixed with self-tapping screws.
- The resulting L-shaped racks are attached to two boards.
- Cut out 4 identical crossbars, which are fixed to the side supports.
- For the backrest, 4 pieces of 600 mm each are sawn off, which are secured to the base of the seats.
- The frame is covered with slats or clapboard.
When creating a product, it is important to adhere to the recommended angle of inclination of the back of the bench: 15–40 degrees. The finished structure is treated with a protective impregnation for wood.
Choosing the material from which the bench will be made
When designing a product, it is necessary to decide what material it will be made of. Each material has its own advantages and disadvantages.
It is necessary to know exactly the characteristics of a particular material for manufacturing.
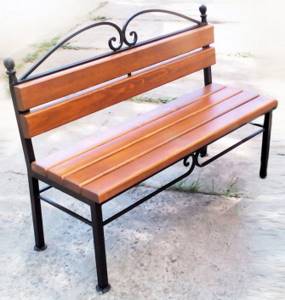
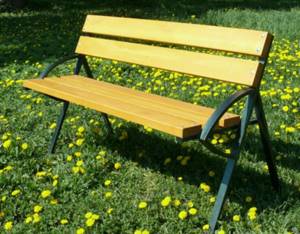
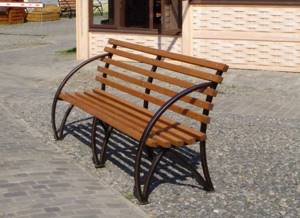
Metal bench
You can independently make not only wooden benches, but also metal benches. Most often, a metal frame is used; making it will not be difficult even for those who do not have experience in forging. To create the frame, the cold forging method is used, in which you can add any details and decorations to the product.
Creating a metal bench with a wooden base and back goes through the following main stages:
- Sizing – you can independently calculate all the main parameters for a future project or use standard measurements. In them, the seat length will be 1.5 m, width 0.5 m, and backrest size 90 cm.
- Creating a frame. The first step is to make the seat. You will need 2 pieces of pipe, 150 cm and 40 cm long. To increase the strength of the product, additional transverse and longitudinal stiffening ribs are welded to the pipes.
- Making legs. According to the standard scheme, the length of the legs is 46 cm. It is to this length that the pipes are cut. To increase the degree of stability of the interior item, it is necessary to first connect all four legs to each other.
- The design of the back consists of welding pipes measuring 150 cm and 44 cm to each other. When this stage is completed, the back is attached to the finished part of the product. The optimal backrest tilt is up to 20°. It allows you to provide maximum comfort during operation.
- Carrying out polishing - cleaning all existing joints, polishing the metal and coating with primer.
- Preparation of wooden parts. These elements are mounted on top of a metal frame. They give the bench a finished look. They can be made from timber or boards; the dimensions can be selected to match the dimensions of the finished frame. The wooden parts must already be fully prepared, have a smooth processed surface without roughness or damage.
- Fastening parts. An electric jigsaw is used to attach the wooden parts to the forging, and it is also necessary to drill several holes in the base and wooden elements to fasten them together. The fastening parts are bolts with rounded heads and nuts.
- The final stage is covering the wooden areas with stain and then varnish. These actions will help the material last longer and protect it from the negative effects of external factors.
Drawings of simple garden benches made of wood:
The finished bench will have a lot of positive aspects. For example, ease of transportation - due to the combination of materials, the product will be lightweight and resistant to temperature changes, which allows you to effectively use the bench outdoors for several years in a row without compromising its appearance.
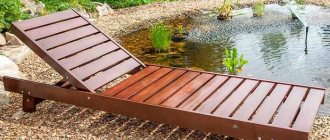
Benches made of plastic
This is a fairly light material, so if you have the task of making a folding bench, then this material will suit you perfectly. It will be easy and simple to carry from place to place.
- Characteristics of Shtil saws

How to make a cold smoked smokehouse - various options and detailed instructions on how to make it yourself! (Photo and video)
Form for paths - is it worth using and why?! Find out the answer to this question in the review and see the instructions for working with the form in the photo.

This material is also available in a wide range of colors. It has low cost. If you have experience working with plastic, you can easily assemble a bench from this material.
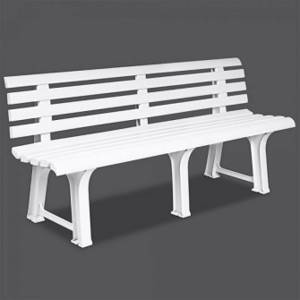
When designing, you can use liquid nails as fasteners. Among the disadvantages, a low degree of reliability should be noted. This material fades quickly in the sun.
DIY metal garden bench
You can decorate your garden plot not only with wooden furniture. Metal benches are another way to create a cozy and comfortable place to relax. To make a metal frame, it is not necessary to master hot forging techniques.
Metal bench An example of a bench made of metal and wood
You can use cold forging technology, in which a frame of metal blanks is welded into a single structure. During production, you can enhance garden furniture with various decorative elements, unusual inserts and additions.

Cold forging
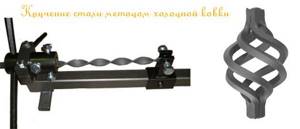
Cold forging
Cold forging tools
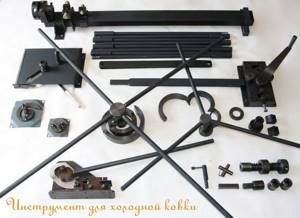
Tools and materials for making a garden bench using cold forging
- Angle grinder with discs for cutting and polishing metal.
- Welding machine with a set of electrodes.
- Pipe bending device. This could be a mini-machine “Snail” or a metalworking vice, with which you can bend the metal according to a template. This device is needed if you plan to have a complex backrest shape with rounded edges.
- Square metal pipes (30 mm by 30 mm).
- Decorative elements of hot forging to decorate the structure.
- Material for seat and back (wood, MDF, plywood).
- Roulette.
- Level.
- Primer for metal.
- Protective coating for wood.
Step-by-step instruction
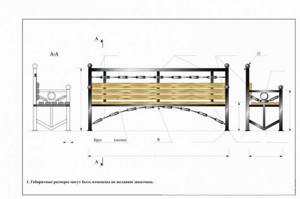
Sketch of a garden bench and dimensions of the frame
It is quite difficult to make a complex and elaborate design of a bench without experience. But you can make a simple and durable structure without difficulty.
Step 1. Develop the dimensions and dimensions of the bench. A standard-sized garden bench has a length of 1500 mm, a width of 400-500 mm, and a back height of 800-900 mm. Corner furniture shapes are the easiest to make, so for the first time it is better to try to make a simpler model with your own hands.
Sketch of a garden bench and frame dimensions
Step 2. Making the frame for the seat. The metal pipe needs to be cut into 4 fragments: 2 x 1500 mm and 2 x 400 mm. All parts are welded into a rectangle. To make the seat more durable, you can weld 2 additional stiffeners into the rectangular frame.
Step 3. Making the legs. The metal pipe needs to be cut into 4 identical sections of 460 mm each. These blanks need to be welded to the corners of the bench. It is recommended to weld additional stiffeners between the front and rear legs.
Sketch of a garden bench and frame dimensions
Step 4. Making the back. Two workpieces 440 mm long and one workpiece 1500 mm long need to be welded together. This structure is then welded to the finished part of the bench. The back should be mounted at an angle of 15-20 degrees. In this case, sitting on the bench will be comfortable.
Step 5. To make the back of the bench stronger, you can additionally strengthen its frame with stiffeners, transverse or longitudinal.
Step 6. The metal frame of the garden bench is ready. The final work is cleaning all welding seams, polishing the metal and coating the frame with a primer.
Step 7. Making the back and seat from wood. Wooden boards or beams are the most suitable material for finishing a metal bench. The wood for the back and seat must be carefully planed and polished, and the chamfers must be processed. The wood needs to be cut into blanks that can be fastened both along and across the back and seat. It all depends on the length of the material.
Garden bench frame assembled
Step 8. Using an electric drill, you need to drill holes in the metal frame of the bench for mounting the wooden trim of the bench. To connect metal and wood, it is recommended to use bolts with rounded heads and nuts.
garden bench
Step 9. After the back and seat are screwed to the metal frame, the wood needs to be covered with stain or varnish. This will protect the material from environmental influences.
The garden bench is ready. Due to the fact that the metal pipe is hollow inside, the furniture is not very heavy and can be moved from place to place. Well-processed metal and wood can easily withstand high humidity and temperature changes, so a DIY bench will serve for many years.
Garden bench for the prevention of diseases of the spine: side support, back and front legs, armrest, rectangular frame bent at an obtuse angle, wooden seat having a width less than the width of the seat contour, and a wooden back curved upward, armrest section with through holes, hinged connection, general view in oxonometry
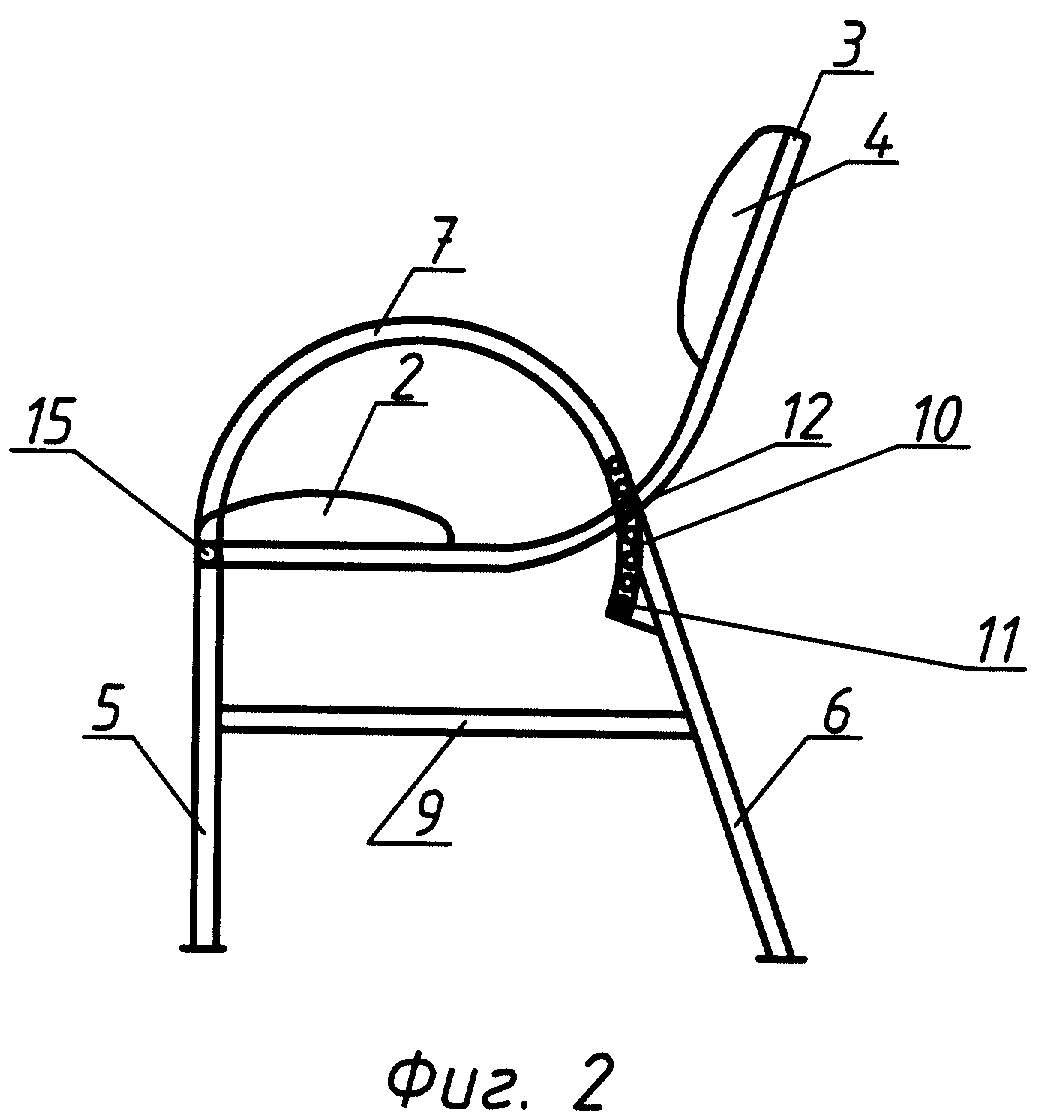
Garden bench for the prevention of diseases of the spine: side support, back and front legs, armrest, rectangular frame bent at an obtuse angle, wooden seat, wooden back, armrest section with through holes, hinge joint, side view Side supports, armrest with through holes, fastening elements, wooden back and seat, rear view
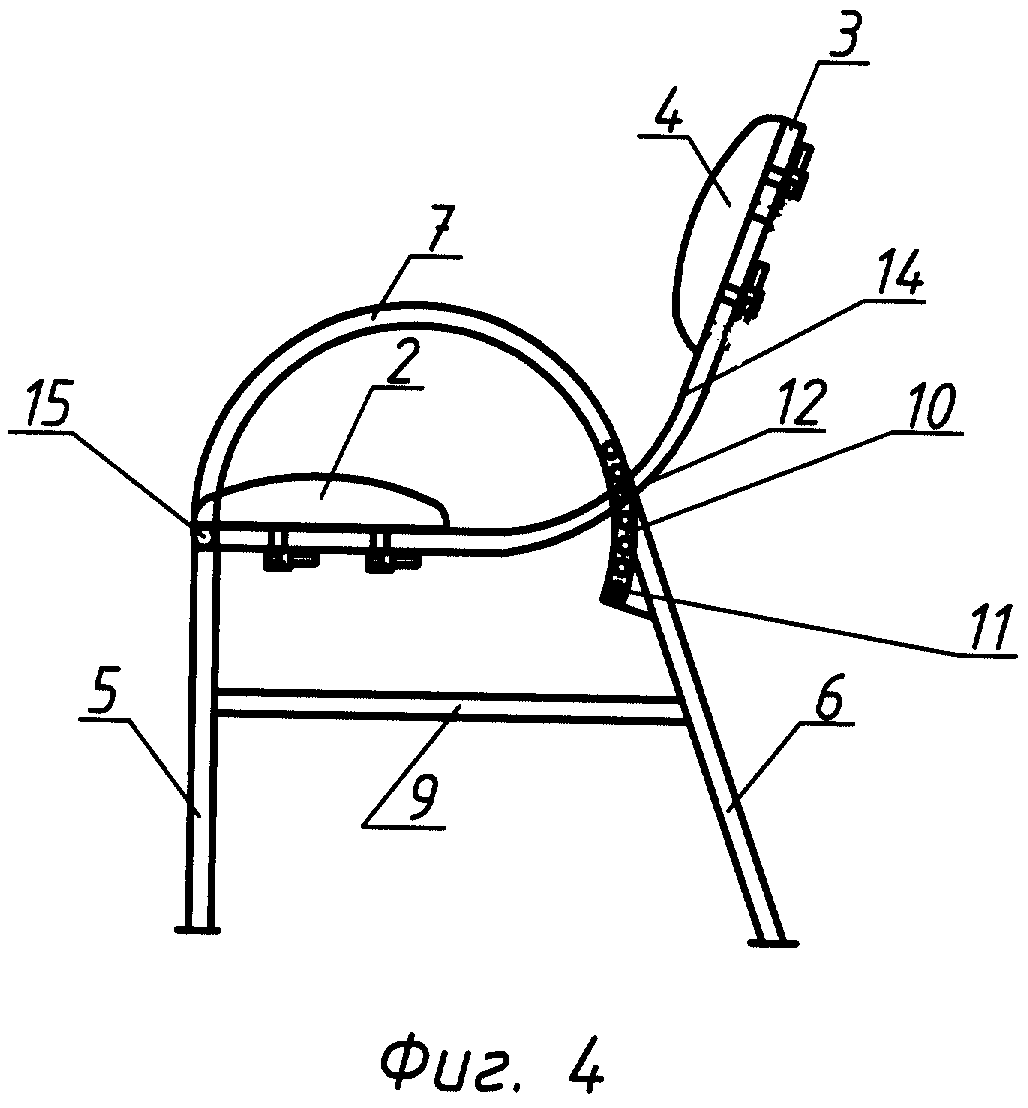
Side support, rear and front legs, armrest, rectangular frame bent at an obtuse angle, wooden seat having a width less than the width of the seat outline and wooden backrest spherically curved upward, armrest section with through holes, hinge joint, wooden seat and backrest in the form of a beam, moved along the grooves to the extreme positions, side view Side supports with armrests, rectangular frame of the seat and back, welded plates with grooves and fasteners, rear view
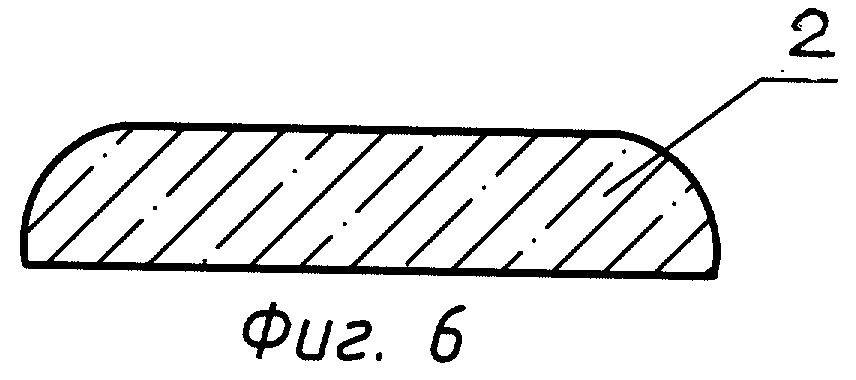
Flat beam with rounded edges, cross section
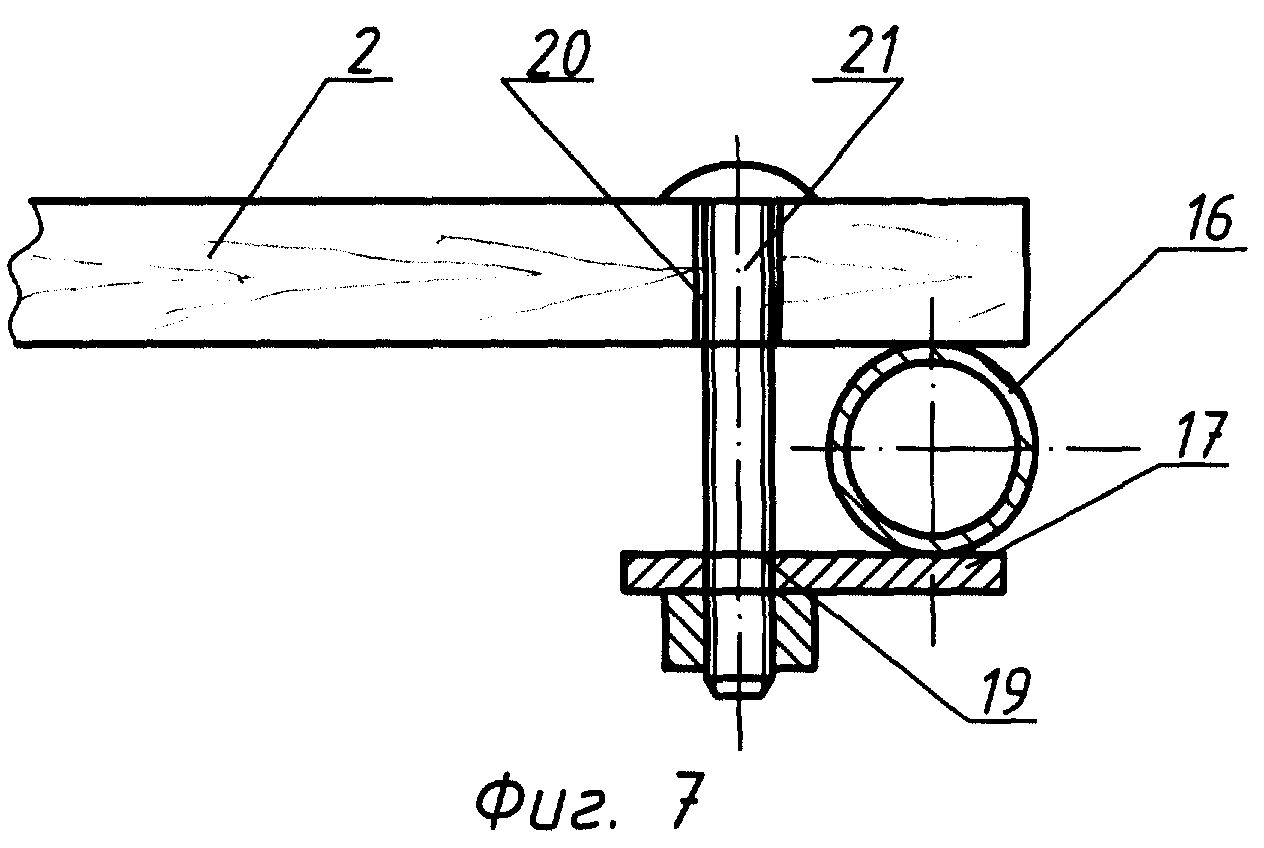
Wooden seat or backrest attachment, vertical hole and metal plate with hole

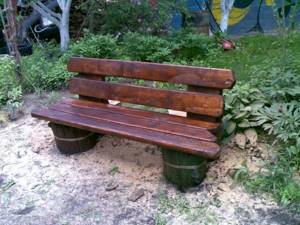
The bench can be built from a single log
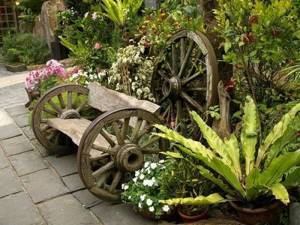
A bench made from old wheel rims and unedged boards
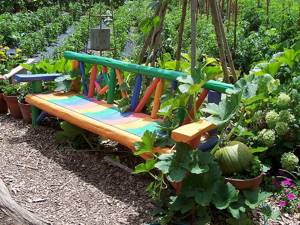
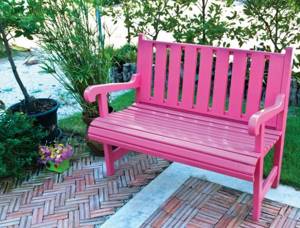
Bright colors will add special charm to the bench

Relaxing on a garden bench is a pleasure
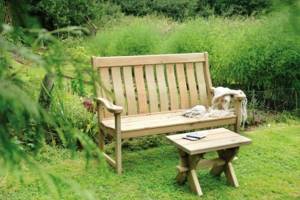
Wooden benches
This is a universal material for making any types of benches. Any type of wood is suitable for the job.
The main thing is that it is easy to handle when working and is dry. Take the trouble to choose a tree without flaws for processing so that it is easier to process.
Stone construction
A product made from such material always has a unique and sophisticated look. Such benches are very beautiful and will be a good addition to any designer’s decision when decorating the landscape of a garden plot.

Do-it-yourself water supply at the dacha - how to do it correctly and everything you need to know for proper water supply (photos and videos)- How to make a smokehouse with your own hands - drawings, diagrams, projects and features of building a smokehouse (145 photos and videos)
- Fabrics for curtains: types, features, popular options for sewing curtains (photo)
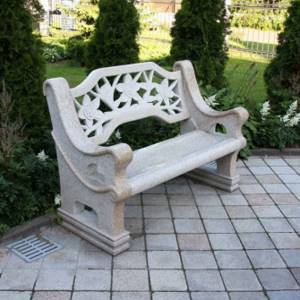
On the Internet you can see many photos of garden benches made of stone, made by yourself. But products made from this material have a number of disadvantages.
Such benches cannot be moved from place to place; they are only of the stationary type.
It is imperative to make a soft seat on which to sit comfortably, since sitting on a bare stone is not very comfortable.
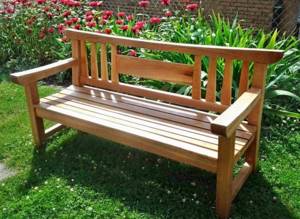
How to make a simple wooden bench with a backrest with your own hands
How to make a simple wooden bench with a backrest with your own hands
Bench design
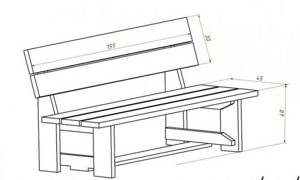
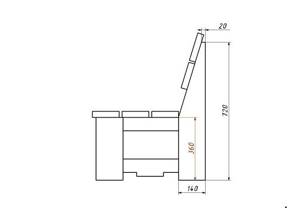
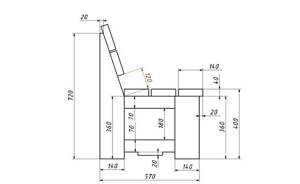
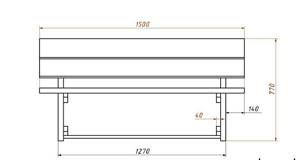
The length of the seat and backrest will be 1500 mm. This furniture can comfortably accommodate three people at once. Seat height - 450 mm, back height - 900 mm. It is advisable to place the back at an angle of 18-20 degrees. The seat width is 400 mm.
Material and tools for making a garden bench from wood
- Wooden boards 1500 by 150 mm, thickness 35-40 mm. Three blanks for the seat and two for the back.
- Blanks that serve as legs and holders for the back - 900 by 150 mm, 35-40 mm thick.
- Blanks for the front legs of the bench - 360 by 150 mm, thickness 35-40 mm.
- Beams 40 by 40 mm will be used to strengthen the structure of the bench.
- Self-tapping screws.
- Electric jigsaw for cutting boards.
- Electric planer for grinding the surface of boards and processing chamfers.
- Screwdriver.
- Sandpaper.
- Varnish and primer.
Making a wooden structure
Drawing of a bench
Step 1. Boards for making a bench can be purchased immediately in size; if they are not available for sale, the wood will have to be cut into blanks using a jigsaw or miter saw.
Drawing of a bench side view
Side view drawing with dimensions
Front view drawing
After the wood is cut to the desired length, it needs to be carefully processed. The blanks for the back and seat need to be sanded. All ends of the boards also need to be processed with an electric planer, it is advisable to give them a rounded shape.
Board processing
Step 2 . The long rear legs of the bench, which additionally serve as a frame for the backrest, need to be set to the correct angle of inclination. To do this, you need to apply markings to two wooden blanks having a length of 900 mm.
The first to be noted is the height of the bench - 400 mm. This section of the board does not need processing. Starting from the segment, you need to make a 20-degree cut along the entire remaining length of the board, which forms the angle of inclination of the back of the bench. The cuts on the two rear legs should be the same in both height and angle. Otherwise, the bench will be skewed.
Frame elements
Step 3. The legs are assembled first in the design of the bench. The distance between the front and rear legs is 280 mm. The legs are connected by a beam, which is cut to cover the entire width of the bench - 500 mm. It is advisable to do a double strapping - top and bottom.
Step 4. After the two sides of the bench are assembled, you can connect them together with boards intended for sitting. The boards are screwed using self-tapping screws to the upper beams of the frame. It is desirable that gaps of equal size remain between the wooden pieces - 1-2 cm. These gaps promote air circulation and moisture removal.

Backrest fastening
Step 5. Strengthening the bench structure. In order for garden furniture to be stable and durable, it is advisable to strengthen its structure. For these purposes, you need to make the lower strapping along the legs using beams. Two pieces, 1500 mm long, are screwed to the front and rear legs of the bench. If there is not enough lumber, you can use one cross member, which is attached to the lower beams of the frame.
Step 6. Installation of the bench back. The bench is almost ready, the final touch remains - attaching two boards that serve as a backrest. It is recommended to attach the first board at a distance of 200 mm from the seat. The second is at a distance of 380 mm from the seat.
Step 7. Finish coating of garden furniture. To protect wood from environmental influences, it is advisable to use deep impregnation and varnish. Impregnation will protect the bench from moisture, mold, and pests.
The varnish will give the furniture a beautiful and elegant look. To give the wood shine, you need to thoroughly polish the material and varnish the workpieces several times.
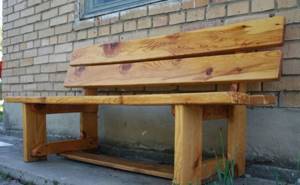
Photo of the bench from a different angle
Video - Detailed instructions for making a garden bench

Making a garden bench

Making a garden bench
Video - Shop in 6 minutes
Find out some interesting options on how to make a table with your own hands from our new article.
Metal benches
Products made from this material always look very elegant and can decorate any garden area. It will always be pleasant to spend your free time and relax on such benches.
- Do-it-yourself decking: types of decking boards, installation technology. Step-by-step installation of WPC decking. Laying errors
- Which lock to choose for a gate - tips on how to properly embed or install the lock yourself (105 photos)
How to make furniture from pallets: features of using pallets, where to get pallets? Preparation of material. Options for making furniture from pallets
Making a Bench from Pallets
The simplest and most affordable option for a do-it-yourself wooden bench is a product made from pallets. If you add a little imagination during the work process, you can get a unique and original item for the landscape. 3-4 wooden pallets will be enough, some of them will have to be divided into several more parts.
The simplest option is to fasten two pallets perpendicularly, which results in a seat and backrest.
Since pallets are quite bulky, so that the resulting structure does not turn out to be rough and large, the pallets must be cut in accordance with the selected dimensions.
All parts of the bench will be connected with self-tapping screws. Using self-tapping screws, the side strips are attached to give the product greater reliability and strength, as well as the legs of the bench.
The pallets themselves are a rough, rough and untreated material, so additional sanding will be required to avoid splinters in the future.
The final stage of creating such a bench is coating with paint or varnish. For comfortable sitting, you can place soft covers or pillows.
A method for making a metal product with your own hands
When designing, first of all, it is necessary to determine the dimensions of the product. If there is no specific drawing, then standard sizes should be used.
If you are not an experienced craftsman and making a bench is new to you, then take the simplest design first.
First of all, you need to design the seat. To do this, you need to use two pipe pieces. The length of the pipes is 1600 and 500 mm.
If you do not have blanks of such material, you should make it yourself. To ensure better reliability, this design is supplemented with stiffening ribs.
The next stage is making the legs. To do this, prepare pipes of the required size. Their length is approximately 550 mm. To ensure the required stability, the front and rear legs are connected to each other.
We want to make a bench with a backrest. To do this, we will need two pieces of pipes with a length of 1600 cm and 44 cm. They must be welded to each other.
After welding the structure, it must be attached to the finished structure. The backrest must be welded at an angle of 25 degrees. This is the most optimal angle for a comfortable position on the bench.
To ensure reliability, the back frame is strengthened with additional stiffening ribs along and across the back.
The manufacture of the frame should be completed by processing the joints and polishing the metal. It is also necessary to coat the product with a primer.
They proceed to the manufacture of wooden parts of the product, which are attached to the top of the metal frame. They can be made of timber or boards. Their dimensions must correspond to the dimensions of the metal frame.
Wooden elements should not have external defects and should be well polished.
All structural components are assembled into a single whole using fasteners. All wooden parts of the product are processed and varnished.
How to make it yourself from wood with a metal frame
If you decide to make a garden bench from metal and wood, then there is nothing complicated about it. If you have no experience in this matter, then you should choose a simple design. You can get a simple and durable bench if you adhere to the following plan:
- Decide on the dimensions of the bench . If a standard design is needed, then it is worth making it 1500 mm long, 400-500 mm wide and 800-900 mm high back. Corner shapes of the structure are very easy to make, so for the first time you should choose a simpler option.
- At this stage, you can start making the base for the back. To do this, take a metal pipe and cut it into 4 parts: 2 parts – 1500 mm and 2 – 400 mm. Weld all the parts to form a rectangle. To give the seat strength, it is necessary to attach 2 auxiliary stiffeners to the rectangular frame by welding.
- Let's move on to making the legs . It is necessary to cut the metal pipe into 4 equal parts 460 mm long. Weld these parts to the corners of the bench. Between the front and rear legs it is worth strengthening with auxiliary stiffeners.
- To make the back, you need to take two blanks with lengths of 440 mm and 150 mm . They are fastened together using a welding machine. The resulting structure is attached to the finished part of the bench by welding. The backrest is fastened at an angle of 15-20 degrees. Then it will be comfortable to sit on the bench.
- To make the back of the structure stronger, it is worth strengthening its frame with stiffeners, both longitudinal and transverse.
- The metal base of the garden structure is already ready; now you need to clean all the welding seams, polish the material and coat the frame with a primer.
- Wood must be used to make the back and seat . Boards are the most suitable material for finishing a metal structure. For this wood, carefully plan and polish and chamfer. Cut the board into blanks that can be fixed both along and across the back and seat. Here you need to be guided by the length of the material.
- Using an electric drill, make the holes in the metal base that are necessary to install the wood trim . To connect metal to wood, you should use bolts with rounded heads and nuts.
- When the backs and seat are fixed to a metal base, treat the wood with varnish or stain. This will protect it from the adverse effects of the environment.
Such a bench can very easily be placed in a wrought iron gazebo.
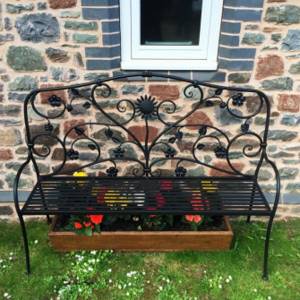
Photos of benches for the garden
Did you like the article? Share

0