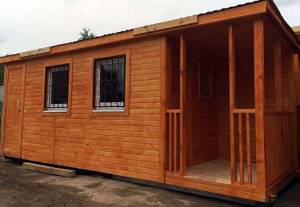
When buying a summer cottage or land for the construction of a permanent country house, you should initially worry about the problem of temporary accommodation, as well as secure storage of household and household items. A change house with a veranda is the optimal solution to the problem, taking into account the assembly time and financial costs. The option of purchasing a finished structure from a commercial company or building a prefabricated utility unit on their own is something each person chooses independently.
A garden shed with a terrace is erected by two builders in the shortest possible time, taking into account qualifications, professional experience, and the availability of ready-made, high-quality building materials. Auxiliary lifting equipment will speed up the construction process. According to their functional purpose, cabin projects are divided into types, and the materials used differ:
- wooden;
- metal;
- combined.
Wooden structures are distinguished by a variety of shapes, individuality, and high aesthetics.
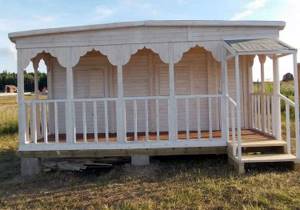
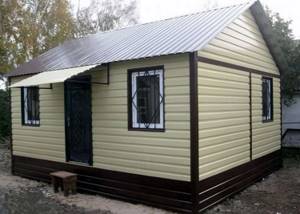
At the same time, metal structures are more often used by construction crews. This is a safe place to store tools and protect against vandals. Combined buildings combine the advantages of lightweight, prefabricated buildings, along with reliability and service life in all-season weather conditions. An iron entrance door and bars on the windows will allow you to preserve the premises in the winter, as well as leave the area unattended on the weekend.
Design options
In a summer cottage there is not enough space for a hallway or dining room. There is a need to add a porch, terrace, veranda. These building options have different functional purposes.
Porch is a door area measuring 1–1.5 square meters. If you equip a hallway in the vestibule, more living space will appear in the change house.
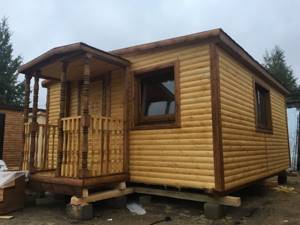
Veranda - covered glazed room, extension. Entrance to it is possible from the house or from the street. On the veranda they set up a summer kitchen or receive guests. If the room is insulated and heating devices are installed, then it can be used all year round.
Terrace is an open flooring for relaxation. It can be fenced with railings or have a canopy. The platform is used in the warm season; in winter it is not functional. In summer, garden furniture and sun loungers are placed here.
Need for construction resources
When starting construction, they independently make an estimate of tools and materials.
Visible surfaces are made of planed wood.
The extension to the trailer with an iron frame is made of rolled metal. For the work you will need a welding machine.
Construction stages
Construction work is being carried out in stages. I - preparation of the site and materials. II - construction of the foundation. III - construction of the floor, walls, roof, canopy.
Preparatory work
The floor level of the building is supposed to be horizontal.
To remove the extreme points of the structure without distortions, you will need:
A regular rectangle and a square have equal diagonals.
The area for the extension is cleared of the top layer of soil. Select soil 20 cm deep. Cover with sand and crushed stone 10 cm thick with layer-by-layer tamping.
Foundation for an extension
The construction of a terrace is possible without a foundation on a prepared crushed stone base. Crushed stone is poured with cement mortar. Lags are laid from beams. They are protected from dampness with waterproofing mastic. The wooden frame is attached to the cabin with metal corners.
Ready-made blocks are placed under the porch and veranda or a tape fill is performed. Blocks are placed at the extreme points and in the middle. The column spacing is 2–3m.
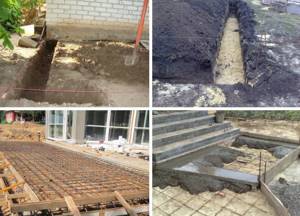
To make a strip foundation, formwork is made from boards. The fill is made 30 cm wide, deepening it 50 cm into the ground. Concrete grade 150M is used. The foundation is reinforced with rods or meshes. After the concrete has hardened, frame beams are laid on it.
Basic structures of the extension
The installation of the frame continues upward. Vertical posts are placed on the lower beams, which are tied at the top. Then a pitched roof is made. After erecting the frame, they begin laying the floor and ceiling, sheathing and insulating the walls.
Wooden structures are fastened together with nails and screws. The connection is made on metal corners, plates, or a notch is used.
The veranda and porch are insulated if necessary. Use polystyrene foam or mineral wool 50 mm thick.
The exterior and interior decoration of the extension follows the design of the change house. A wooden house is painted or covered with siding.
We build walls and partitions
The outer perimeter is tied using metal corners with a stiffener. This design can easily withstand a gable roof loaded with winter snowdrifts. Budget decoration of interior walls involves the use of plastic panels, but it is better to use energy-efficient, environmentally friendly materials, such as construction lining and plywood. A wooden beam of 50*50 mm, laid at a distance of 60 cm from each other, is suitable for sheathing the walls. Laying of mineral and basalt insulation with a thickness of up to 50 mm is done end-to-end, and the double layer is staggered.
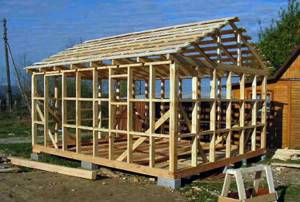
From the outside, the surface of the walls is covered with a block house and sandwich panels. The partitions are constructed from moisture-resistant plasterboard. The number and area of individual rooms depends on the specific needs and budget of the customer. Door and window openings add to the overall cost. Country two-room cabins are ideal for families with children who require separate accommodation and a quiet, cozy corner.
Projects
Country house expansion projects are limited only by the owner’s imagination.
The area is used advantageously when the veranda is attached to the cabin along the long side. In some bold projects, the veranda goes around the entire building. The garden shed is connected to the terrace according to the same principle.
The porch is attached to the change house from the entrance side.
Buildings can be oblong, square or round. A veranda, terrace, or circular porch will look unusual. The extension may have a forward projection in the form of a bay window.
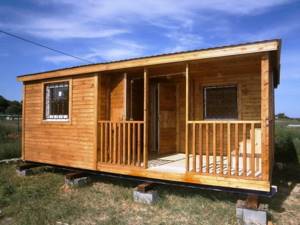
A veranda attached to a one-story house is complemented by a roof. The roof of the general building is single or gable. The entrance to the veranda is mounted with sliding or hinged doors. Wooden, metal or glass doors are installed in the extension.
Terrace - open plank flooring, platform. Instead of a roof, a canopy is made over the site. The perimeter of the terrace is surrounded by railings or stairs.
Positive aspects of a change house with an extension
Regardless of how long the construction work associated with the construction of the main house continues, the owner of the site will gradually get tired of the original appearance of the change house. He will be visited by thoughts of adding a little variety to this simple structure. For these purposes, an extension to the change house is being organized. This addition has a number of positive aspects, including:
- Reliable protection of the door from the adverse effects of moisture during precipitation such as rain or snow.
- The opportunity to be outdoors in a variety of weather conditions. A canopy constructed at the dacha can protect a person from snow, rain, as well as direct rays from the sun.
- The area of temporary housing is becoming noticeably larger. Essentially, adding a veranda turns the cabin into an additional small-sized home.
You can add a terrace in a short period of time and at minimal cost. In order to attach a veranda to a bathhouse or such a house, it is not at all necessary to hire a special team. All necessary procedures can be carried out by the owner of the site on his own if he has minimal knowledge and skills in this area.
Canopies over the terrace
The terrace is not insulated or sheathed from the inside; only a floor and a canopy are installed.
The latter is made from various materials:
The frame of the canopy is made of wood, metal or suspended on cables. Lightweight structures with supports can be folded if necessary.
The canopy can be made over the entire area of the terrace, or it can cover only part of it.
The design of extensions is varied. The article describes the main layout options. The type of construction is selected for the house, site and region of residence. The choice of construction remains with the owner.
Source
Erection of the roof
You can hide from the scorching sun, pouring rain and snowfall under an energy-efficient roof. A roofing iron and galvanized sheet covering will protect the house for a long time. The use of non-woven material of the “isospan” type will help to insulate the roof. If the drumming of raindrops is not pleasant, then you can cover the roof with a soft roof, ondulin.
The rafters must be installed edgewise at equal intervals. In this case, the protrusion beyond the frame must be at least 30 cm, in order to avoid running raindrops from hitting the walls and washing away the foundation.
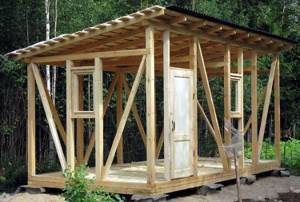
How to attach a terrace or veranda to a shed yourself
The construction of country houses and cottages quite often lasts for years, so at the very beginning of this complex process it is necessary to install temporary residential and non-residential structures. Such buildings include garden houses and cabins, which greatly facilitate life and work on the site until permanent structures are erected on it and all the necessary communications are provided. As practice shows, a properly assembled shed with a veranda can serve for years, and by slightly changing its design, you can create a living or storage space, a utility block or a bathhouse.
Ready-made project of a change house with a veranda covered with siding
A distinctive feature of the cabins is their versatility and ease of installation. Summer residents, builders, hunters, and foresters have long appreciated the benefits of cabins. This is exactly the case when maximum returns are obtained with a minimum of costs. But in order for this advantage to be fully revealed, you first need to clearly define what exactly the change house is for.
Features of installation of a suspended structure
The canopy over the change house can also be made of polycarbonate. To do this, cut the sheets to the size of the frame, drill holes for fasteners slightly larger than the screws themselves. Attach the material to the base. Cover the top edges with perforated tape, and the bottom edges with solid tape. Corrugated sheeting can also be a good covering. Lay sheets of this material overlapping, fixing them with galvanized bolts along the entire plane, but you need to start from the outer corners
In cases where a canopy is attached to a shed, an important point is the connection of the roofing material of the extension with the roof of the temporary shed. To prevent water from seeping into the seam, remove all end screws and place the canopy cover under the shed flooring. Secure the structure with self-tapping screws.
In this way, you can build a shed for a change house yourself, but this will require capital investment, the availability of professional tools, experience and significant time expenditure. But, if you have no experience in construction work and are limited in time, contact the specialists of our company. We manufacture and sell ready-made cabins and extensions to them, including sheds. For detailed information, call the phone number.
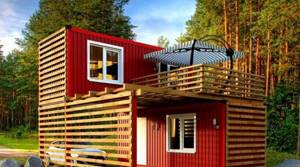
Having a comfortable cabin with a veranda at your dacha is no less important than building the house itself. Everyone knows that due to financial or other problems, the construction of private property sometimes takes many years, so all this time you will simply need to have a room for temporary residence, which, although smaller, will be practical and comfortable. Such a temporary structure for a summer residence can be either stationary or mobile (on a platform and wheels). It can be transported from place to place in a similar way, made angular (so that it takes up less space) or freely moved within the site if you need it.

Choosing a cabin
The purpose of the cabin is directly related to its design. For example, cabins that will be used as country houses must be insulated. It is also highly desirable that inside the utility unit there is a bathroom with a toilet and shower, and that repairs acceptable to humans have been made. For cabins used as a utility block and structures with a shower, the most important thing is high-quality waterproofing, especially if there will be building materials inside.
Project of a country house on a columnar foundation with a veranda
As an example of how a change house is built, we can consider its residential version, which, although it is the most expensive, including in terms of time, reveals what issues may arise during the installation of this, in general, quite simple structure.
The choice of cabin design is determined not only by its cost and functionality; the material from which it is to be built plays an important role. By and large, outbuildings come in two types: wooden or metal. Metal cabins are the most durable and with high-quality insulation they will serve well as housing or a utility unit for quite a long time, but their construction will require special welding equipment and skills to work with it.
Cladding of a country house with a veranda
It is obvious that the best option, especially in our forest-rich country, remains wood as the main building material.
Advantages and disadvantages of an extension
Along with the fact that when constructing an extension to a change house, at least such as a veranda, its decorative effect positively increases, there are other advantages:

An additional plus is that you can make a terrace for the house yourself, without resorting to the services of professional craftsmen.
Of the shortcomings, only one stands out - the increased cost of a living space with an extension, however, based on the listed advantages, it turns out that in such circumstances the price is completely justified.
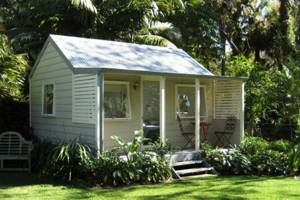
You will learn how to attach a terrace to a shed in the next video.
Source
Design options
In a summer cottage there is not enough space for a hallway or dining room. There is a need to add a porch, terrace, veranda. These building options have different functional purposes.
Porch is a door area measuring 1–1.5 square meters. If you equip a hallway in the vestibule, more living space will appear in the change house.
Veranda - covered glazed room, extension. Entrance to it is possible from the house or from the street. On the veranda they set up a summer kitchen or receive guests. If the room is insulated and heating devices are installed, then it can be used all year round.
Terrace is an open flooring for relaxation. It can be fenced with railings or have a canopy. The platform is used in the warm season; in winter it is not functional. In summer, garden furniture and sun loungers are placed here.
Need for construction resources
When starting construction, they independently make an estimate of tools and materials.
Visible surfaces are made of planed wood.
The extension to the trailer with an iron frame is made of rolled metal. For the work you will need a welding machine.
General recommendations when choosing materials
The basis of the cabin will be a wooden frame. Although there are known versions of utility units assembled from panels, it should be noted that they are less durable compared to frame ones. Therefore, it is better to choose them when use is expected to last no more than 2-3 months. In addition, the manufacture of panel structures requires more skill than for assembly based on a frame.
Insulation of cabins is an important component of construction, but you should not purchase too expensive materials for this, since a cabin with a terrace is still a temporary space. Cheap, time-tested materials such as polystyrene foam and glass wool will do just fine.
The same applies to materials for waterproofing floors and roofs; roofing felt, construction polyethylene film, galvanized iron - these are the available materials from which it is advisable to build temporary country houses and storage facilities.
Insulation of the walls and ceiling of a country house with special foam
As for wooden building materials, in addition to external criteria, you need to pay attention to the degree of drying. If the boards and beams are not dry enough, during periods of cold weather, rain and snowfall they will become oversaturated with moisture and the dacha structures may suffer greatly. You should not rely too much on treating a damp or half-damp board with water-repellent compounds; the wooden structure must initially be dry.
Construction of a change house
The stages of constructing a change house are practically the same as during the construction of ordinary houses and cottages. The main difference is the attention to communications.
The process of insulating floors in a change house
As a rule, the matter is limited to supplying electricity to the utility unit; less often, a bathroom is installed in it (with a shower, washbasin and toilet), and heating is even less often provided. The stages of building a cabin with a veranda are as follows:
Adviсe
A do-it-yourself cabin is a practical, inexpensive home that doesn't have to be temporary until you build a home on the property. It may well come in handy after this as a residential or auxiliary space, for example, a bathhouse or utility room. You can choose for yourself whether it is worth buying a ready-made cabin from a construction company or whether it is better to build it yourself.
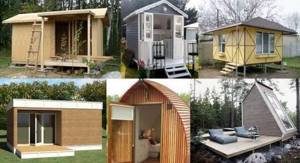
If you want to purchase a ready-made version, it is cheaper to buy the structure directly from the manufacturer rather than in construction stores. Before making a purchase, be sure to discuss in advance all the nuances regarding the type of materials used in construction, as well as sizes, type of glazing, installation details and payment. It is quite possible that they will bring you a finished product, since it is assembled in special hangars. Builders, at the request of the customer, can install the structure on your site.
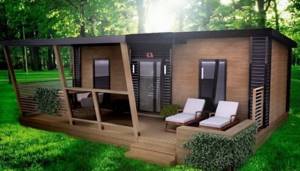
And if you decide not to rush and make a change house with a veranda with your own hands, choose the two-room option. This type of cabin is as comfortable as possible. It will be an excellent place to relax after a working day at the dacha. If you arrange such a “nest” comfortably, then you probably won’t even notice the difference between it and a full-fledged home.
To learn how to build a shed with your own hands, watch the following video.

The change house plays the role of a temporary structure. Proper insulation will make it possible to live in comfortable conditions throughout all construction work. When the construction of the main facility is completed, the temporary structure does not need to be dismantled. It can be used as a utility room. An important step is the construction of an extension to the change house.
DIY house extension
Dear visitors to the site “Visiting Samodelkin,” from the material presented by the author you will learn how you can build an extension to your house yourself and without the help of professional builders.
When living in a private house, there is always the opportunity to expand your living space, namely to make an extension. This type of extension can be different, both directly for a living space and for a secondary one, for example, an entrance hall or canopy. The material used is also different, there is a wide choice today. For example, the author created a frame-panel structure, which has a number of advantages, 1- it is, of course, quick to erect, 2- thermal conductivity is not inferior to brick and block. I cleared a site for construction, made a shallow foundation, assembled a timber frame, insulated it on both sides and plastered it over a reinforcing mesh.
So, let's look at what exactly the author needed to build an extension to the house?
1. timber 2. used red brick 3. cement 4. sand 5. board 6. polystyrene foam 7. mineral wool 8. mounting frame 9. plastic window 10. door 11. OSB 12. screws 13. nails 14. professional sheet 15. reinforcing mesh 16. corner 17. metal window sill 18. leather substitute (for front door upholstery) 19. floor tiles
1. trowel 2. shovel 3. spatula 4. hacksaw 5. screwdriver 6. drill 7. metal scissors 8. hammer 9. tape measure 10. level 11. container for preparing mortar 12. pegs with rope (for marking) 13. ax 14. scissors 15. garden wheelbarrow
Step-by-step instructions for building an extension to your house with your own hands.
The first step, of course, is to make a foundation, as with any other construction. The advantage of a frame building is that it does not need a massive buried foundation, unlike brick buildings, and therefore the financial costs will not be high. The author used used red brick as a base. Having cleared the area, I laid out a row of bricks and filled them with cement mortar, then began laying. Having made a brick foundation, I moved to the inside, filled up the fragments of stone and brick and filled them with concrete mortar, and the result was a slab. Red brick is laid out.
Lays brickwork, starting strictly from the corner. The author fills the inner part with fragments of red brick and stone, and fills the top with a liquid solution of cement and sand in a ratio of 1:3, so that everything flows and fills the gaps between the fragments. The result is a slab like this. Afterwards a layer of waterproofing in the form of roofing material is laid. Next, holes are drilled in the foundation for fastening the wooden beams. On the resulting wooden base, the author begins to install and fasten the bars vertically. It is worth planning the location of window and door openings in advance. The rafter system is being manufactured. The roof is covered with a metal corrugated sheet; it is important to slide the edge of the sheet 10-15 cm under the slope of the slate roof. It is also necessary to organize the correct outflow of rainwater using a metal gutter. A plastic window is inserted into the window opening, the cracks are filled with polyurethane foam. Next, the author prepared insulation in the form of mineral wool for the interior decoration, and the outside of the frame is covered with OSB. Finishing begins from the bottom up; the slab is cut to the required dimensions in advance. The entrance door is inserted and hung into the doorway; they didn’t buy a new one, because the old one is in very good condition, despite several dozen layers of paint, the door is well preserved, and it is already over 40 years old. The frame is sheathed, the door and window are installed, and the roof is covered. The door will subsequently be covered with crap on the outside and will be better than new. From the outside, the extension is insulated with polystyrene foam 5 cm thick and glued using polyurethane foam. Small sections of foam are applied to the surface of the foam board, and then applied to the wall of the extension, and finishing also begins from the bottom up. Then a layer of foam is applied to the edges - this is necessary to form a seam and glue the next sheet of foam. For reliability, it is screwed with self-tapping screws with a metal washer made from a 0.7-1 mm metal sheet cut into square blanks. The surface of the walls is completely insulated with foam plastic. Please also note that the author adjusted the extension to the same level as the adjacent wall without a transition, that is, in the future, when the walls are plastered and painted, everything will look like one whole. During the insulation process, a gap formed between the window and the foam. Filled with polyurethane foam. A metal window sill is installed. Then you need to secure the reinforcing mesh and begin plastering the walls. Perforated corners are attached to the corners. Excess polyurethane foam was cut off and covered with plaster. The lines are smooth and clear. The door is sheathed on the inside with OSB, and the sheet was sawn using a regular metal circle, resulting in a very smooth and even cut surface. This is what the door looks like inside the extension. On the outside, the door is trimmed with leatherette, it looks no worse than a new one, and maybe even better, the main thing is free and inexpensive) Thus, the author acquired additional living space, the extension was built in a short time, some of the material was used second-hand, which slightly reduced financial costs . All that remains is to cover the walls with a primer and paint them one color so that everything looks the same. As you can see, everything is simple and clear, there is nothing complicated and it is quite feasible for an ordinary person without construction experience or education. Be brave, friends!
This concludes the article. Thank you very much for your attention! Come visit more often, don't miss out on new items in the world of homemade products!
Delivery of new homemade products by mail Receive a selection of new homemade products by mail. No spam, only useful ideas!
*By filling out the form you agree to the processing of personal data
Become the author of the site, publish your own articles, descriptions of homemade products and pay for the text. Read more here.
Correcting skewed walls of a change house
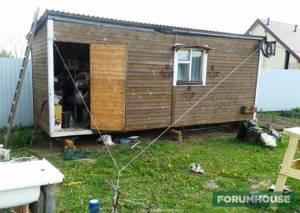
After installing the change house, I leveled it horizontally, but the vertical distortion remained, and the distortion was uneven. The doors still didn't close. This happened due to the fact that the frame of the cabin was assembled from a “fifty” bar. This design has no rigidity. There was also a sag in the middle. I decided to fix this.
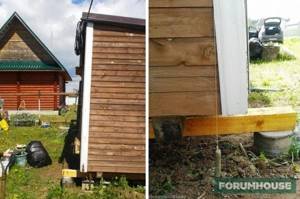
The user, using piles for the future canopy, which he poured during the construction of piles for the change house, secured a steel cable with a diameter of 4 mm to the corner support column.

The cable was tensioned using two turnbuckles.

To secure the cable, homemade mortgages were used, pre-embedded in the pile.
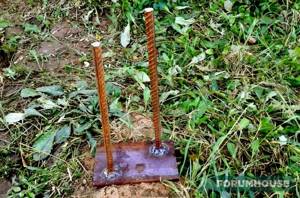
According to the user, tightening the lanyards did not help correct the misalignment.
To increase the force, the cable was twisted like a pigtail with a piece of reinforcement, turning the lever around its axis.
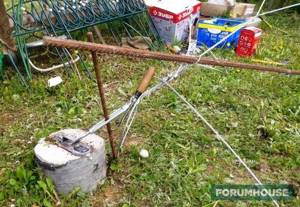
As a result, the cabin straightened out and the doors began to close.

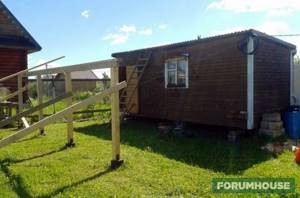
Although the change house straightened out, the following problem was discovered - as soon as the tension in the cable was removed, the next day the change house began to warp again. The insufficient rigidity of the frame affected it. The solution is to load the change house from the front. For this purpose, Nicht79 decided to make a canopy measuring 6000x4000 mm.
To make the canopy, we used a 5x20 cm board of natural moisture, cut on a circular saw.

Only galvanized screw nails were used to fasten the boards together.

From 5x10 cm boards, again joined in twos, the user made 10x10 cm racks, having previously made a groove in the upper part for attaching the crossbar.
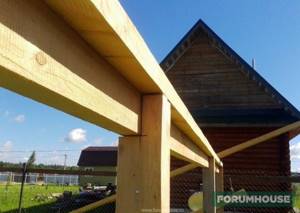
Canopy characteristics:
- support height – 1750 mm;
- cabin height – 2500 mm;
- roof slope length – 4000 mm;
- Roof inclination angle – 12%.
The pillars from below were attached to the foundation with welded side plates, and to the plates - with “grouse caps”.
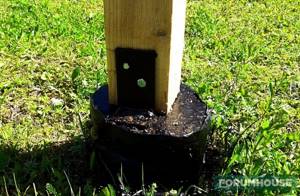
Nicht79 also covered the posts for waterproofing with bitumen mastic.

The most difficult thing, working alone, was to align the columns vertically. It's easier to do this with an assistant.
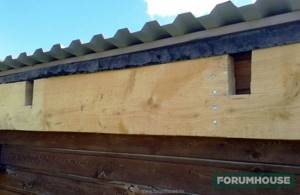
Then the user attached a six-meter board (support for the canopy rafters) with a cross-section of 20x5 cm to the front wall of the cabin, under the roof itself.

To cope with the task, Nicht79 drove a hook into one side and, throwing the end of the board onto it, gradually raised it and leveled it. Moreover, a couple of times the board fell off, almost knocking off my hands, and I had to start all over again.
The board was nailed with 4 nails in those places where the change house racks were located. Also, grooves for the rafters, 5x10 cm, were cut out in advance in the board.
Foundation
Unlike permanent buildings, the utility block can be placed on the simplest, columnar foundation. The depth of location, the distance between the pillars and their thickness vary depending on the size of the cabin and the type of soil; the general rules remain the principles of placement and waterproofing of the foundation. The pillars are placed not only at the corners of the future building, but also along the entire length of the support bars at a distance of at least 1.2 meters between them. The columnar foundation is laid out on a carefully compacted sand bed.
As for the material from which this type of foundation is made, you can use either brick (ceramic only) or ready-made concrete blocks.
The latter option is more preferable, since in this case the foundation is much more durable than a brick foundation. The foundation blocks or brickwork of the foundation must be strictly at the same level, protruding 200–300 mm above the ground.
An example of a foundation for a cabin with a veranda
The foundation blocks are laid using a regular cement-sand mortar, after drying which can be waterproofed. The most common waterproofing option is two layers of roofing felt laid on the foundation. They will prevent the wooden blocks laid on the blocks from getting wet. For temporary structures, such waterproofing is quite sufficient if there is additional insulation under the floor and the ventilation system is properly organized, especially for options with a toilet and rooms equipped with a shower.
The process of making a canopy for a change house
In total, it was planned to make 8 rafters from boards with a section of 20x5 cm.
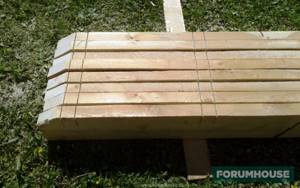
The roof covering is brown cellular polycarbonate, 6 mm thick. The sheet size is 12x2.1 m. This should be enough to cover the entire area of the canopy.
To avoid sagging and deformation of polycarbonate from snow, a maximum supporting surface is required - lathing.
To do this, grooves were cut into the rafters for timber 6000x50x50 mm.
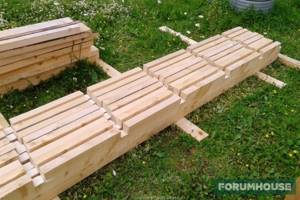
An important nuance : the user carried out all the work on erecting the canopy by pulling a cable to level the cabin. In this case, after removing the load, the canopy will redistribute the load, and the change house will remain level.
Having laid out the rafters on the upper crossbar, the user inserted a block (sheathing) into the grooves.
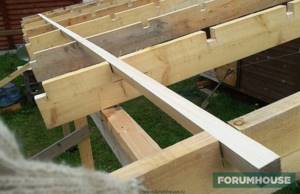
After making sure that everything fits together, Nicht79 made markings for the groove on the rafters.
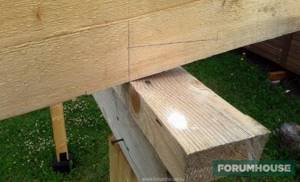
This is necessary so that the rafters are firmly fixed, resting on the crossbar with their entire plane. It also slightly increased the angle of the roof slope.
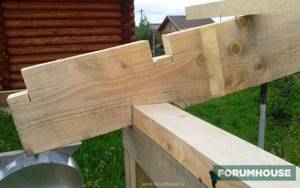
Having made the cuts, I began assembling the canopy. I inserted the rafters into the grooves of the support beam and secured them using a special fastener called a “beam holder.” I nailed them down with galvanized screw nails, 6 pieces each. Then I inserted a block into the grooves of the rafters and secured it with two nails at each joint.
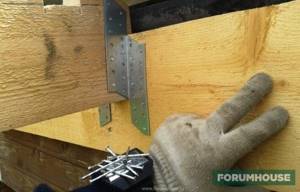
For outdoor buildings it is better to use galvanized fasteners, because... ordinary, “black” metal will quickly rust, and dirty stains will spoil the appearance of the structure.
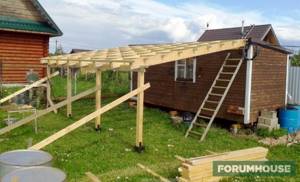
To increase the rigidity of the frame, the user nailed jibs on both sides of the canopy.
So, the canopy frame is ready, the cabin is straightened and placed on a reliable foundation. The next stage is painting and laying the roofing.
Frame, roof and floor
The construction of the lower trim and joists, as well as the frame and roof rafters, is best done according to standard schemes. Usually there are no difficulties here if you know some of the nuances.
In order to prevent moisture from entering the room, it is necessary to insulate the underground. If this is not done, the floor boards may swell. There are voids between the foundation pillars, and they need to be filled with porous bulk material, for example, rubble or expanded clay. To prevent condensation from forming in the underground, there must be gaps or special vents between the spans. The outside of the utility block can be sheathed with any available material: iron, boards, siding or plastic. The main thing is that the sheathing does not allow or absorb moisture. Project of a country house sheathed with siding
The requirements for internal cladding are not so high, so fiberboard, plywood or lining is suitable for it, and if the change house will be used as a room where they only change clothes and store garden supplies, then the inside may not be covered at all. An insulating material, such as polystyrene foam, is installed between the inner and outer skins.
Variations in designs of cabins for summer cottages
In principle, as in any matter, with regard to the construction of a change house there are two ways. Buy a ready-made industrial version or go hand-made and build the building yourself. First, let's look at what types of summer cottages the industry offers us.
1. Panel room
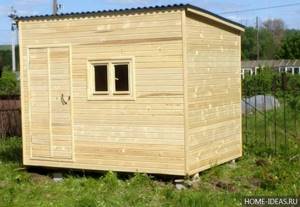
The simplest, “budget” option. As a rule, disposable. The rather presentable appearance is deceptive, since due to the lack of special stiffening ribs, the building can become deformed and even collapse like a house of cards.
The fact is that panel technology involves the construction of a frame from thin wooden beams, and the outer cladding from clapboard. The interior is covered with chipboard, and the roof is covered with low-density iron sheets. As a rule, a panel shed cannot withstand gusts of wind and frost; it is better to use this option in the summer - for example, for cooking or as a utility unit.
2. Frame
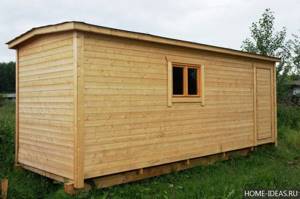
This is a more reliable, but financially expensive option. Advantages - the use of deformation-resistant wooden beams, visual appeal. Disadvantages - using mineral wool for insulation dries out the air inside the house. Also, due to the dense layer of vapor barrier, the useful area of the change house is reduced.
3. Brusovaya
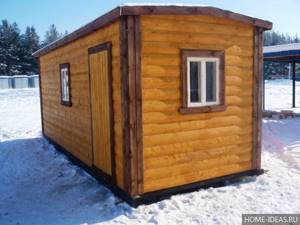
Luxury offer. It differs from its relatives in its high price. But this is understandable, since massive logs are used for construction.

A log cabin is a capital structure designed for more than one year of operation. It makes sense to spend money on its construction once in order to solve several dacha problems at once for a long time. In addition to the function of storing equipment, such a nice wooden house can serve as a bathhouse. Only in this case should you worry about all internal communications in advance (for example, about partitions, installing a stove or water heater).
4. Container
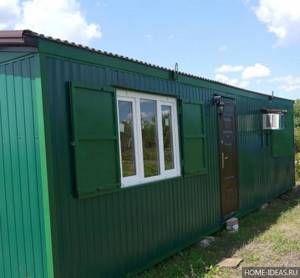
A completely acceptable type of country house that can organically fit into any design style of the site. The frame is made of a metal channel, and the side walls are made of panels of a modern material called sandwich in English. The advantages of the container model are reliability, durability, and the ability to retain heat inside.
Canopies over the terrace
The terrace is not insulated or sheathed from the inside; only a floor and a canopy are installed.
The latter is made from various materials:
The frame of the canopy is made of wood, metal or suspended on cables. Lightweight structures with supports can be folded if necessary.
The canopy can be made over the entire area of the terrace, or it can cover only part of it.
The design of extensions is varied. The article describes the main layout options. The type of construction is selected for the house, site and region of residence. The choice of construction remains with the owner.
10.12.2017
And it all started as usual. Since ancient times, there has been a change house on the dacha plot, it doesn’t seem to be presentable, but there is a place to spend the night, store all sorts of dacha necessities, and hide from bad weather.
Two-story country cabins with toilet and shower: how to add a floor to the building?
Two-story country cottages deserve special attention. This is one of the most economical solutions for rebuilding a ready-made block container. It allows you to significantly save on materials, thermal insulation and roofing. But at the same time, special attention must be paid to the reliability of the foundation and the ease of construction of the second floor.
During construction, the roofing system is carefully dismantled. Reinforce and insulate floors. Vertical posts are attached to the crown, form a frame and are usually sheathed with the same material as the walls of the first floor. The gaps in the supporting structure are filled with insulation. Typically, the same materials that were removed before construction can be used for the roof.
Often the second floor of a change house is obtained by rebuilding the first floor and changing the roof to a higher one. In this case, it is possible to organize a residential attic.
Source
Insulate and protect
Massive beams adjacent to the ground are treated with an antiseptic against fungus, bees, ants, and other insects that can cause significant damage to load-bearing structures over the course of a year. To increase comfort during the hot summer and cold winter periods, it is necessary to competently approach the insulation of the facade. Block and roll insulation should be laid against wind - moisture - insulation. The use of polystyrene is allowed - carefully closing cracks and gaps using polyurethane foam.
Modern protective wood stains will provide a spectacular appearance, giving the shade of expensive wood species, and additionally protect against ultraviolet rays and seasonal abundance of precipitation.
