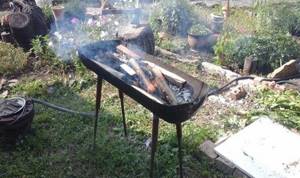
A warm, friendly feast in the fresh air is always associated with barbecue, barbecue, coals. The most economical and simple device for preparing juicy, tasty and healthy meat can be a grill made from a gas cylinder. Of course, you can also purchase a barbecue in stores that offer a huge range of similar products. But when you purchase a cheap grill, you risk losing it after the first three cookings of meat, because the walls of this box are thin, the iron is 1-3 mm thick and burns out quickly.
You can also purchase a more expensive unit with a wall thickness of up to 6-7 mm. But in order for everything to work out, it’s better to do everything yourself.
And if there is an unnecessary gas cylinder in the house, then
there will be no problems with fireproof thick iron and a high-quality barbecue .
Types of barbecues
If you want the grill to be stationary and you can use it all year round, then you should prepare a site for installing the unit . It is better that the surface is smooth and hard.
A concreted area with fixation of the barbecue legs is suitable for this.
If you want to have a mobile device for frying meat and barbecuing, you can do the following:
- Device on legs;
- On wheels;
- With folding legs.
The mobile portable unit can be folded with the legs detachable, or the legs, up to 10 cm high, can be welded to the bottom of the stand.
Precautionary measures
When using a gas cylinder that has not been used for its intended purpose for a long time, you should make sure that the previously used gas is not in the cylinder . For this:
- Unscrew the cylinder valve;
- Make sure there is no gas escaping from there;
- Fill the tank completely with water to remove remaining particles of propane or butane and condensation;
- Turn the container over and pour out this water;
- Fill the container again with water to the brim;
- Leave it filled for 2-4 hours;
- Throw out the water.
After this, you can use the equipment for cutting and welding the unit.
Preparing tools
To begin with, before performing the main work, you need to stock up on the necessary tools and materials so that the process of making a barbecue from a gas cylinder is:
- Continuous;
- Fast;
- Effective;
- High quality.
Materials and tools
The main tool when cutting iron will be a grinder (you will need cutting and cleaning discs for the grinder) or a gas cutter and a jigsaw. In addition, you need to have other equipment on hand, as well as materials and components for the future cooking unit:
- Drills, electric drills - for making holes in the body;
- Pipes (diameter 100 mm) – for legs and chimney;
- Sheet iron - for stands and bottom;
- Metal corners - for fastening various elements and strengthening the structure;
- Grate – for mounting a barbecue;
- Welding machine (electrodes with a diameter of 4 mm);
- Bolts, rivets, hinges, adjustable wrenches, wrenches, gas wrenches;
- Roulette, ruler;
- Pencil - for marking.
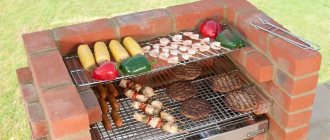
Features of a barbecue made on the basis of a gas cylinder: advantages and disadvantages
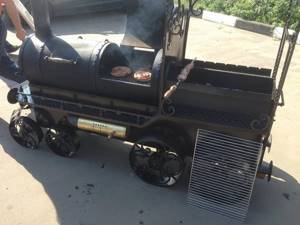
Today, barbecues made from gas cylinders are very popular and this is quite understandable. Such devices are quite large and spacious, so you can install a large number of skewers for a large company at once. Their legs are much higher than those of standard store products, and this allows a person to stand straight without bending while preparing kebabs. Also, if desired, you can create various interesting shapes from a cylinder using welding, fittings and metal to suit the exterior of your home.
Advantages of a barbecue from a cylinder:
- Ease of manufacture. Even a non-professional can easily make such a design in a few hours if you have detailed instructions and a visual image.
- Cheap design. If you have a used or unsuitable gas cylinder at your dacha, then the base of the barbecue will be free for you. The most you will have to spend money on is additional structural elements.
- Thanks to the thick walls of the cylinder, such a grill can withstand even the highest temperatures and high pressure, thereby significantly increasing its service life.
- If there is a hinged lid, the grill can be left outside without fear of precipitation. A lid is also necessary so that it can be used as a home smokehouse.
- Functionality. If necessary, the design can be improved using additional elements.
- Mobility. The grill can be moved from one place to another or transported by car.
- Ease of use. Since the bottom of such a grill does not burn out thanks to the thick walls, after preparing kebabs or other dishes, the coals do not need to be filled with water. You can just close the lid and that's it.
- The structure is too large and may not fit into the overall interior of the yard.
- This barbecue is quite heavy, so one person will not be able to move it without assistance.
- Only coal can be used as a raw material, since there is very little space for logs in it, or you will have to wait until the firewood is completely burned out, and then you can lay the skewers.
Preparatory stage before disassembling the cylinder
Before starting work, make sure that all tools, materials, and components are available.
The cylinder, washed and cleared of remaining gas particles, must be placed on a flat, hard surface for marking.
Performing markup
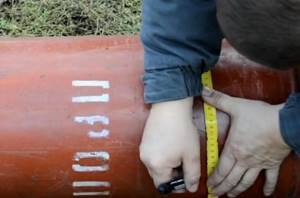
Let's look at an example of marking a typical 50-liter cylinder with a diameter of 96 cm. This value is important for us to accurately determine the markings on the surface of the cylinder. Let's do the marking step by step :
- Divide 96 cm by 4, we get 24 cm.
- Determine the location of the longitudinal seam.
- We retreat from it 24 cm in both directions.
- We draw a line along.
- We make circular markings, making an indent of 3 cm at the top and bottom.
- The distance between the longitudinal lines should be within 10 cm - for convenient laying out of skewers in the future.
- To mark the lid, we determine what part it should be of the total volume of the cylinder. Usually this is a smaller part, which is less than half the length of the structure, then from the longitudinal central seam we make marks up 10 cm and draw a longitudinal line.
- The marking of holes or slits for air flow should be made taking into account the minimum possibility of clogging them with fat deposits from cooking or ash. The openings should facilitate the convenient exit of combustion products and ensure air movement inside the unit.
All cut points must be clearly visible.
When processing the edges, it is necessary to take into account the tightness of the structure , therefore it is desirable that all metal edges are even and smooth.
It all starts with cutting the cylinder
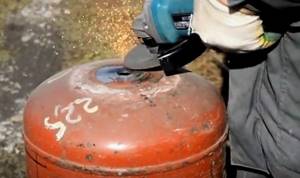
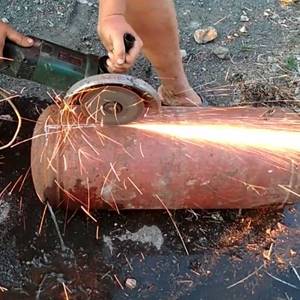
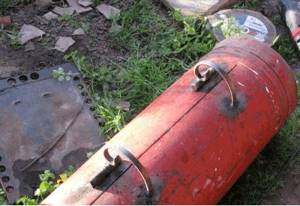
Regardless of the design chosen, the first step in making a barbecue is cutting an old 50-liter propane cylinder. We do not recommend immediately rushing at him with an angle grinder. In this matter, you must follow safety rules. The remaining gas present in each container may explode if it comes into contact with sparks and air.
Therefore, you will first have to manually unscrew the tap. Removing a fitting on an old cylinder is not always a simple operation, since it is tightly “stuck” to the body. You can try to move it using an open-end wrench, hitting the handle with a hammer.
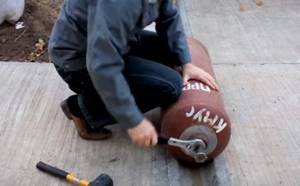
If the tap does not budge, then use another tool - an adjustable water wrench and a steel pipe as a lever.
Under the influence of such a powerful force, any thread gives way. To prevent the container from rotating, a stop angle is attached to its bottom on the other side.

To make unscrewing easier, you can apply VeDeshka to the contact point between the tap and the body and wait a couple of hours until the thread loosens.
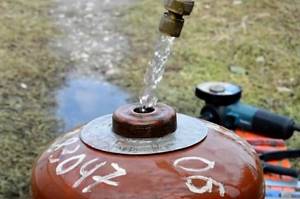
After this, the container is slowly filled with water. It displaces the flammable gas-air mixture, eliminating the risk of explosion when cutting.
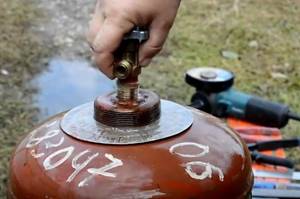
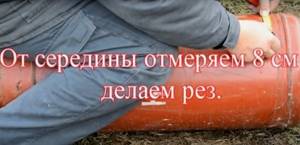
After this, the water is not drained, but the tap is put back in place and they begin to mark the body.
On one side there is a long seam on the body of the cylinder. It will be a “beacon” for the first cutting line. The second line is drawn on the other side so that it is opposite the first and recedes 8 cm upward from it. This will be the second cutting line. If you do not make this adjustment, the roasting pan will turn out shallow.
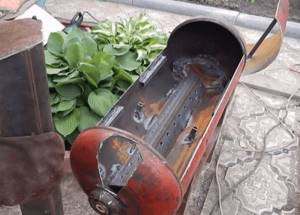
Having made the markings according to the drawing, they take the grinder and cut through the walls, separating part of the body. It will be used as a hinged lid.
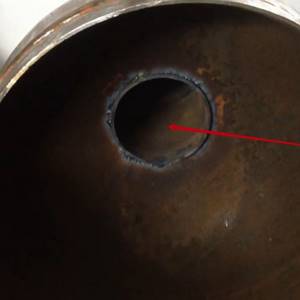
Important nuance! You need to cut the body carefully next to the seam so as not to damage the steel ring that is located under it. It will serve as a stop for the lid so that it does not fall into the fryer.
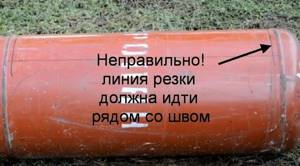
In the bottom photo you can see a ring on the left side of the container. If the master had passed the grinder next to the seam, it would have remained in place and served as a stop. It is not difficult to correct this mistake: you need to weld steel strips on top of the lid.
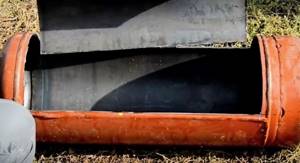
The next step is to remove the fitting. It is cut flush with the body.

Burrs are removed with a grinding wheel.
The further procedure depends on how you intend to use the grill: only for frying or combine it with a smokehouse. We will consider these operations after reviewing the finished structures.
What are we going to make from the balloon?
When making a barbecue from a gas cylinder, it is necessary to take into account a number of its characteristics, on which the further functionality of the structure and its efficiency will depend. Therefore, the cylinder must be:
- Convenient to use;
- Sealed when closed;
- Reliable in operation;
- Correct to use.
All openings must be in the right place - on the side or below - for optimal heat distribution and removal of combustion products. The lid should be in tight contact with the base when closing. Gaps for placing skewers should be located at a sufficient distance - at least 7 cm.
The edges should not be sharp or uneven, which will ensure safety, tightness, and aesthetic appearance.
Preparing the cylinder for cutting
We fix the cylinder on a flat surface - at a convenient distance from the ground for you. We prepare the grinder and insert cutting discs into it - when cutting with this tool, the look will be more aesthetic.
We open it correctly

After thoroughly, repeatedly rinsing the cylinder with water and removing all traces of propane and butane, we dismantle the cylinder valve using gas wrenches.
We weld the hole from the valve, unless, of course, you plan to use the additional function of the cylinder - to use it as a smokehouse. Then this hole will be needed for installing the chimney and will serve as a place for welding a pipe of a certain diameter. We cut along the markings with a grinder for a more aesthetic appearance and safety for further construction of the device.
We use a metal strip to decorate the edges, leaving the base of the unit uncut, and clean up the sharp edges.
How to cut correctly?
Using a grinder with a cutting disc installed, we cut the cylinder by diameter (in accordance with the markings), dividing it into 2 parts. You can leave the lower part larger, in accordance with the project diagram.
We weld the hinges according to the marks for the hinges. There can be 4 or 8 of them, depending on the volume of the gas cylinder.
We cut out the lid along the circular marks; it is better to do this with a grinder, but you can also use a gas cutter.
On the first cut line, you should immediately weld the hinges to avoid additional measurements, markings and determining the exact fixation of the lid. To accurately and tightly fix the upper part of the unit, it is worth welding stops from parts of metal corners up to 4-5 cm wide; it is better to mount them on both sides - to avoid distortion of the lid. These clamps will also help determine the amplitude to which the lid of the gas cylinder grill will be tilted in the future.
What else can be made from a gas cylinder - manufacturing nuances
Based on a gas cylinder, you can make dozens of variations of grills, barbecues and smokehouses. For convenience, we will briefly describe some of these devices:
- Outdoor grill from a gas cylinder. The simplest type of construction from a gas cylinder. Even a schoolboy can make such a grill.
To create such a “masterpiece” you will need a minimum of cost and time - B-B-Q. We described this design option in detail above. A special feature of this design is the presence of a hinged lid.

- Smokehouse differs from a barbecue in that it necessarily has a firebox.

The firebox for a smokehouse made from a gas cylinder plays the role of a small stove.
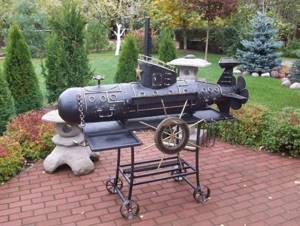
Its task is to supply warm steam at a constant temperature to the smoking compartment. The entire structure must be airtight. The structure is necessarily equipped with a chimney pipe. - Smoker is the second name for a steam locomotive. It is better to do it on the basis of accurately constructed drawings. This is the brainchild of a folk craftsman, because the unit combines the functions of several devices at once - barbecue, grill, smokehouse and barbecue.
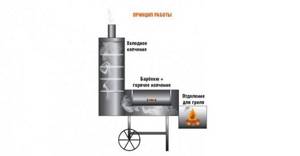
The principle of operation of a smoker
Of course, one cylinder is not enough; each pipe has its own function. This product contains all the options that are available to similar structures: barbecue, barbecue, smokehouse, grill.
How to make a smokehouse from a gas cylinder
Let's look at some of the features of making a smokehouse from two cylinders.
| Illustration | Description of action |
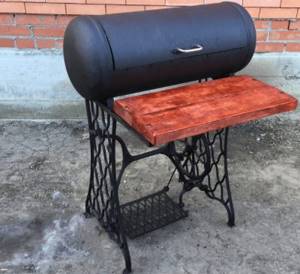
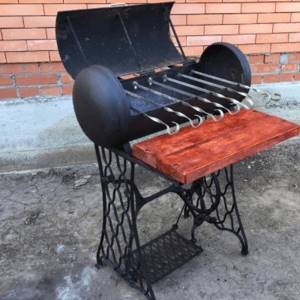
| The base for a barbecue smokehouse made from a gas cylinder can be a stand for an old sewing machine or a welded structure like this. |
| We think through options for mounting a retractable or folding table in advance. The design may vary. | |
| Prepare the cylinders following the instructions above. We cut each of them like simple barbecue roasters. It is better to make a smokehouse from a gas cylinder yourself according to the drawings. |
| The only difference is that you need to make a hole in the firebox for a “blower”, which will allow you to control the smoldering process of the coals. Which, in turn, will create the smoke necessary for smoking. | |
| Weld a handle for opening it and transport handles to the lid on the side convenient for you. |
| We place a special mesh in the firebox for laying wood chips. | |
| We begin work on creating a chimney. We weld the “elbow” and the main pipe. |
| We cover it with an adjustable “curtain” from above. | |
| And we made such a multifunctional smokehouse from a gas cylinder with our own hands. |

Cold smoked smokehouse - from assembly drawings to test tests of the taste qualities of an aromatic delicacy. In a special publication on our portal we will talk in detail about cold smoked smokehouses. You will learn the features of the cold smoking process, the design diagram and operating principle of a cold smoked smokehouse, and how to make a smokehouse with your own hands.
DIY gas cylinder grill
A gas cylinder grill is a variation of a barbecue. With only one difference - to create this design, corners for attaching a special mesh are necessarily welded into the cylinder.
Do-it-yourself barbecue from a gas cylinder
We discussed in detail an example of making a barbecue from a gas cylinder in this article. If you still have questions about how to make a barbecue grill yourself from a gas cylinder, watch this video:
Do-it-yourself kebab maker from a gas cylinder
The role of a kebab maker can be played by any of the homemade products discussed in this review. Even an open grill will cope with this task perfectly. However, it should be remembered that most often such structures are not protected from wind or rain.
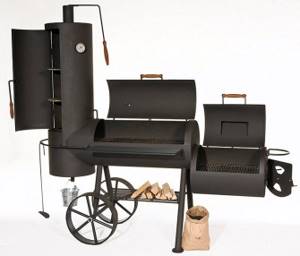
How to make a grill-steam locomotive from a gas cylinder with your own hands
This is one of the most difficult and most time-consuming tasks that true masters of working with metal set themselves.
A beginner cannot create such a design. A “homemade product” of this type is capable of solving several problems at once: it is a grill, a smokehouse, a grill, and a barbecue. Each compartment performs its own task. Such barbecues have high productivity due to their sealed design; there is practically no heat loss.
If you decide to create a grill-steam locomotive, then from this video you will learn how to cook a grill from a gas cylinder.
From cutting the cylinder to installing the legs
How to make a grill from a gas cylinder correctly? When making a barbecue from a gas cylinder, you need to take into account a number of points that will make your design convenient and of high quality:
- Full compliance with the project - drawings and diagrams.
- Welding limiters for the lid will prevent it from falling inside the structure. The latches will help you tilt the lid to the desired distance.
- We mount the handles on the top of the structure.
- We drill a place for skewers with a diameter of up to 14 mm. Then we make triangular cutouts on the front wall near each hole. These grooves can be processed with a file.
- An additional shelf at the bottom of the unit will promote uniform heat distribution due to the fact that coals will not accumulate in the center of the cone-shaped product. In accordance with the drawings, we cut out a sheet 4-5 mm wide on which the coals will smolder, and fix it at the bottom with fasteners.
- The distance from the bottom to the surface where the products will lie should not exceed 100-150 mm.
- Holes at the bottom are a necessary condition for air circulation and the outflow of harmful substances from combustion and cooking products. The location of the holes directly affects the quality of the prepared products. The holes at the bottom allow all harmful substances to directly leave the structure and do not allow them to settle on meat or fish. Side openings are not as effective and do not completely protect food from combustion products.
- We install the device on the legs, which we weld to the cylinder. To make the legs, angles and pipes of the appropriate diameter are used - it is important to ensure the stability of the grill.
- We paint the grill with heat-resistant paint.
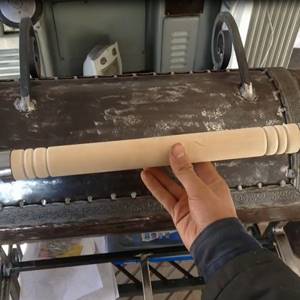
Subtleties of handle installation
It is better to purchase handles for opening the lid ready-made at any building materials store.
It is more convenient for them not to heat up, so we choose appropriate materials: wood, fire-resistant composite materials.
If heating the handles does not play a significant role for you and you want to save money, you can make handles from any metal fittings or a rod of the appropriate diameter (3-7 mm), bending it into the appropriate shape - U-shaped or C-shaped.
If necessary, you can place a thermometer on the lid, which will allow you to monitor the temperature when preparing a particular dish.
The handles are attached after the final stage of manufacturing the device, that is, after painting and drying the product.
The cover is usually created at the first stage of work on the grill or barbecue.
Installation of a chimney pipe for a barbecue
If a chimney is required in your device, in accordance with the drawings and diagrams, then the place for its installation is a former valve, cut off at the initial stage of construction. To ensure the tightness of the grill and combustion products do not escape through the pipe, this integrity should be strengthened with corners, welding them to the longitudinal edges of the walls of the device.
They can also serve as ledges for placing grills and skewers.
Places for skewers and grill grids for barbecue
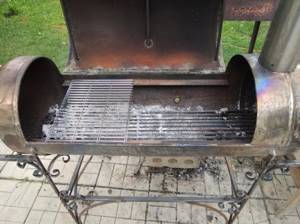
A metal sheet no thinner than 4 mm is placed on the bottom, preferably made of cast iron or carbon metal alloys. In order for food to cook fully and evenly, the height of the food devices should not exceed 150 mm from the flame level. You can make fastenings at different levels - for different products and methods of cooking meat and fish of different degrees of roasting. In small cylinders you should limit yourself to one level. Barbecue and grill grates should lie comfortably, and the food on them should completely absorb heat.
If you have not welded a corner for skewers inside the cylinder, you can insert it into the side parts of the grill. The holes in the base of the structure will get rid of dust and dirt and remove excess moisture, and will also contribute to additional traction.
Painting a barbecue from a propane cylinder
Regular paint is not suitable for painting the device - you need heat-resistant paint. But before painting, it is worth making 1-2 fires to degrease the surface of the unit and ensure the removal of residual gas elements.
After this, you can paint the body and interior with a brush, and you can use a propane tank to ensure uniform coloring.
Then the paint layer will be:
- Smooth;
- Without bumps;
- No trash;
- Smooth.
You are guaranteed not to leave a single place without painting, since the evenly spreading jet from the cylinder will provide painting even to hard-to-reach places in the device.
How to paint a homemade grill?
Today, the paint and varnish market offers a huge selection of products that are suitable for painting barbecues. All of them are distinguished by heat resistance; they do not change their properties at temperatures of +700 degrees or more. Such means include:
- Silicon enamel;
- Powder thermal paint;
- Acrylic paint;
- Oxidized substances.
Popular brands are:
- Elcon;
- Thermal;
- Kudo;
- Certa;
- Thermal KO-811;
- Hammerite;
- Bosni Hi-Temp.
What to paint with?
To save paint, you can not paint the inside of the cylinder, but give an aesthetic appearance to the barbecue only by painting the outer frame. Then you still need to use a heat-resistant type of paint, but purchase it in smaller quantities. Heat-resistant paint Tikkurila Thermal is popular.
Thermal paint cylinders are also immediately sold, which are easy to use; their cost starts from 150 rubles.
Examples of barbecues
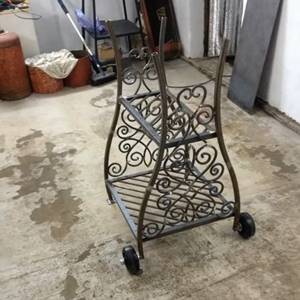
Often a beautiful stylish barbecue on a personal plot does not look at all like the gas cylinder from which it was made - the design and decor of the structure are so well thought out. Here the choice is yours: you can paint it with any color of heat-resistant paint, you can weld curls or even profiles. You can also decorate the lid with an openwork handle if desired. There is a lot of room for imagination. Or you can look at additional photographs of ready-made barbecues made from a gas cylinder with your own hands, and take useful moments for yourself.
Advantages and disadvantages
The main thing in a barbecue is the convenient preparation of healthy and tasty food. Therefore, it is advisable to prepare the edges of the product both for skewers and for the grill. If you want to adapt the grill to a smokehouse, then you just need to weld a pipe with a diameter of 10-15 centimeters to a pre-cut side hole.
Therefore, the main advantage of a barbecue made from a gas cylinder is its versatility.
It is also distinguished by:
- Durability;
- Variability;
- Reliability;
- Convenience.
Among the disadvantages, we can note the more frequent contamination of the internal part, especially the lower part. If there is a welded metal panel on the bottom, then this problem can be easily solved.
Another disadvantage many consider is the long preparation of the cylinder for cutting - its careful removal of gas microparticles. Video on this topic
Features of using barbecues assembled by yourself
Before you decide to create or purchase such a product, pay attention to some points:
- First of all, understand that any structure that works with fire is potentially life-threatening.
- Ask yourself in advance where the product will be stored during the cold season.
- Study the principle of operation of the barbecue and its features. Each structural element has its own purposes.
- Prepare all materials for work in advance.
- Do not leave small children unattended near power tools, much less around the cylinder.
- Consider the option of buying a barbecue from a gas cylinder if you are not entirely sure whether you can finish the work yourself.
We hope that our recommendations helped you decide on the option of setting up a barbecue area yourself on your property or in your home.
And it’s quite possible that already this summer your neighbors in the area will be eager to take a selfie with such a work of art
If you have any questions for the author of the article, you can ask them below.