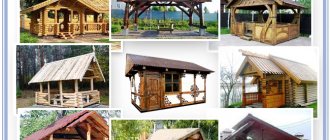
Summer is coming, which means it's time to get ready for outdoor recreation. To ensure that your vacation is always comfortable, we recommend making a barbecue with your own hands from metal, because it is difficult to imagine such a vacation without a well-fried kebab. This device can be purchased at almost any hardware store, but if the cost/quality of factory products is not suitable, then you can make a barbecue with your own hands from metal.
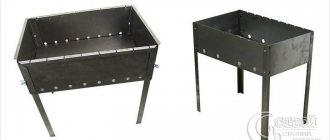
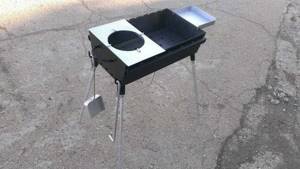
DIY metal grill
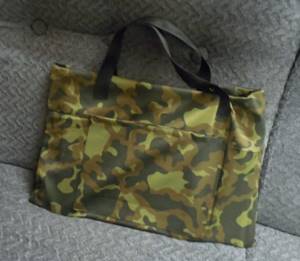
The grill can be transported in a convenient bag
Advantages of iron barbecues
This kind of barbecue is very popular, and the reason lies in their undeniable advantages, such as:
- low cost;
- easy cleaning, transportation, assembly/disassembly;
- uniform roasting of meat (iron retains heat well);
- safety;
- ease of use;
- possibility of making it yourself.
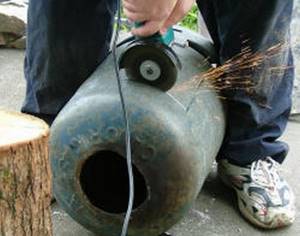
Usually, homemade barbecues are welded, but in the absence of welding equipment, you can resort to bolting.

DIY metal grill
Prices for various types and shapes of barbecues
Braziers
Selection of materials
The most inexpensive material is concrete blocks. It is recommended to line them inside with fire-resistant bricks.
Exterior finishing is usually made of natural stone. This natural material is non-toxic and retains heat well. Installation takes a lot of time, however, the result is worth the effort.
Ceramic brick is the most popular material. It looks beautiful, is not afraid of open fire and retains heat perfectly. We recommend that you first read about the basics of brickwork to avoid mistakes in building the structure.
Making a barbecue
The work will require the following tools:
- Sheet steel;
- grinder, wheels for it;
- electric drill;
- roulette;
- welding equipment (or bolts for screeds).
Let's look at the process of creating a traditional metal barbecue.
Stage 1. Plan
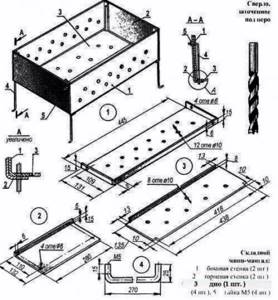
Metal barbecue diagram

Drawings of a metal grill

Drawings of a metal barbecue
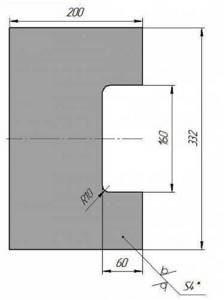
First, a plan is drawn up - a small diagram of the future product. In the diagram you need to describe the kebab maker in as much detail as possible and indicate the dimensions of each part. The most convenient is a grill with a height of 85 cm and a roasting pan size of 40x80 cm.
In addition to drawing up a diagram, you should take care of consumables.
Note! It is undesirable to use too thick sheets of steel, otherwise the structure will be difficult to lift. The steel should be between 0.4 cm and 1 cm thick.
Stage 2: Consumables
Below are the components for making a kebab bar with a height of 85 cm.
Supports:
- 4 iron legs 65 cm long from a corner or pipe ø2.5 cm;
- a pair of angles or pipes ø2 cm for horizontal connection of the legs (each such connection will be 76.5 cm in length).
Fryer:
- two walls measuring 77x20 cm, made of sheet steel;
- a pair of cross walls 39x20 cm;
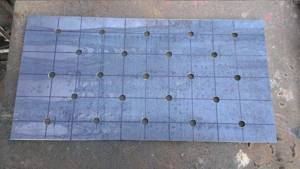
- metal mesh 39x77 cm;
- a pair of transverse pipes for the bottom of the structure, 39 cm long;
- two iron handles for easy transportation;
- several fireclay bricks.
Note! Instead of a mesh with crossbars, you can use one solid sheet of 39x77 cm.
You will also need a lid of the appropriate size with longitudinal edges curved inward.
Blanks for barbecue
Blanks for barbecue

Blanks for barbecue
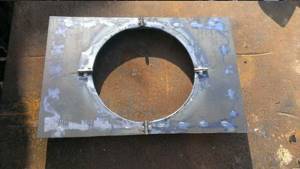
Blanks for barbecue
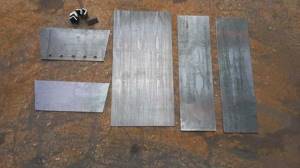
Blanks for barbecue
Stage 3. Welding work
Next, all prepared elements must be welded or bolted together.
Step 1. First, the body is welded from the walls and bottom (the use of bolts will be discussed below).
Step 2. The legs are welded to the body.
Step 3. The legs are strengthened with a longitudinal connection, preferably at a height of 15 cm - this way there will be a reserve between them for storing firewood.
Step 4. If a metal mesh was used for the bottom of the brazier, then fireclay bricks are laid. Small holes are made in the longitudinal walls (5 pieces on each side, step 10 cm) to supply oxygen (this will make the wood ignite faster).
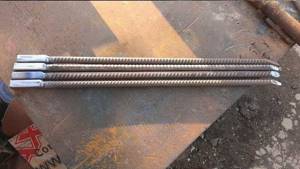
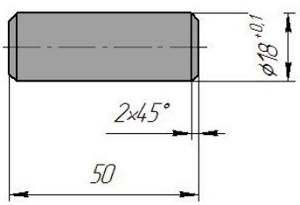
Step 5. Handles made of steel wire ø1 cm are fixed on the transverse walls.
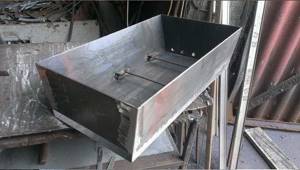
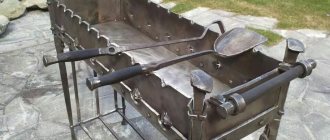
Assembling the barbecue

Assembling the barbecue
Assembling the barbecue
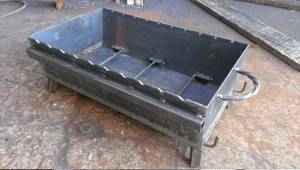
Metal brazier
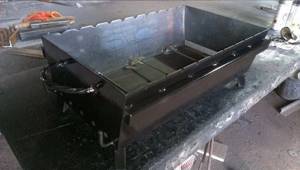
Metal brazier
Metal brazier
Prices for popular models of welding machines
Welders
Stage 4. Painting the grill
First, let's figure out whether it is necessary to paint the kebab grill at all. On the one hand, it is undesirable to apply paint, as well as other chemicals, to the grill, since the cooked meat will absorb harmful substances. On the other hand, the current products used to paint barbecue grills are absolutely safe.
Note! The only problem can be a high combustion temperature, which can lead to delamination or even burning of the paint layer.
Among all the fireproof coatings for barbecues, it is recommended to choose the following:
- silicone enamel, which can withstand temperatures up to 600ᵒC;
- thermal powder paints - effective, but difficult to apply (need high-temperature firing);
- oxidation technology.
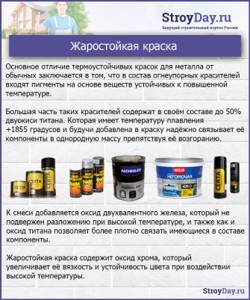
Heat-resistant paint
The last option is most suitable. First, the body is treated with 5% sulfuric acid, then boiled in a solution of laundry soap and boiled for 1.5 hours in an infusion of sodium hydroxide. As a result, a black non-stick layer is formed on the structure, protecting it from rust.
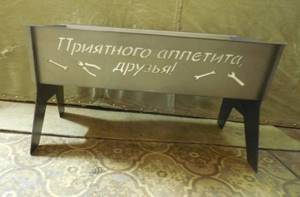
Steel grill with brick lining

Steel grill with brick lining
Video – DIY grill
The technological process of creating a barbecue using welding
Here it is important to decide what kind of structure you are planning - stationary or portable. The first can be installed in a specific place and for a long time. The second one can be transported without problems.
Typically, the use of welding equipment is necessary when producing a stationary version. Before the work process itself, be sure to watch the video tutorials and decide how you will decorate the future device.
The work algorithm here is as follows:
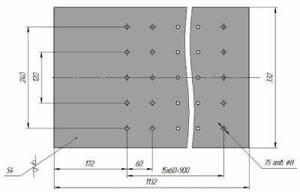
Stage 1. Initially create cuttings. Lines must be marked on metal sheets. The guideline in this process is a previously made or copied drawing.
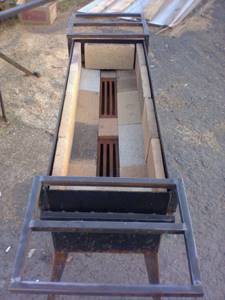
Stage 2. All the main components of the intended design need to be cut out of the working material. The work proceeds in accordance with the existing markings on the sheets. A bottom should form. This is the largest component. It is formed by four lateral parts. Two of them are short, and the other two are long.
Stage 3. Be sure to make holes in the long side components. They can simply be drilled in one line. They guarantee the penetration of oxygen into the firebox to the coals. And then the heat required for normal working process will be maintained in your device. The distance between the holes should be approximately 5.5 cm. Make sure that there is at least 2.5 cm left to the edge.
Stage 4. All side components (both long and short) are connected to each other by welding. A rectangular structure without a bottom and lid should form. Incisions are made on the upper extreme sides of the long walls. For this work, you should use a grinder. This tool must have a special attachment for cutting and processing metal products. It is recommended to make cuts on two side parts at the same time. They should fit together perfectly. The cuts will be aligned. If you do everything correctly, you will be able to place skewers here without any difficulties in the future.
Stage 5. All side components, already welded, need to be welded to the bottom of the planned structure. Good welding skills and the ability to work with welding equipment are extremely important here. The task is this: all welding joints must be of the highest quality possible. This will give you a box. If you have material with a thickness of 2-3 mm, it is better to work with inverter welding equipment. To create a box, four seams on each side are enough. If the density of the material is 1.5 - 2 mm, the bottom and walls are curved in a certain way. This must be prevented. Therefore, these components are reinforced using a profile pipe or angle.
Stage 6. The legs are welded to this box. It is not difficult to prepare them for work. Metal corners will help with this task. The legs can be mounted along the corners of the created structure, or at the end of the bottom.
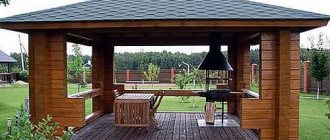
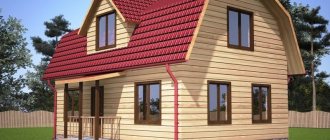
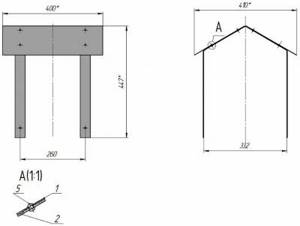
Stationary grill with canopy
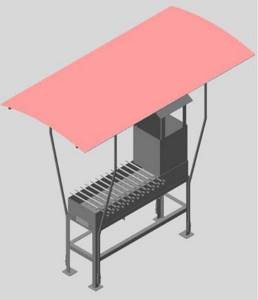
Stationary grill with canopy, drawings

Stationary grill with canopy, drawings 1-Firebox. 2-Table. 3-Stand. 4-Canopy. 7-Skewer

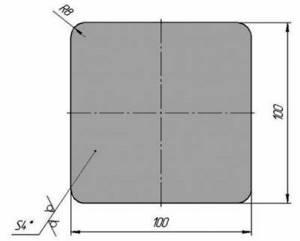
Skewer. Sheet steel

Grill firebox

Sidewall
Screed
Lattice
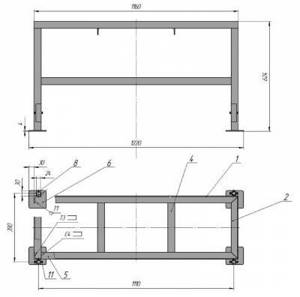
Barbecue table Screed (40 angle) Short tie (40 angle)
Front coupler (40 angle)

Sleeve
Plug. Pine Screed. Pipe d22
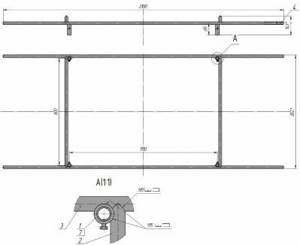
Canopy frame. Assembly drawing
Visor.Polycarbonate

Canopy. Assembly drawing

Knee. Pipe d22

Sleeve
Rack. Assembly drawing

Umbrella support. Sheet steel

Pay. Sheet steel
Umbrella. Assembly drawing
Heel.
Sheet steel After making a stationary barbecue, it is advisable to build a canopy for it. There are a lot of materials that can be used for this with minimal investment of time and money. Unless it is impossible to make an iron structure without welding (if desired, it can be replaced with a tie bolt).
The supports of the canopies are usually welded to the legs of the barbecue, but sometimes there are very large structures (4x4 m), for which four metal pillars are concreted.
Corners of 5x5 cm are laid on top of the posts along the perimeter of the canopy, and on top of them - a metal profile or any other roofing material. If desired, the canopy is decorated with forging.
It is easier to make a wooden canopy, but the surface should be treated with an antiseptic and fire retardant.
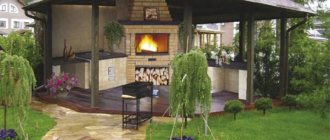
DIY creation
Many people prefer to create a barbecue with a roof with their own hands . In this case, you can create a really good model, the analogues of which will be impossible to find. If you have certain construction skills, then creating such a structure will not be difficult.
In this case, it would be best for professionals to draw up a design drawing. Which will be able to accurately determine all the parameters of the device and take into account all the requirements of the owner. This will eliminate the possibility of remaking the product in the future .
The permanent location of any device will require the creation of a strong foundation. A barbecue with a roof in this case will not be an exception. It is best to immerse the legs deeply into the base - this will help give special reliability and fixation to the structure.
The accuracy of welding work will affect the quality and appearance of the finished product. All seams must be thoroughly cleaned with a special preparation that will prevent corrosion.
When using the barbecue, the user can identify some calculation flaws that can be easily corrected. To prevent damage to the device, in the process of creating the structure you should use only the best quality metal that will not have any defects.
The thickness of the metal sheet will affect the time of use of the finished structure. Such metal, when periodically exposed to fire and temperature changes, can also greatly deteriorate its characteristics.
It is necessary to create holes of a certain size in the grill itself. They will help create a certain draft when burning wood. In addition, you can make special slots to create a more reliable fastening of the skewers when frying food.
Following the pre-applied markings, you need to cut out a fragment of the future structure on the metal. In this case, you need to leave 3-4 additional centimeters of joints on each side. Using special bolts of the welding device, the barbecue is assembled with the main parts fastened to each other.
Once the assembly is complete, you can begin attaching the roof to the grill, which involves the use of additional rods and angles to create a reliable frame. The height of the racks will be determined individually depending on the chosen design option . The best alternative to a simple barbecue would be a device with a mounted roof .
Roof structure
Since the roof will be installed on a complex object, it will have to withstand a special load, for example, high temperatures or smoke envelopment.
A brazier, as the main attribute for a comfortable holiday outside the city, exists for almost every summer resident. It can be bought on occasion or created by inspiration. In any of these cases, you will only have to slightly improve the device by creating a reliable roof on it.
To install such a device, it is best to use only durable materials . The heat coming from below will provoke the formation of a kind of condensation from above, so priority should be given to materials that will have the following qualities:
- moisture resistance;
- heat resistance.
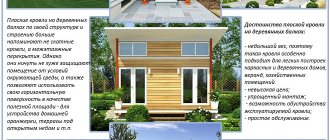
Corrugated sheeting responds best to temperature changes and high humidity. A sheet of metal of this class has a special polymer coating that prevents it from rusting and adds special beauty. You can find corrugated board in exactly the color that will look good with the overall style of the site.
The support frame for such a roof can be created by welding a metal profile and pipes. A good roof will come from:
- metal tiles;
- slate;
- ceramic tiles.
Cellular carbonate should not be used for this . If exposed to high temperatures, it may simply catch fire.
What size to create a roof for the barbecue is up to you to decide. The indicator itself will depend on what specific tasks need to be assigned to it. In any case, the roof must exceed the total area of the equipment. This is the only way it can completely protect the coals, as well as food, from the effects of rain and wind. It would be best to choose material with some reserve.
What kind of material to use can be calculated using a special working drawing, if. Without creating a plan, all the money can be spent just like that. Although at the dacha site there is always a use for even the smallest scraps of modern roofing materials.
If we talk about the shapes of roofs over the barbecue, they can be very different:
- single-slope;
- semicircular;
- arched type;
- gable.
Each option presented will be good to use in its own way . The roof can be created as a solid or lightweight one, with or without a pipe. It is worth taking a closer look at the creation of the pipe. The pipe located above the fryer will help improve the quality of draft and protect against too acrid smoke. It will not affect the eyes of the person preparing the food or the guests who are sitting nearby. To create a pyramidal type of smoke collector, only two meters of a wide pipe is enough.
When deciding which roof shape to choose, you need to remember that it should look good in the architectural structure of the site itself. This fact becomes especially important for stationary structures that will be in the yard all year round.
How to install the structure
If you particularly wish, you can create a stationary structure without moving it around the site. This is an important fact, since the space near the barbecue can be well decorated, creating a unique exterior for this, namely:
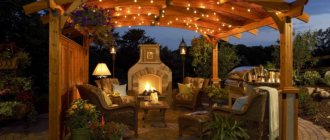
- install a cozy gazebo next to the barbecue;
- lay out a kind of path made of stones, bricks or tiles;
- install additional benches for relaxation;
- plant flowers and shrubs at some distance.
Depending on the size of the installed device, the area for its permanent location is determined. Such a structure should not be installed in close proximity to the house itself. Cooking smoke can enter the living space .
When determining the location of the barbecue for cooking, you need to remember that raw foods and already prepared food should not be transported over long distances. The smell of fish and meat may dissipate even when the dish is brought to the table.
The grill with a roof should also have a janitor where supplies of firewood will be kept. In addition, this design has all the necessary shelves on which you can put not only meat, but also kitchenware and other utensils necessary for preparing a dish. The barbecue itself will be used for years and will not allow the structure to become rusty before the established date.
How to choose a design
There are several criteria that must be taken into account when choosing a device. When creating a design you need to consider:
- Number of persons. If your family has two to three people, then the simplest design (maybe even portable) will do.
- Weight. If you plan to move the grill from one place to another, then the less it weighs, the better for the user. If it is located in one place, then it can be a rather heavy product that will have several reliable support points at once. This will make it much easier to work with.
- Type of device. If such a factor in the device is important to you, then it would be best to use forged barbecues, since in this case forging is the main factor.
If we talk about other criteria, they will not be so important, since they will not play a special role in the design and its use. Although it is up to the user to choose, so it is up to him to decide whether there will be additional details in the design.
Installing the feet
A do-it-yourself grill is good for its optimal height . When created, you can attach legs of absolutely any height to the brazier. When cooking with these parameters, you won’t have to bend over or turn the skewers while squatting. You can determine the optimal height of the legs using a test. To do this, take a tape measure, step on the beginning of the tape with one foot, and then stand straight and bend your elbows almost at a right angle. This indicator needs to be recorded .
Based on the obtained indicator, you need to choose the height of the fryer; with its help you will get the desired length of the legs. Installing a light canopy on a mobile barbecue would be the best option. Such a canopy will provide good protection from the influence of the external environment and will not allow acrid smoke to accumulate near the barbecue. For a hinged roof, it will be possible to change the angle of inclination, as well as adjust the overall height.
Making a barbecue from an iron barrel
If desired, you can design a larger version - for example, a stationary structure made from a barrel. The barrel itself can be anything, the main thing is that its size is sufficient for cooking barbecue.
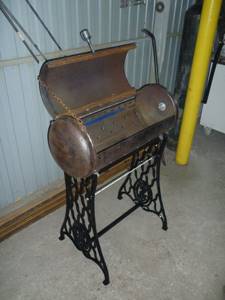
Brazier
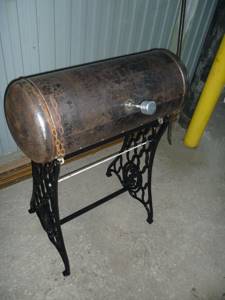
Brazier
Note! When choosing a barrel, special attention should be paid to its “past”. If chemicals or fuels and lubricants were previously stored in it, then it is prohibited to use it to create a barbecue.
In addition to the barrel itself, you should prepare:
- steel corner with a shelf at least 4.5 cm high;
- four rubber wheels (preferably with a metal base);
- two sets of door hinges;
- door handle (iron);
- metal mesh;
- grinder, wheels for it;
- welding;
- jigsaw
Manufacturing instructions
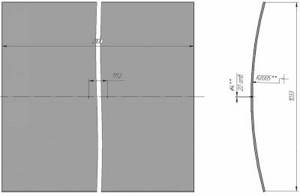
Step 1. Angle sections of the required length are cut. The height of the structure should be approximately 1 m, and the width should correspond to the length of the barrel.
Step 2. The side elements will consist of two horizontal and two vertical posts each. The first ones will be installed from below, approximately 25 cm from the bottom edge of the vertical posts, and from above, at the level of the barrel radius. The racks are laid out on a flat surface and welded as shown in the image - at an angle of 90ᵒ.
Cylinder cutting
Step 3. The second side part of the structure is welded in a similar way, after which both elements are connected using two corners installed at the level of the lower horizontal posts.
Note! Connections must be done with extreme caution to avoid distortions.
Step 4. The wheels are attached to the sidewall.
Step 5. Next, the barrel is installed on the finished support. This must be done in such a way that the drain hole is located at the back and top at an angle of 30ᵒ, on the right side (in relation to the front part). Such a hole will serve as a hood during operation.
Step 6. Using chalk, mark ¼ of the barrel - the lid of the kebab pot. The marked part is cut out with a jigsaw, the edges are carefully cleaned with a grinder and a grinding disc.
Step 7. Door hinges are attached to the quarter of the barrel, after which they are connected to the base - the lid is ready. For ease of use, a door handle is attached to the lid.
Step 8. A pipe of the appropriate diameter is inserted into the hood.
Step 9. All that remains is to take care of the internal arrangement. Special holders are welded on the inner surface of the body (iron plates measuring 3x6 cm, although thin corners can also be taken). These holders are installed in the middle of each side, two pieces each.
Barbecue from a barrel. Forging elements
Note! For convenient transportation, a handle can be attached to the barbecue frame. After this, the structure is painted in the same way as described in the previous paragraph of the article.
Video - Barbecue from a barrel
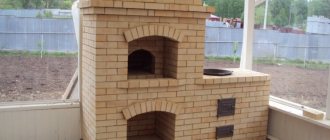
How to make a barbecue from stones or bricks
This design is similar to the previous one. Large stones or bricks are also laid parallel to each other, focusing on the length of the skewers or meat racks.
If you lay bricks on all four sides, then the grill will be almost like a real one. In addition, the flame will be protected from the wind, and the heat will be stronger.
Interesting ideas for barbecues
Find out how to make a barbecue with your own hands from metal, and also consider collapsible and stationary structures from our new article.
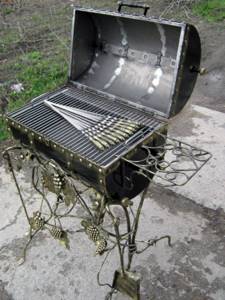
If the goal is to create a kebab maker that is not only functional, but also attractive from a design point of view, then we advise you to pay attention to artistic forging. Of course, it is impossible to do this yourself without special equipment and appropriate skills.
Or another option: if it is possible to get the front part of an old car, then it can also be used to make a barbecue. The roaster in this design is placed in the hood. Moreover, the grill already has wheels, so you can take it with you outdoors (as a trailer, of course).
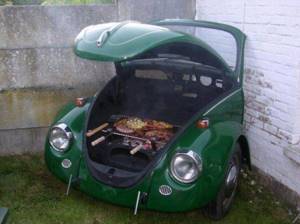
Brazier from a car
Mini-barbecue for city apartments
It is unlikely that in a city apartment there will be room for a full-fledged barbecue, but this does not mean that you should deny yourself a good picnic. For such cases, there is a miniature balcony grill, mounted on the railing like flower pots. The length of such structures is just over half a meter, so they are suitable for even the smallest terraces and balconies.
If desired, the balcony grill can be screwed to the wall or installed in any other convenient place. In short, now you can enjoy a bite of real shish kebab without even leaving your apartment.

Mini-barbecue for city apartments

Mini-barbecue for city apartments

Mini-barbecue for city apartments
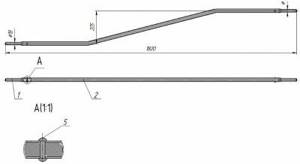
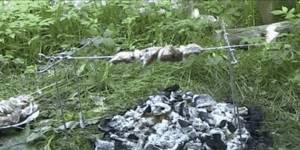
How to make a grill from skewers
To make such a barbecue you will need a lot of skewers, because, in addition to their intended purpose, they will also be used as a support.

survivalresources.com
Light a small fire on the ground. When the firewood burns out, insert three skewers from two opposite sides so that about 15–20 cm remain above the ground. Thread two skewers or two thin branches into the rings.
You can safely place meat on skewers on such a structure.
Tips for using barbecues
In order for the kebab maker to serve as long as possible, it is necessary to follow all fire safety rules. The distance from the fire to the wooden structural elements (if any - for example, the attachment to the transport handle) must be at least 20 cm. Moreover, all these elements must be treated with an antiseptic and fire retardant.
How to use the grill
Previously, when the range of spices was very scarce, burning wood was used to add flavor to dishes. Below are the types of trees and the meats they are best used for:
- oak – seafood, poultry;
- apple tree – lamb, beef, pork;
- grape vine – snails, seafood;
- alder – salmon, turkey;
- maple – seafood, poultry, pork;
- birch – beef, chicken;
- cherry – poultry, lamb.
Note! It is not recommended to use coniferous trees (they release resin when burning), chipboard or plywood.
There is another option - purchase ready-made coal briquettes in the store. Briquettes provide permanent heat, but at the same time there is no aroma. There is also loose coal, but it burns unevenly due to the different sizes of the pieces.
Before frying, the grate should be greased to prevent food from sticking to it. And lastly: the place to install the barbecue should be cleared of dry grass, branches, debris in advance, and it is also advisable to always have a bucket of sand nearby.
Video - How to quickly light a barbecue
How the grill works

Before starting construction, carefully study the design principle. A simple grill consists of 5 parts:
- Firebox. These are the internal walls that are in direct contact with the fire. It is best to make the cladding from refractory bricks. If you move the inner wall forward relative to the outer ones, you will provide easy access to the grill grate.
- Grill grate. It can be either cast iron or stainless steel. Lies on corner strips screwed into the brick.
- Foundation. It consists of a layer of concrete on top of compacted crushed stone and holds the entire structure.
- External walls. They encircle the firebox on one side, protect against flying sparks, and also significantly reduce the consumption of firewood. They often serve as a firebox if there are no internal walls.
- Ash pit. It is a metal sheet on which fuel burns. It is located under the grill at a distance of about 30 cm.
Voting: which welding inverter is the best?
Which welding inverters would you choose or recommend purchasing?
Eurolux IWM190
0.00% ( 0 )
Fubag IQ200
0.00% ( 0 )
Resanta SAI-220
100.00% ( 1 )
Spark MIG-305SP
0.00% ( 0 )
Blue Weld Starmig 210 DualSynergic
0.00% ( 0 )
AuroraPRO Overman 200
0.00% ( 0 )
Svarog ProMIG 200 Synergy
0.00% ( 0 )
Fubag IRMIG 200 Syn
0.00% ( 0 )
AuroraPRO Inter TIG 202
0.00% ( 0 )
Svarog Real TIG 200
0.00% ( 0 )
Resanta SAI-250AD AC/DC
0.00% ( 0 )
Wert MMA 200
0.00% ( 0 )
Cedar MIG 175GD
0.00% ( 0 )
Quattro Elementi MultiPro 2100
0.00% ( 0 )
Improvements for the barbecue
To expand the functionality of your stove and give it an original design, you can add several modifications:
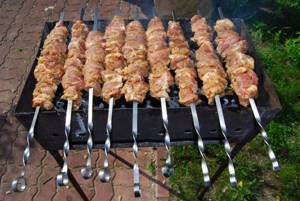
- a spit will allow you to cook a large piece of meat evenly;
- the chimney removes harmful combustion products away from the dining area;
- A barbecue fireplace is a stylish and grandiose structure where the grill grate is located inside a homemade fireplace.
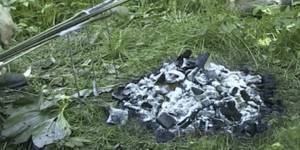
Allow used coals to cool for at least 48 hours before disposing of them. Even though they seem cold, they can remain warm for up to several days.