Tree
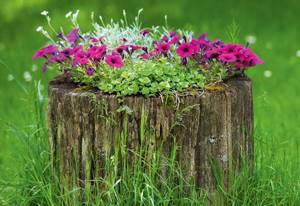
Making a flowerpot from a cut tree or stump is not difficult at all. This birch pot turns out to be very beautiful, but any wood will do. If this is a stump, then the processing will be as follows:
- many closely spaced holes are drilled on the upper plane;
- scrape out the inside;
- treat the entire surface with a protective agent;
- Place a container with a plant inside.
Related article:
How to properly store beets in winter
Another option involves using a board or timber. In the first case, 4 shields are knocked down, which are then connected into a container. In the second, assembly is carried out according to the principle of constructing a log house. To do this, the timber is first cut, then a recess is cut out on each side. The form is assembled and fastened with self-tapping screws. The surface is treated with protective agents.
Wooden flowerpots
Wood may not be the best choice for making outdoor flowerpots, but it is very affordable, flexible, and easy to process. That's probably why it's popular. Wooden outdoor flowerpots can be made from scrap boards, moisture-resistant plywood, timber, tree trunks, stumps, old barrels and tubs.
From boards and plywood
If you want the flowerpot to retain its color for a long time and not turn gray, but you don’t want to paint it with some kind of opaque paint (such as oil paint), you will need to buy wood oil. It gives the wood a tint, but leaves visible pores (like a stain). Along the way, this oil kind of “preserves” it, protects it from fungi, insects, and mold.
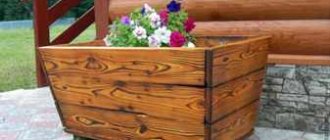
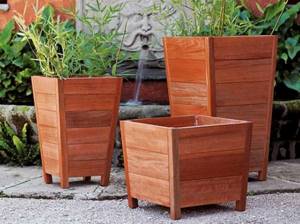
The easiest way to make flowerpots is from rectangular or square boards. You need to cut several pieces of the same length, put them together into a box, and nail the bottom.
Wooden flowerpots made from boards
To prevent the bottom of such a flowerpot from blooming, it must be raised on its legs. In the simplest version, four small pieces of board can be nailed to the bottom, in the corners. If you want, you can try to make more decorative legs (as in the photo above).
When nailing the boards, do not try to knock the planks very tightly. When watered, they will swell and, if nailed tightly, they can lift. However, you shouldn’t leave very large gaps - the earth can spill out through the bottom.
Another way to make an outdoor flowerpot from wood is to cut four identical pieces of timber with a small section of 25-25 mm, for example). Use the bars as the ribs of the structure, nail boards to them, and attach the bottom to the bottom. This option is good because such flowerpots immediately have legs.
The second option for making wooden flowerpots
Using the same principle, you can make a flowerpot from moisture-resistant plywood. Cut out the sides from it and attach them to the bars. Wood screws are usually used instead of nails, and you will also need a drill. Before tightening the screw, drill a hole. Place the sidewall against the timber post and drill, stepping back 1 cm from the edge. The diameter of the drill is 1-2 mm less than the diameter of the screw. So, firstly, the block will not burst, and secondly, the fasteners fit into the plywood easier. Instead of wooden corners, you can take metal ones, preferably stainless steel.
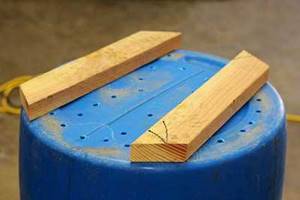
The next version of a flowerpot is made of wooden beams (photo below). Here everything is even simpler - fold the beam so that the connection is in one plane, then in another. After laying each beam, it is nailed to those located below. Be sure to drive nails in the corners; you can also nail them once or twice on the long side.
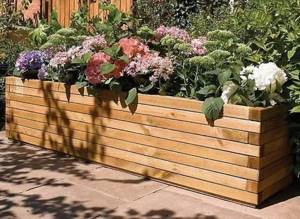
Outdoor flowerpot made of timber
It's simple. Difficulties can arise only with the first row. It can be attached to some kind of bottom, for example, a piece of waterproof plywood knocked down from boards with holes drilled in it for water drainage.
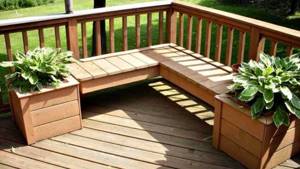
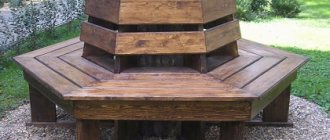
Flowerpots combined with a bench
Any of these flowerpots can be combined with a bench. It will be a wonderful place to relax. Such a group can be placed in the garden, near the entrance, somewhere on the site, near a gazebo or a homemade small fountain.
From stumps and logs
In a garden or at a summer cottage, you have to periodically cut down old trees. From their stumps and trunks you can also make outdoor flowerpots. First let's talk about how to use barrels. It is better not to peel off the bark, as this will make the flowerpots look more decorative. Depending on the idea, the trunks are cut into logs of some height. You can cut with a regular hand saw, but faster - with a chainsaw. These logs can be placed standing or laid on their sides.
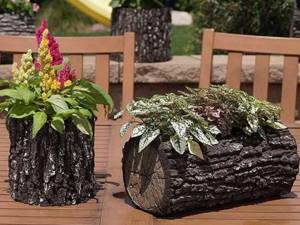
Sections of tree trunks make excellent decorative outdoor flowerpots.
The main task is to remove part of the wood so that a container is formed that can be filled with earth. There are several methods for removing the core. Usually they take a drill and a large-diameter drill bit. A conical or blade-shaped drill (as in the photo) works better.
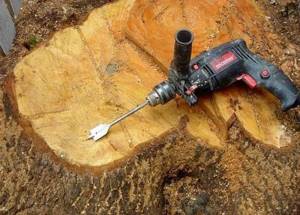
This drill makes it easier to remove the core
They make a number of holes to the depth you need. It depends on the type of plants you plan to plant in this pot, but usually 15-20 cm. You can make a lot of holes - the thinner the walls, the easier it is to remove them.
The walls are destroyed with a chisel or a wide chisel. The handle of these instruments is hit with a hammer, and a sharp blade breaks off pieces. So, gradually, the core is released. Then the edges of the resulting container are slightly aligned using the same technique.
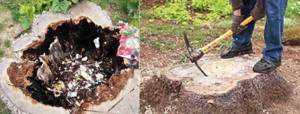
Alternative to a drill
If the stump has a large diameter, you can use an ax or pick. You just need to work carefully so as not to destroy the walls. Near the walls, you can use a drill to finally decorate the inside of the flowerpot with the same chisel.
Another option is to make some cuts with an ax, crumble the wood, and make a fire inside. But whether it will be possible to extinguish it in time is the question. The charred insides are then removed with a chisel or chisel.
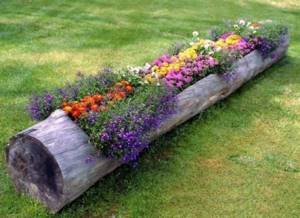
Flowerpots made from stumps and tree trunks can be of different sizes
By the way, very interesting compositions can come out of a very old and rotten deck. It is cleared of very crumbling wood. In this case, the inside is picked out very easily - the inner part of the trunk is the first to decay. What remains can be coated with wood oil, stopping the destruction for a certain period.

Rotten decks make very interesting compositions
Such hollowed out logs or stumps make excellent flowerpots. Some design ideas are collected in the photo gallery.
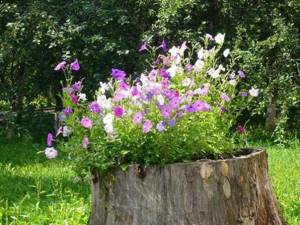
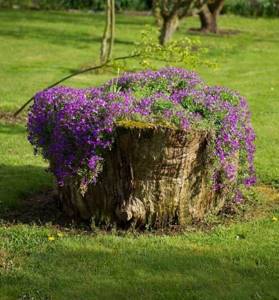
You can plant petunias in a flowerpot made from a stump. Hanging ones look better in tall ones
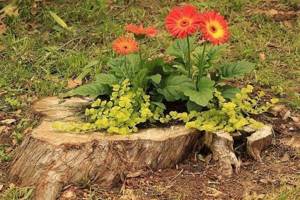
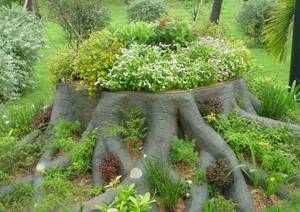
Several plants with decorative foliage and one or two flowers with large bright flowers are planted in low stumps
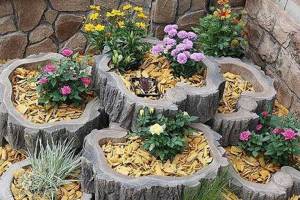
By cutting a hollowed out log into rings and attaching a bottom to the bottom, you can make a two or three tiered flowerpot
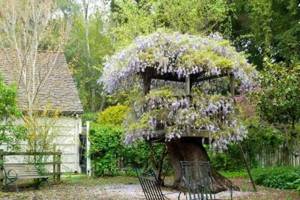
This decoration will take a long time to grow, but it looks magical
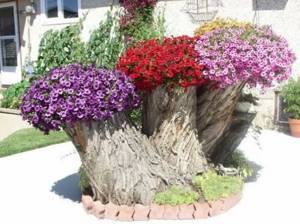
The powerful roots are painted, soil is also poured between them and plants are planted
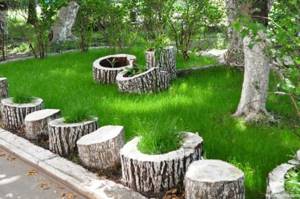
An interesting fence around the lawn - flowerpots made from stumps alternate simply with logs
Hanging flowering vines look wonderful on a high stump
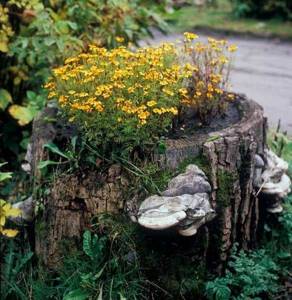
Chornobrivtsy - unpretentious flowers with a long flowering period
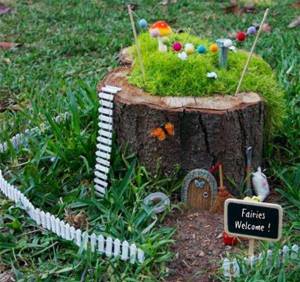
Decorate an outdoor garden flowerpot as a fairy house
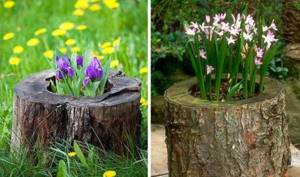
Primroses will bloom earlier in the stumps - they receive more sun and are located higher from the cold ground
And even a stump, on a spring day...
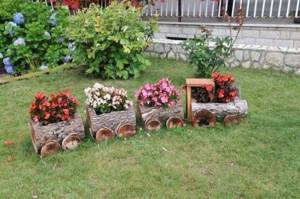
Cute little train
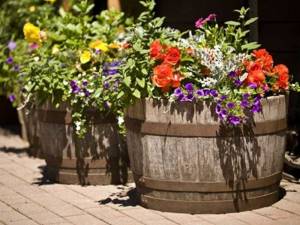
From barrels and other cooperage products
The easiest way to make outdoor flowerpots is from old barrels, tubs and other containers that are no longer used and cannot be used due to old age, but it would be a pity to throw them away. They can be sanded a little - manually or by attaching an appropriate attachment to a drill/grinder. Then they can be painted, coated with exterior varnish or wood oil. And you can plant plants.
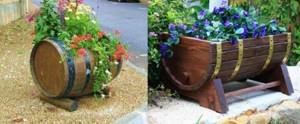
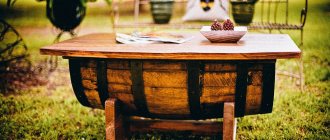
Barrels sawn lengthwise
Barrels are sawn, and in any plane. But if you cut lengthwise, you will have to nail the planks together. The barrels, cut crosswise, look like two identical (or almost) flowerpots.
Option for a homemade flowerpot that looks like a barrel
Even old wood does not need to be treated. This way the composition looks more natural. But such a flowerpot will not fit into all styles. In this case, use a special paint for exterior use, which can be used on wood.
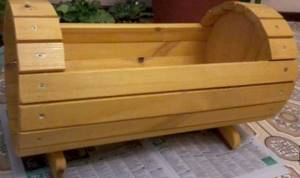
With tubs or halves of barrels everything is generally simple
Outdoor flowerpot made of plastic with wooden lining
If you like the appearance of wood, but want to have a sealed container to avoid drips on the site after watering, you can cover the plastic container with wooden strips. The planks are treated with antiseptics, painted, and dried. Then you can start converting a plastic container (bucket, tank, barrel) into a flowerpot for outdoor flowers.
Attach the legs to the bottom of the tank
First, holes are drilled in the bottom. The diameter is 10-14 mm. Leave the two opposite zones at the edges untouched. Here we will attach the “legs” - two strips, cut so that they do not protrude beyond the contour of the barrel. You can attach it with bolts, drill a hole under the head so that the fasteners are “recessed”.
Related article: DIY plywood box
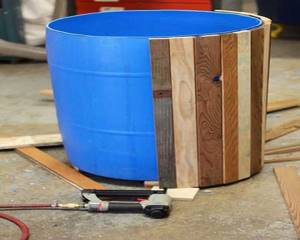
We cover a plastic barrel with strips
We take universal glue, which is suitable for gluing plastic and wood, and glue the planks onto it. The narrower the planks, the more monolithic the surface will be. Such outdoor flowerpots do not shrink or swell.
Concrete
Pots of any configuration can be made from the concrete mixture, depending on the mold used. To do this, you must first select this form, and then perform the work in this order:
- prepare a concrete mixture of cement, peat and expanded perlite in a ratio of 2:2:1, diluting the mixture of these components with water to the thickness of a regular concreting solution (you can add dye if desired);
- cover the mold with film, avoiding the formation of folds;
- Place a layer of concrete mixture 5 cm high on the bottom, inserting a film-wrapped plug in the center to create a drainage hole;
- then cover the side surfaces with the solution;
- leave to harden, periodically spraying with water to prevent cracks from appearing;
- when the container is dry (after 7–10 days), walk over it with a wire brush, leveling it and making the surface slightly rough;
- rinse with water, dry, cover with film and let stand for another 7–10 days.
Related article:
How to properly care for and store garden tools so that they last a long time
This flowerpot turns out to be very heavy, so it must be made right at the installation site. To make the product as durable as possible, it is recommended to use a metal mesh as a frame. Adding shredded fiberglass to the solution will also help.
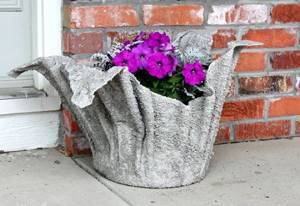
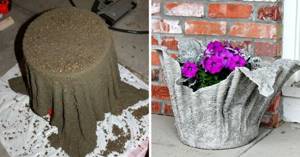
How to make flowerpots from cement and fabric
Flowerpots made of concrete and fabric look very beautiful. It turns out to be a real work of art.
Of course, to make such a flowerpot as shown in the picture, you will have to work hard:
- First you need to mix the concrete solution so that it is not too thick. In this case, it should be more liquid, because in this liquid you will soak the fabric of your choice. We recommend using an old towel because it will give the pot a unique texture when it dries.
- After you dip the towel into the solution, make sure that it is completely saturated with the concrete solution.
- Remove the fabric from the solution and hang it on an upside down bucket. Immediately straighten the edges of the towel and leave the future flowerpot to dry for as long as needed (much also depends on weather conditions).
- Turn the finished flowerpot over, place it in the desired location and paint if desired. In their natural color, such concrete structures look quite nice.
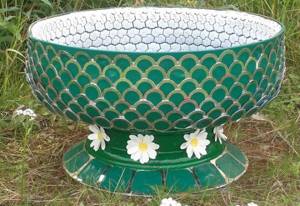
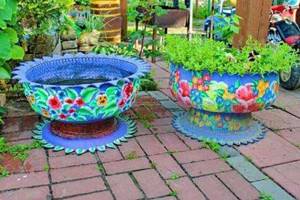
Tires
Car tires are the most common available material for outdoor flowerpots. They make a variety of decorative products with a very bright and original appearance. Winter tires are ideal for this as they are softer and thinner.
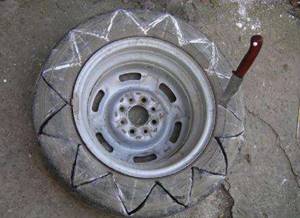
To make a garden decoration in the shape of a flower, perform the following manipulations:
- draw the desired shape on the tire;
- cut it out with a rubber knife or jigsaw;
- make small cuts at intervals of 5 cm along the contour;
- turn the flowerpot inside out.
Related article:
We equip productive home beds: 7 secrets of an indoor garden
Decorate the product at your discretion, fill it with soil and plant plants.
How to make a flowerpot from a tire
- On the side of the tire, make the pattern you want to cut. You can cut it with an ordinary knife, but you will first need to dip it in a soapy solution, which will make the knife cut better. If you want the edges of the pattern to be embossed, then it is better to cut them with a jigsaw.
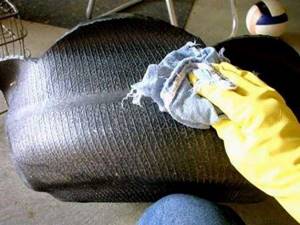
- Next comes the most difficult part - turning the tire so that it resembles an open flower. It is physically difficult because the rubber is very dense. After you manage to cope with this step, sand the surface of the tire so that the future flowerpot has a beautiful appearance.
- We make the basis for a flowerpot from a tire rim - we connect the elements and it turns out that the frame of the flowerpot is completely ready. You just need to paint it and plant flowers:

Plastic containers
All kinds of plastic products (from bottles to barrels) can be turned into a beautiful garden flower bowl. To do this, just cut off the top if necessary and make drainage holes at the bottom.

It should be borne in mind that plastic is light in weight, so the containers must be additionally weighted or secured. In the first case, a layer of crushed stone is poured onto the bottom, in the second, the container is placed on a metal pin dug into the ground. The finished pot is decorated and filled with soil.
Pipes
Excellent flowerpots are made from plastic and metal pipes. To do this, they are cut into pieces of different lengths and used in one of the following ways:
- dig in vertically, creating a variety of compositions (in this case, plants are planted only from above);
- make holes on one side or cut off one side and install horizontally.
Related article:
Seeds from which everything grows on its own: 7 rules when choosing high-quality planting material
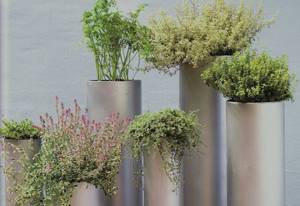
You can create a variety of structures from pipes by fastening them together, fixing them on a fence or other support, or simply burying them in the ground.
Beautiful flowerpots with your own hands, step by step with photos
At the end of our article, we will present you with a few more instructions on how to make a beautiful flowerpot with your own hands:
Option #1

- Take an old barrel, treat it on all sides with an antiseptic so that it does not rot.
- Strengthen the future flowerpot throughout the entire barrel with additional metal hoops.
- Attach a wooden foundation to the bottom, which should match the circumference of the barrel itself.
- Make several holes in the bottom for good drainage.
- Decorate the barrel - you can make a couple in love like the one shown in the photo.
- Place soil inside and plant the plant.
Option No. 2
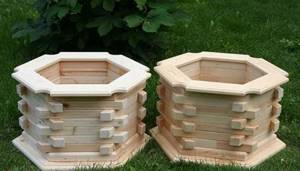
This version of the flowerpot is suitable only for those who have basic carpentry skills:
- Prepare a flat wooden surface that will serve as the bottom. Immediately make holes in it for drainage.
- Then cut as many pieces of wood as possible and lay them out to create the structure as shown in the photo. Although you can not complicate it this way, but simply make a rectangular wooden flowerpot.
- Fasten the bars together with self-tapping screws.
- Treat the surface of the flowerpot with sandpaper, and then saturate the wood with a special antiseptic that will protect it from rotting.
- All that remains is to fill the pot with soil and plant the plant.
As you can see, you can add beauty to your garden or yard without making any large financial expenditures. All you have to do is show your ingenuity and a little creativity, and you will have an incredible piece of jewelry that you can admire every day.
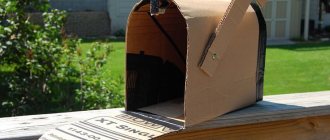
Other materials
The choice of available tools for creating outdoor flowerpots is almost limitless. It all depends on your own tastes and imagination. To do this, you can use any things and objects that have served their purpose, become unnecessary or are not useful in the household: old shoes, wheelbarrows, baskets, bicycles, boxes, barrels, etc.
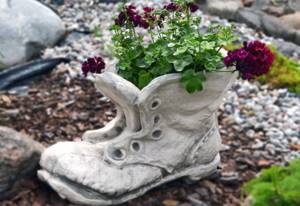
The main thing is to correctly arrange and beautifully decorate such flowerpots. They will be able to give the site a completely unique and original look.
Marine-style flowerpot made from a laundry basket
Has your plastic laundry basket seen better days? Give it new life as a jute-wrapped planter. For this project you will need a plastic laundry basket, 3-ply jute rope, dark blue rope, high-temp hot glue, a drill bit, and a plastic trash bag.
Blogger Katya Klap showed the first shots of family life with her lover
Not only in love, but also happy: Lolita admitted her new marital status
Ten Easter eggs in mass-produced cars that the manufacturer hid