As soon as a city dweller finds himself in the countryside on his own piece of land, the makings of a peasant, builder, and landscape designer “awaken” in him. He begins to create, in the best sense of the word, things he never even dreamed of. For example, he is seriously thinking about building an arch in his dacha.
Our article today is about such people who built a country house, planted their own garden, equipped a family recreation area, with friends who often come from the city.
But they also want to create some zest in their eco-friendly surroundings. Let's give him a theme that will bring the site closer to Eden (paradise), which everyone will admire.
We will also publish step-by-step instructions for achieving this goal. Forward! But first, look through the photo of the arch in the garden on our website and choose what interests you.
Brief history of the arch
The landscape option comes from construction arches, which were used to cover buildings and structures (bridges, aqueducts, tunnels) 4,000 thousand years ago in the Ancient East and the Roman Empire.
Used in the construction of structures made of bricks and stone blocks. In some places, these artifacts still stand and firmly hold the structures.
Because the ancient masters, and not just modern technologists, also “included” algebra and geometry for calculations.
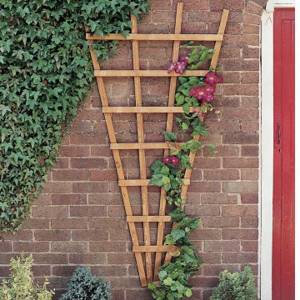
For a simple garden arch, we will take from this arsenal only options for the outlines of arches, types and types of arches. There is a less functional arch for plants in the garden, instead of less aesthetically pleasing trellises and for exotic climbing flowers.
We recommend reading:
- Effective Weed Killer - Review of the Best Weed Removal Products and Methods. Geotextiles and rules for their installation (145 photos and videos)
Flowers for a flower bed that bloom all summer - a review of unpretentious types of flowers for the whole summer (85 photos)
Do-it-yourself trellis - 110 photos on how to make it yourself and video tips for use in landscape design
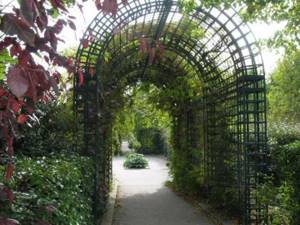
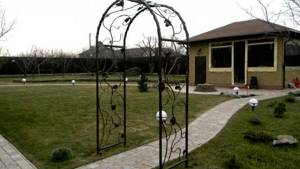
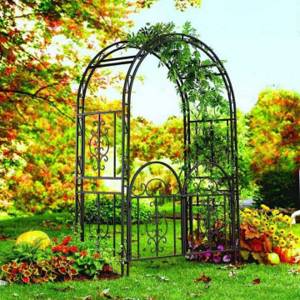
Your entrance to Eden
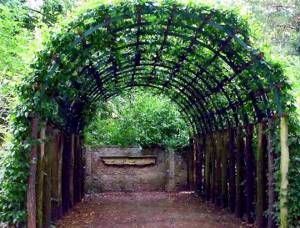
Do not try to completely copy the classics, as in the photo of the garden arch. Take from them the elegance, surrounded by vegetation, add to this strength, resistance to precipitation, ease of manufacture from available materials, with the ability to be transferred to storage for the winter.
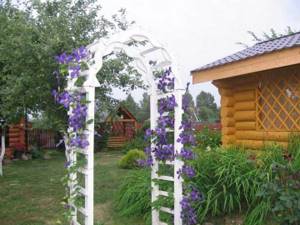
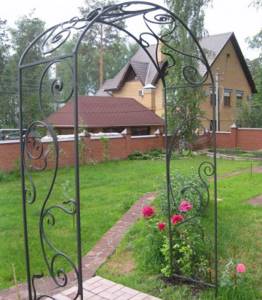
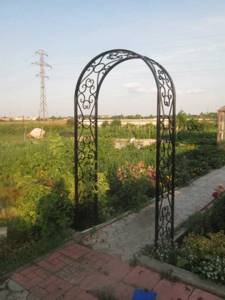
In addition to technique and technology, do not forget about the floral decoration of the arch itself. It will be necessary to select the main, weaving types of flora to cover the structures: roses, clematis, ivy, as well as a border type to connect the arches with neighboring vegetation.
Especially if you are a lover of luxurious colors and your garden arch is for climbing plants. Then it will doubly decorate the site.

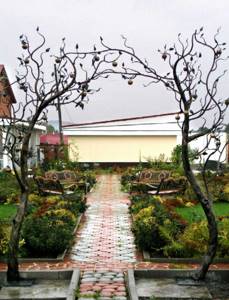
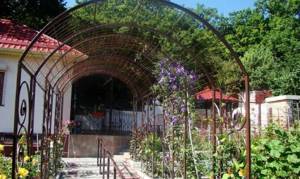
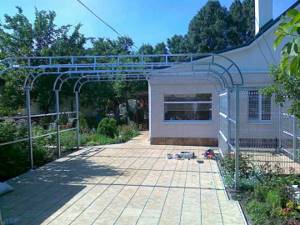
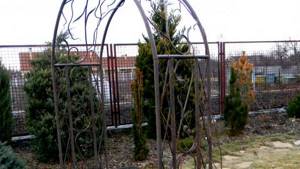
Arches made of wood or other material can be either an independent element of garden design or linked to other important objects. For example, this will be the entrance to a gazebo or a pond.
In this regard, the material you choose should not look eclectic in relation to the overall concept of the garden and yard area, and the arch should not fall out of the design style.
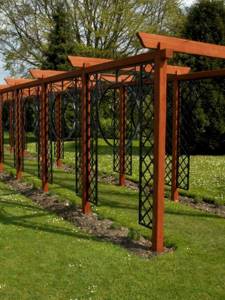
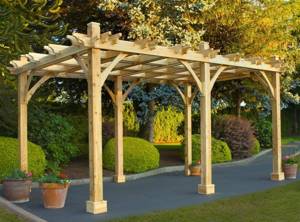
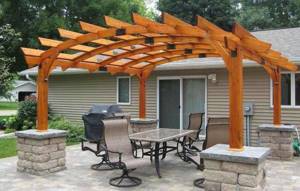
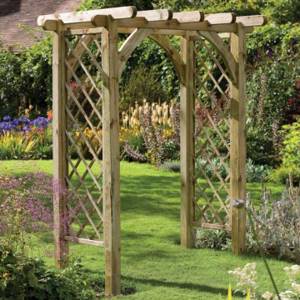
How to make a pergola with your own hands
What you will need
Making a wooden pergola requires the following tools and materials:
- hammer;
- chisel;
- self-tapping screws;
- drill;
- wood hacksaw;
- roulette;
- level;
- clamps;
- Boer;
- timber, slats;
- metal staples;
- cement;
- sand;
- roof kit (sail, fastenings, cable);
- glue;
- bolts;
- metal bases;
- primer;
- screws.
Preparation
Before starting construction work, draw up a plan that will reflect the layout of the pergolas and planting of roses (and/or other liana-like plants that require support).
For installation, choose an area with fertile soil, because the plants will need to receive the necessary nutrition. Or prepare a fertile layer 60 cm in size. Plant perennials at such a distance from each other that they do not interfere with the wind blowing them, preventing stagnation of moisture and the spread of diseases.
Pergolas are a decorative element that is designed to create a unified style space. You cannot design a high-tech lathing if your garden is a pastoral idyll.
Think about what object the wooden pergola you create should lead to: the entrance to the room, a fountain or an original sculptural composition.
It will be useful to read:
Floral arches in garden design A garden arch will help add elegance to the space surrounding the house. Visually, it creates an interesting focal point…
Methods
This article will help you answer the question of how to make pergolas for roses with your own hands.
So, here are step-by-step instructions on how to easily make a pergola with your own hands.
- Before you start making a wooden pergola, dig holes (according to the number of pillars in the pergola) 80 cm deep in order to secure the bases of the pillars.
- Remember that the minimum width of the structure must be 150 cm!
- Prepare forms for formwork, fill them with cement and place metal tips in them (you can do without metal tips and place the base beam directly into the cement).
- We give it a couple of days for the cement to set.
- We screw the beam to the tip with screws.
- Secure the wooden beams (beams) with screws or self-tapping screws so that sharp corners are formed at their junction. This is necessary so that the plants can hold on.
- We lay horizontal load-bearing beams: simply screw them in with screws/connect them using metal plates/cut out special grooves in the support pillars/use two edged boards instead of a horizontal beam, which are easily attached to the supports with self-tapping screws.
- Using slats, connecting them crosswise or forming another pattern, we make a sheathing.
- Prime all wooden elements of the pergola with primer.
Nuances
When installing a pergola at your dacha with your own hands, remember the basic principles of this procedure:
- The pergola should give the impression of lightness, weightlessness, and delicacy, regardless of the material from which it was made.
- Consider the size of your plot and the size of the planned pergola: a small one has no place in a large garden and vice versa.
- A DIY pergola must be strong, because climbing plants quickly increase their mass and become quite heavy. In addition, it should not bend or break under the snow.
- The height of the entire structure should be no more than 250 cm.
- Try to take into account the direction of the winds.
- In late autumn, winter and early spring, the supports of the structure will be decorated only with dark plant stems, so make sure in advance that all the details of the structure have a presentable appearance and do not spoil the appearance of the garden.
- Wooden pergolas, as well as metal buildings, must be systematically treated with antiseptics, preventing rotting of the wood (after all, plants need constant watering) and metal corrosion.
Sections for a pergola do not have to be made from wood yourself. You can save time and buy ready-made elements at a garden or hardware store and assemble the structure yourself. There is also a system for ordering ready-made pergolas from specialists
c3ef36b1945371fc6ab1d7f040bd83b9.jpe aa553e5a07bc5d02001483ad1d0fd9eb.jpe

In principle, it is not so important whether you make this decoration yourself or buy it. The main thing is that it matches your wishes and the design of the site
Enjoy your gardening!
Features of floors
Often arched structures are used in the following qualities:
We recommend reading:
Laying artificial turf with your own hands: how to choose and step-by-step description of how to lay a lawn (100 photos)
How to lay rolled lawn - step-by-step master class and tips on how to lay rolled lawn correctly (120 photos + video)

The best flower clock - a step-by-step description of how to make a beautiful element of landscape design correctly
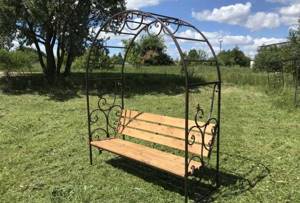
Garden gazebos. Plants entwined them and you can put a summer table under this tent.
Transitions. There can be several arches if the area of the site allows it. They can be given elements of some secrecy and mystery.
Cut-off zone. For example, from exotic plants or a place of relaxation.
Types of arches
Do not forget that the weight of the structure is determined by the material used and the parameters. The shape and width of the opening and mounting posts are selected.
Design definition of types of structures:
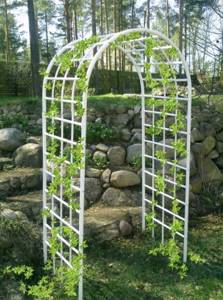
- classic (oval or semicircular);
- modern;
- cocked hat;
- trapezoidal;
- romantic (rounded edges);
- portal (angular);
- abstraction (half-arches).

We settled on these types, of which there are fifteen in building architecture, although a few more could be added from the remainder.
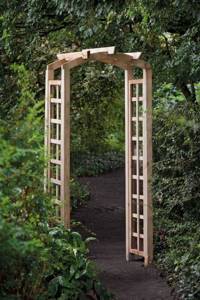
Wooden classic arches
With your own hands, you can make massive, luxurious arched structures from wood that will amaze with their simplicity of shape and discreet natural tones. For doorways, structures are made in the form of an ellipse or trapezoid, complementing them with special extensions and decorative elements. But it is worth noting that a simple shape, smooth lines, and beautiful texture can make wooden arches elegant and aesthetic even without additional decorations. In rooms where you need to be in a serious mood, namely in offices, auditoriums, you should make wooden classic arched structures with your own hands.
Requirements for arches
Material. It must be strong and not deteriorate from temperature changes or high humidity.
We recommend reading:

Creepers for the garden - a review of the best climbing flowers and popular types of plants for the garden and landscape design (120 photos)
Rules for whitewashing trees - a step-by-step description of whitewashing and methods for quickly processing garden trees (115 photos)

Which flowers are the most unpretentious? Review of the most beautiful and easy-to-care plants for the garden or landscape design (105 photos)
Structural strength. If the arch is not made of woven rods, make connections of high quality, without sharp corners. From top to bottom, the arch should look like it was cast from metal.
If it is not installed for the season, then the supports need to be thoroughly strengthened in the ground, otherwise the “legs” of the arch will be damaged by freezing and thaw.
Dimensions. Not too bulky, that is, eliminate large windage so that the wind does not blow over. And it should look aesthetically pleasing.
Opening dimensions. Taking into account the height of the tallest person in the environment. The width is along the path so that both people and carts can pass through.
Preparation for production
Tree selection
The following types of wood are used to make an interior arch: oak, ash, pine, larch, mahogany and others. Let's look at the most popular of them.
- Pine. It is most often chosen because of its color - the pinkish color changes to dark red. Among the advantages of pine are high strength and elasticity. In addition, it is resistant to rot and is inexpensive.
- Oak and beech. Usually they are chosen in cases where the room has something similar in style and texture. These types of wood are very reliable and durable.
- Red tree. The material is used very rarely for residential premises, the reason being its high cost. This material looks very elegant and expensive.
- Other. Usually these are cheap materials (for example chipboard), which will help you make an arch with your own hands at a very low price.
Dimensions and shape
When you have chosen the type of wood required for manufacturing, decide what shape and color the arch will be. Most often it depends on the furniture and design of the room. Today the most popular are the following:
- Classic. A classic interior arch is called a semicircle or arc; it fits into any room.
- "Modern". This option is perfect for wide doorways; the difference from the classic arch lies in the shape (the top of the arch looks more flattened).
- Ellipse. Perfect for small openings.
- "Trapezoid". The design with sewn corners is used in rooms with different parameters. It’s easy to do it yourself, because to make such an arch you only need straight boards, no complicated processing is needed.
- Other. This includes “portals”, “transoms” and other exclusive solutions for people with wild imagination. Such arches may have a non-standard appearance.
Wooden arches can be supplemented with side elements - shelves, decorative elements.
When you have decided on the type and material from which the arch will be made, you can begin the manufacturing process.
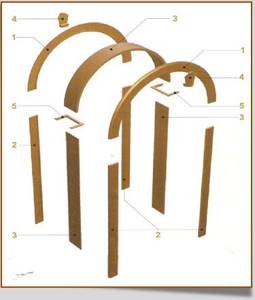
A wooden arch is created in three stages:
- Drawing and cutting out the template.
- Cutting beams, assembling the arch.
- Final finishing.
The following tools and materials will be useful for this:
- level;
- compass;
- planed boards of equal thickness (about 40 mm);
- pencil;
- screwdriver;
- self-tapping screws;
- drywall;
- roulette;
- perforator;
- jigsaw;
Creating an arch vault
To make an interior wooden arch we will use a pine board. In the absence of a ready-made calibrated board, you will need to do this yourself, for which you will need a surface planer.
We cut the finished calibrated board into strips 30 mm thick. After which it is also advisable to run them through a surface planer. Next, we cut the prepared planks into the required number of blocks in a size equal to the width of the opening into which the arch will be installed.
Let's start making a template from plasterboard. The radius of the template should be made 1-2 cm smaller than the opening.
When working with your parameters, consider the following - the deeper the bend of the arc, the more difficult it is to make the arch. Therefore, when working with such a structure for the first time, choose the bend that is as flat as possible.
We coat the sides of each piece with glue and join them together, laying them out along the radius of the template. Then you need to let the glue dry.
The next day, we remove the arch from the template and strengthen the back side with glue and fabric, this will make it much stronger. After which the front side of the arch can be sanded. To do this, we place it back into the template and process it with a grinder.
Manufacturing of arched casing and side posts
Now let's start making the arched casing. To do this, cut the board into small pieces and lay them out so that they coincide with the radius of the arch. Then we glue them together.
The next day, the glued casing can be sanded and the outer side processed with a router. Next, we attach the platband on both sides to the arch. Then we fill the inside with a hand router.
Let's start making the side racks. To do this, you need to make a strapping using a hand router. Then we make panels, which we insert into the harness and glue. We attach the vertical casing. Glue the outline from 3 parts.
Final processing and installation of the arch
The final finishing consists of sanding the arch; a sander is suitable for this. This finish will hide the joints, making the arch appear as if it were solid. Also, varnish or paint is used for finishing.
After finishing, we can begin installing the arch. First we install the arched part. Then we install the racks on both sides. We install lining at the joints.
Photo gallery of wooden arches
An element such as an arch can be an excellent replacement for a regular door or act as a delimiter of functional areas. It not only plays the function of protecting the opening, but also carries a colossal decorative load, which is why it is important to choose the right style and high-quality materials. Every home craftsman can make a wooden arch with his own hands; the process is not particularly complicated and does not require any special expensive tools.
A wooden arch is an original decoration for your interior
Materials
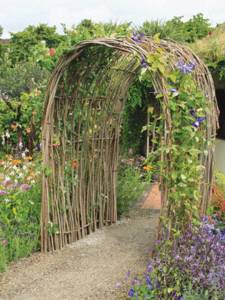
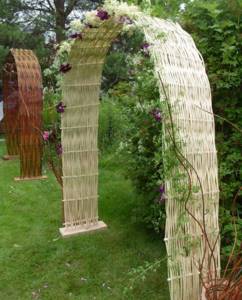
Typically, an arch is constructed to cover it with climbing plants from bottom to top. Choose from the following material:
- tree;
- vine;
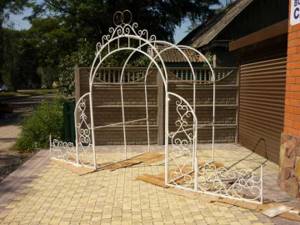
- metal;
- plastic;
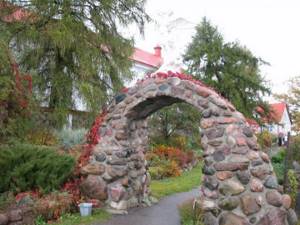
- brick.
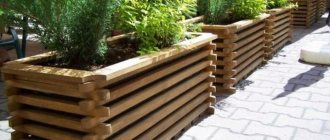
On mini- and midi-sites, wooden openings with a height of 2.3-3.3 m, a width of one and a half, and a depth of 50-70 cm look better. Let’s make a choice on the tree.
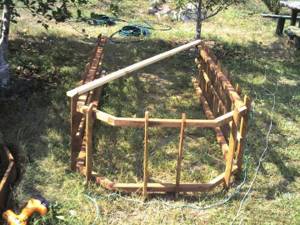
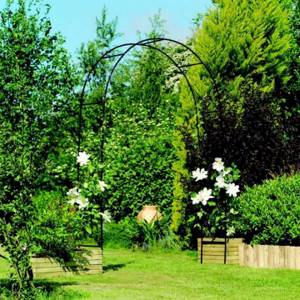
We install an arch made of logs and boards
Consider the curvature of various arches on the site. Choose a vault shape for your site. After all, it is precisely this that is the most difficult thing to make from wood. An arch is always a bend.

Wood doesn’t bend like that, so you will assemble it from the timber gradually, fastening it with PVA glue and self-tapping screws.
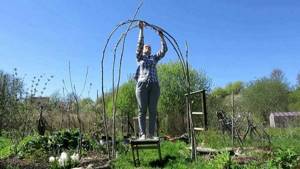
To do this, make the drawings equal to the parts themselves to make it easier to cut and fasten. Including mark the interface with the racks in the form of a head, which can be made of metal, well painted to prevent rust.
The racks will look better from a solid log, well hewn, polished and varnished.
On the vault use:
- spruce;
- deciduous - birch, oak;
- cedar;
- fir;
- softwood lumber.
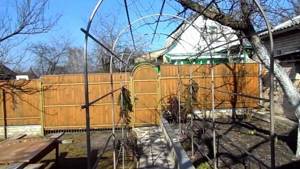
An arch made of red and well-fired brick will look good. And also garden arches made of metal. In the latter case, you will need welding and a grinder.
How to make an arch from a profile pipe (video)
Self-production technology:
- trimming the edges of three-meter and four-meter bars at an angle;
- making a tenon in the end part of the beams with a thickness of 5 cm and a height of 9 cm;
- treating all wood elements with a primer followed by painting or varnishing;
- marking a 260x300 cm rectangle at the selected location;
- installation of wooden marking pegs in the corners;
- drilling in accordance with the markings of half-meter holes for the installation of support beams;
- installation of beams, alignment of supports in height using a level and rope;
- preparing cement mortar and pouring support posts;
- installation of four-meter beams on spikes on both sides of the racks;
- drilling through holes in the beams and fixing fasteners on the racks;
- measurements of the upper part of the pergola for the purpose of uniform installation of nine three-meter bars in the form of crossbars;
- fixing the crossbars with fasteners.
Inside the finished pergola, as a rule, pieces of wicker or moisture-resistant furniture are installed, and vines or climbing ornamental crops are planted around the perimeter of the building, which will serve as effective shading.
Inside the finished pergola, as a rule, items of wicker or moisture-resistant furniture are installed
Photo of a garden arch with your own hands
Read here Trimming bushes with your own hands: a step-by-step description of how to trim bushes correctly. Options, forms, ideas and features of their implementation (video + 150 photos)
Did you like the article?
1+
Arch portals made of wood
These wooden arched structures are U-shaped, often with rounded corners. At first glance, an inconspicuous counter can modify and complement the existing interior, adding a touch of luxury and sophistication to it. You can make such a structure with your own hands for high-tech and minimalist style rooms.
For interior door passages, rounded wooden bases are used. It’s easy to make a bend in such a design with your own hands using arched platbands. The finished structure can be decorated with wood carvings, glass, and mirror elements. Shelves, niches and other openings can also be attached to the side of the platband. Such wooden structures are most suitable for low-rise apartments. For the owner, this is an excellent opportunity to expand the living space with his own hands and without much labor.